I didn’t want to step on this discussion, so I started a new thread.
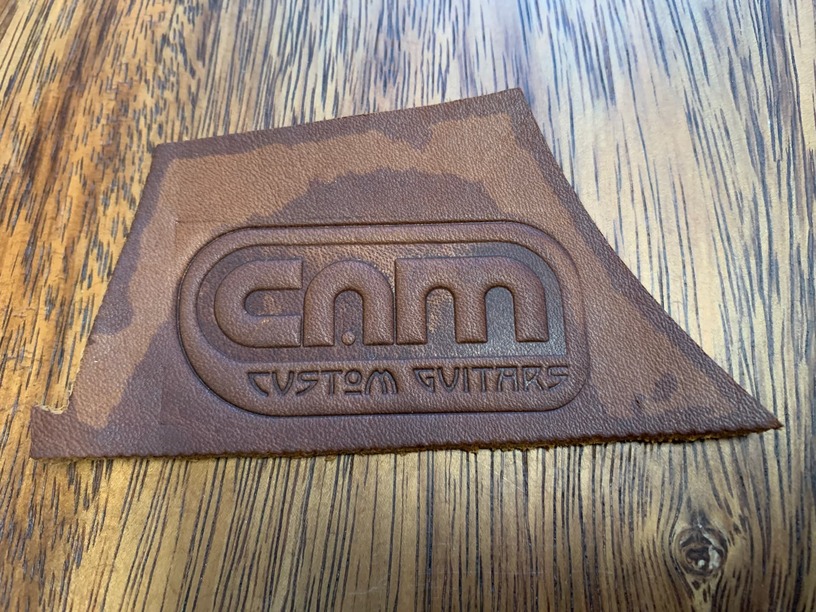
I got my delrin stamps finished, but I’ve discovered I’m going to really struggle with getting them presses into leather. Apparently Harbor Freight is discontinuing the 6 ton hydraulic press in my area and it’s not available, so I just went with the manual 1 ton arbor press. I think it worked pretty well, but now 4 hrs later my back is telling me I will be stuck in bed tomorrow, and I should never, ever attempt that again.
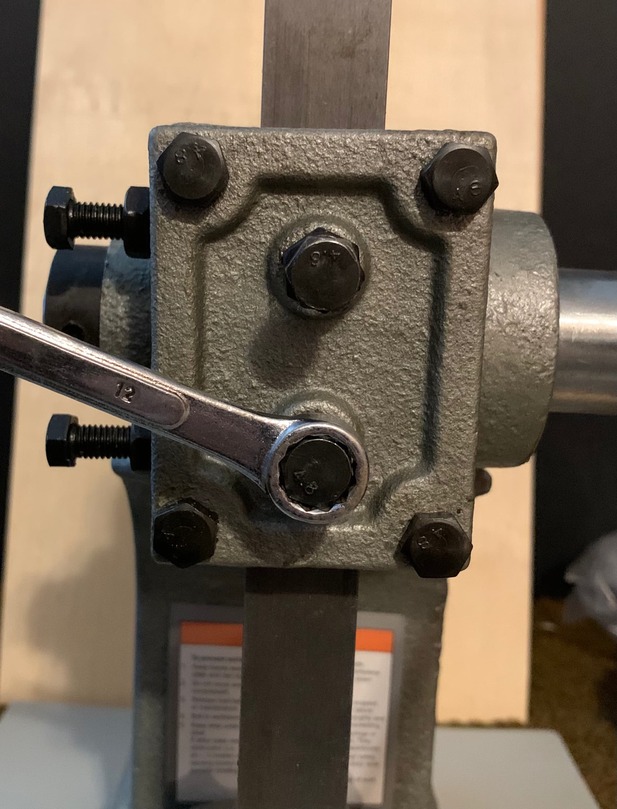
So I’ve ordered this hydraulic one instead, but now I’m worried it doesn’t have a lock. Is it usually a universal feature, or is there any way I can tell? @shop and @JigSawMan, where/how does your press lock? Maybe if I know how yours does it, I can figure out if mine does too.
I also got a decent impression with just moving the stamp and leather around and using the manual arbor press, so it makes me wonder if locking it in place for hours with powerful hydraulic pressure is all that necessary? What do you guys think? Is it a matter of it looking good now, but less pressure will allow the impression to raise up?
That looks great–I’ve only experimented a small bit with pressing/embossing (and just manual and minutes), and usually a bit of moisture or even heat really helps the hide conform & hold the shape with less time/pressure than if it’s just dry… Watching lots of maker’s vlogs lately and many using their clicker or arbor presses to stamp their logos–short time and presses not locked or large–though can’t tell if they dampened the pieces or not… (very inefficient if takes hours to make a badge… could also be the leather–not sure how thick yours is, but you may have better luck with it split/skived down… )
Goodness, not at all! Case your leather properly and you’ll be able to strike an impression with medium pressure in less than a second. (Google “casing leather” which basically means getting it evenly damp ask the way through. There’s several ways ranging from light swipe with sponge to soak in bucket. Every leatherworker has their favorite)
I think your stamp turned out great. It’s clean and clear and appears deep enough to be a lasting image. As far as locking my Harbor Freight press, no, I do not see a lock anywhere so I thought if it became a concern, I would simply use a few very small C clamps to just snug up on the bottom side of the spreader and the top side of my die plate (I made custom 1/2 inch stainless top plates for my press to ensure even pressure 100% of the time). That way if pressure was lost between the spreader and the top die plate, they would not be able to drift apart. If needed, I could apply some pressure later with the press to release them if they became engaged.
JSM
Aww, gotcha. I don’t know why, but I thought the 6 ton hydraulic press might slowly bleed out after numerous hours, but it sounds like that’s not the case if you left your stamp for 8 hrs. I figured I need to add an upper plate to spread the pressure out, did you weld yours on?
No welding. I just created removable plates that are a few different sizes and choose the ones I think will best suit the size stamp I made. I ordered my stainless plates are McMaster Carr. 314 stainless sheet, not bar. A pair for each size I wanted.
JSM
That’s a good looking stamp but I would like to point something out, if I may. When you cut this badge out, unless you’re going to use the that outer impression from the stamp to cut within, I assume you’d be cutting just outside of that. The problem I see that I have made on my first test badges is that my stamp area was too small and you end up with a slight impression of the outside edge of the stamp really close to your finished work. You can see that at the top left and along the top mostly. You should make your stamp area maybe 1/4 larger all the way around so those unintentional impressions do not end up within the finished piece once it is cut out.
JSM
thanks, yeah, i see the edges in the stamp. this was just a quick and dirty test and i didn’t want to waste any more of the delrin than necessary to play. but i’ll make sure to keep a larger area around the edges when i make a final stamp. i also wonder if softening those edges, even just with a little sandpaper, would also minimize any effect they’d have. the corners are much more pronounced than the edges.
Oh, that’s what those bolts do! lol. That’s the same press I bought, and for the life of me I couldn’t figure out why the four of them were sticking out like that. I’m debating if I will keep it as well. It certainly would be easier to use for small stuff like setting rivets etc., but man, it’s so cheaply made. I had to file down the edges of the little paddle lock on the handle because I cut myself on it, and there are divots of missing metal where it looks like a 7 yr old ground down the plate. But I get why; cheap and good don’t often go together when it comes to tools, and I can certainly appreciate cheap.
And your stamp looks awesome with the recessed area so deep and even, and I can tell you used a lot more water than I did. I want to make a dozen or so patches, so I’m trying to find a balance of good results with the minimum time and until my hydraulic press gets here, and I think I’ll experiment and have hubby work my arbor and see what leaving it for just 30 mins or so does.
@ekla@bansai8creations I didn’t know the term “case”, but I did dampen my leather! I only lightly sprayed the top, so I’m going to try letting the whole thing soak for 30 seconds or so and see if there’s a big difference. I just learned what a clicker was a few days ago, and if my arms and back worked, it’s what I’d get for sure because I love that it can do larger things in one swoop. But these things work out because without trying the cheap arbor press first, I would have thought I could tolerate a clicker and I would have bought one for sure. But my body made it abundantly clear that I will not be using anything manual for this. As silly as it sounds, after reading everyone leaving stamps for hours on end, I was worried I’d wake up one day and my impression would be gone lol. So happy to know that’s not the case!
No, it’s not “brake” as in stop, it’s “break” as in take off quickly. In context of the patch, it’s used like, “which dog had the fastest break?” or “did the rabbit break from that bush, or the other one?”
Oh interesting about the soap/conditioner, I’ll look into it. I’ve been worried about soaking leather too long, but if you left yours that long, clearly it’s not an issue.
well… from reading i think it might have some downsides. i saw something about too much water making the leather stretch some when stamped. for a lot of applications, that might not matter. but just in case it does…
Yes, I had read your informative post! I was planning on adding plates on mine too, but now it’s a bit of a moot point. I will be using some plates on the hydraulic press that’s coming, but I don’t think I want to weld them on.
I wouldn’t think so because you are pressing that stamp into the leather and no matter how you try, the whole stamp will be pressed down in to some extent. Just extending your engrave background a little and then cutting the finished piece out within the new extended area should alleviate that issue.
JSM