Hello. I’ve noticed that when I print a project, the printer is printing it 1/2" right of where the artwork appears to be on the app. I kinda need it to line up with the material. Any insight on this?
2 Likes
If you’re not printing on Proofgrade material, which has a QR code on it that loads that information, it is extremely critical that you measure the thickness of the material with a pair of calipers, and enter the value in inches in the Unknown Materials slot at the top of the left column.
Not doing so will throw your placement off by up to half an inch. The lid camera relies on that measurement for accurate placement.
6 Likes
Okay. I cheated and used PG medium basswood since I’m printing on .125" basswood. Kinda odd that the printer would shift right if the depth setting isn’t there or correct. I cheated because I have no clue what the settings for engraving a photo are without choosing the PG setting as a base.
The lid camera uses the correct depth setting to compensate for fish eye effect - has nothing to do with anything other than placement, but it’s absolutely critical to get that number right, or the algorithm for placement is wrong. And you get movement away from where you think it is.
Just measure the actual thickness and load that number in the slot before you place the image on the wood.
(And you can set the same burn and engrave settings for the basswood as used for the PG - just click on Manual after choosing a setting and write them down.)
Then you can enter the Manual values on your own material.
6 Likes
Thanks, Jules!
1 Like
As most always, dead on advice from @Jules, I’ll just add that if you don’t alread own some, buy a medeum quality set of digital calipers right now.
1 Like
Thanks. Well, same result. I used Unknown Material this time and measured .124 with my digital calipers, and the print is still starting offset. Could it be a bad calibration?
Try resetting your machine. (Turn it off, move the head underneath the lid camera, and turn it back on and let it calibrate again.)
Then do a placement for a small rectangle to see where it hits - you don’t need to test with a full size engrave - that just wastes material. Get the placement issue worked out first.
It shouldn’t be off by half an inch underneath the lid camera if you have the correct height entered for the material, so it might be indicating another problem that support is going to need to look at.
(And be sure to record the time and time zone for the print when you run it so they can check the logs later when they see this.)
2 Likes
Yeah, that appears to be a bit off. It can help if you can capture the ruler in the screen cap so they can see how far off it is. They might be able to adjust it remotely. (Or they might not, so it’s a waiting game at this point.) 
Thanks, Jules. Do they listen here or do I need to open a support ticket. BTW, I tried my test on PG and it’s still shifting 1/2" over. 
Posting here opens a ticket.
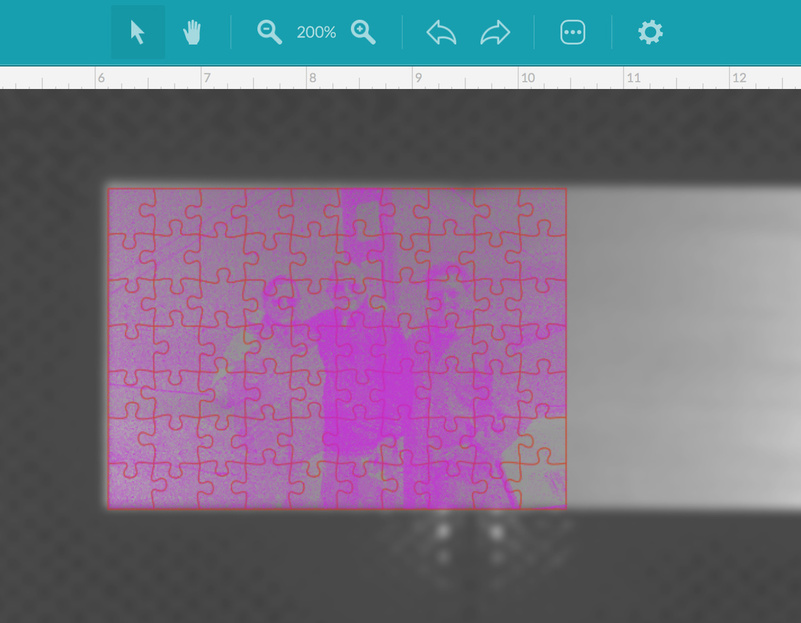
Thanks. I left the final print in the printer and took a screenshot of where I placed the art. It definitely shows how it’s off:

Also be sure to not open the lid until the whole cooling down thing is done. It takes an after-image capture of the cut. Just more data for them to analyze.
Also, make sure your crumbtray is sitting down on the divots and not on any debris. And that the lid is fully closed.
It does? Is that image stored locally or is it actually being sent to Glowforge? As far as cool-down, I wait until after the exhaust fan spins down. Does that signal the end of the cool down cycle?
3 Likes
I’m so sorry for my late reply.
Thanks @Jules, @markevans36301, and @jbmanning5 for the advice and for getting the troubleshooting started!
I’d like to have you try a few more troubleshooting steps:
- Turn off your Glowforge.
- Check for small pieces of debris or dust.
- Check the lower door to make sure it closes all the way. It may require some force to open, but open it, wipe any dust off the edges, and close it all the way.
- Remove the tray and clean any dust or debris from the surface underneath. Pay careful attention to remove all debris from the four dimples where the tray rests.
- Check the lid to make sure it closes all the way. Small particles of material, such as dust or debris, can prevent it from closing completely.
- Check the surface your Glowforge is on to make sure it’s flat. Ensure it is not twisted slightly and that there is no debris propping up one side of the machine.
- Turn your Glowforge back on.
- We included an extra piece of Proofgrade Draftboard with your materials shipment for troubleshooting. Place Proofgrade Draftboard in the center of the bed and print the Gift of Good Measure using the default settings.
- When the print finishes, without moving your artwork or your material, take a screenshot of the workspace to show us the difference between the artwork placement and the actual print placement. Make sure to include the rulers in your screenshot and show as much of the bed as possible.
- Mac: Press Shift-Command-4 and click and drag a box around your image. You’ll find the screenshot file saved on your desktop.
- Windows: Click on the Start Menu and search for the Snipping Tool. Open the Snipping Tool > New then click and drag a box around your image. Click the Save icon and name and save your file.
- Send me the screenshot along with the date and time of the print, and I’ll investigate.
Thank you.
2 Likes
@avidflyer I just spotted something else with that last photo that you posted, and we saw it on another couple of machines lately - your tray might not be seated down in the dimples completely.
It looks like the tray might be sitting too far back - i can see the curved handle on the tray in that screen capture, and on my machine, the curved handle disappears into the door indentation when the feet are properly in the dimples.
If you open the lid the front of the machine drops down. (With some force sometimes.)
You might want to open that and check that the feet are in the dimples. If the tray is sitting up higher than expected, it’s going to cause a large discrepancy in the placement.
That might be what you are seeing here. 
5 Likes
It’s been a little while since I’ve seen any replies on this thread so I’m going to close it. If you still need help with this please either start a new thread or email support@glowforge.com.