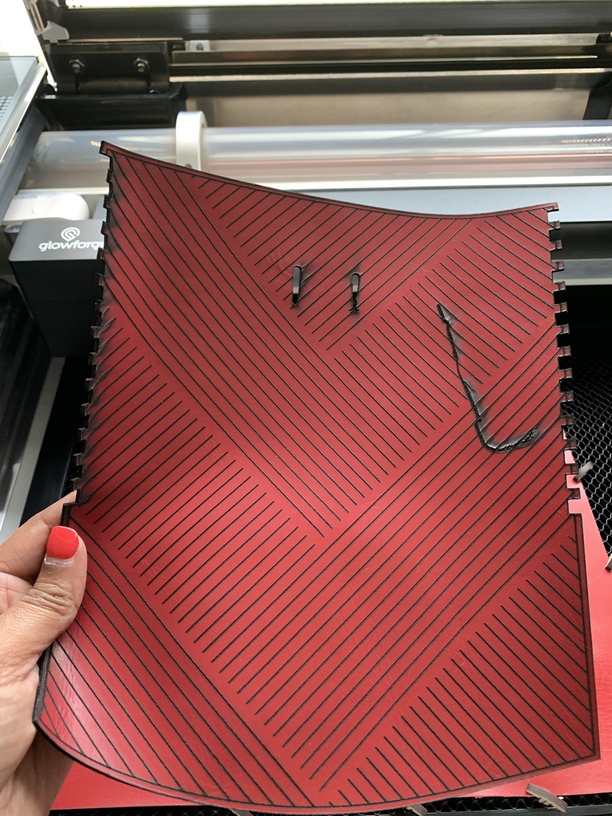
I don’t think this is right this is currently cutting and I’m using the Artisan Clutch this is not looking like the photo? Why is it engraving over top of the cuts??
1 Like
There must be certain parts that are ‘filled’ which will engrave. Can’t tell by looking at your two photos.
Its not here is the actual catalog… https://catalog.glowforge.com/products/artisan-s-clutch
Im pretty pissed right now my leather is ruined I had not changed anything on this file I pulled it as is…
What are the settings on the left hand side?
its like this but I didnt have an idea it would engrave the whole thing… its not that way in the photos… This is a GF file and I didn’t think I need to change anything…
I used my own materials yes but since is a GF all the settings were already set … the lines are scored then the whole thing is cut out… but the second step is engraving the whole thing and it was already set that way… I had no clue it would do that…
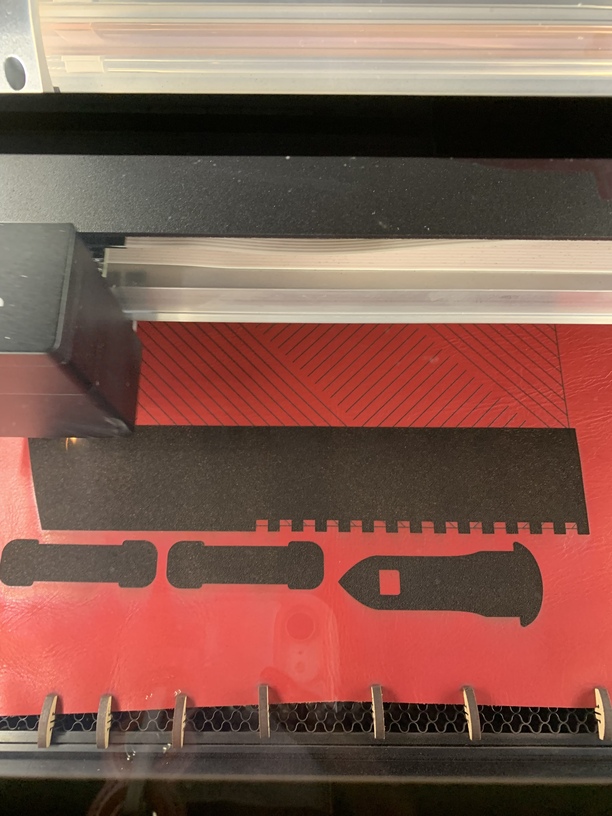
Where are the missing pieces in your first two pictures? The design you have in your screenshot clearly shows there are engrave and score operations to be performed on all of the parts, none should be removed.
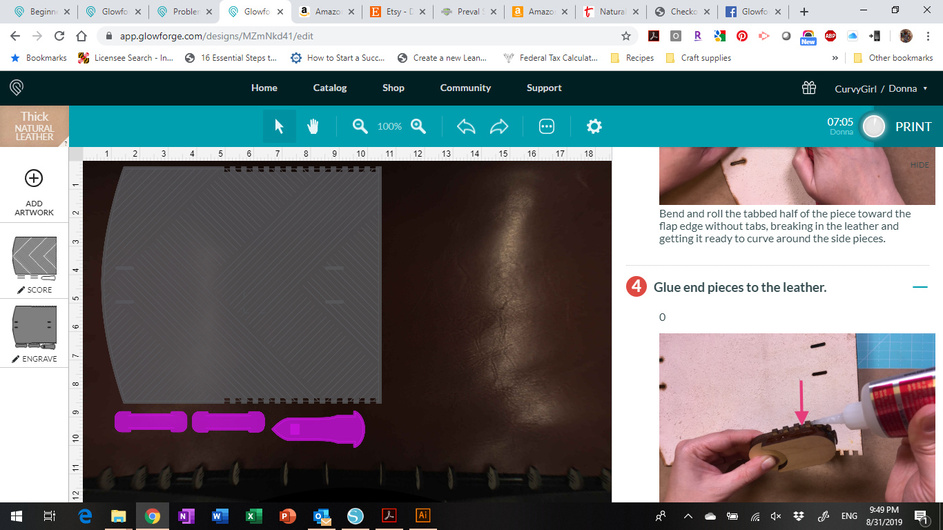
Also, it appears you have the design too far “up” in that image, because the main part is greyed out meaning it would not be processed (it’s off the edge of the work area), but somehow it’s engraving - or did you move it down before printing?
If you look at the image pic in the catalog it’s clearly engraved.
The whole thing is not clearly engraved…
I have that file as well, haven’t ever cut it yet, but I just opened it to see what happens.
If you assign Thick Proofgrade Leather as the Material, the diagonal lines are Scored automatically, and the other parts are Cut automatically, not engraved.

All I can think happened is that maybe by using your own material you might have converted the cuts to an engrave. (Did you try to set your own manual settings for it?)
2 Likes
The image is properly place on the leather I got it figured out thanks…
See when I opened mine it didn’t do that it was already set to engrave and I was like hun… maybe its those smaller pieces… but it started to engrave the whole thing… I got it now… tho thanks…
Yes and I do think thats what happened I used my own material and it automatically defaulted and I thought thats how it was suppose to be… 
1 Like
Were you able to kill the print before the large section was engraved on? Sometimes if you can catch it in time (like if you see it happening) just lift the lid by about half an inch and let it close again. That will kill the print and you can save larger pieces if it hasn’t gotten too damaged.
You can also just press the glowie Button on the machine to Pause it. Then if you subsequently open the lid and take out the material it kills the print.
2 Likes
 nooooo it’s ok lesson learned I do know now! Thanks for pointing that out. I figured the settings were SET. I made another on the scrap less time n it cut. I would like it to be bigger though. This is a cute pouch gonna make it a crossbody. You should cut one!
I’ve been hanging on to some fancy embossed leather for the purpose, but it turned out to be a little too thin, so as soon as I get around to grabbing some thicker leather I’ll give it a go. It’s a cool design.
It surely is what kind of wood do you recommend for the sides?
Any of the Proofgrade would work fine. (Choose the color based on the color of the leather.)
Well I was thinking about staining it anyway… I just want to try a few to see how I like it… I will post when done