I’ve made sure the material is flat, there is nothing on the crumb tray, and it’s not cutting all the way through. I’m wasting all this draftboard, because the cuts are inconsistent, some are all the way through, some require lots of dexterity to push through and many are shredding and unclean. I’m new and trying to learn, I just started using my forge, but I thought the proofgrade stuff was supposed to be foolproof!
1 Like
Now it just happened with with the proofgrade maple plywood too! Crying here!!
I notice that when calling out a proofgrade you can pick on the arrow to the right and get the settings so you can slow it down a hair and be sure of a cut through. All sorts of things can vary the results from warp to local humidity, and if you are using magnets, they must be shielded or they too can mess up the cutting.
1 Like
As you’ve made sure it’s flat by using hold-down pins, the next likely item is that your mirrors need to be cleaned. Both on the head, and the one tucked under the bar on the left side of the forge.
Proofgrade is pretty much foolproof as long as the laser is working correctly, and the material is flat, but as it’s natural material there is going to be some variation due to temps/moisture/time in storage/etc.
Point - don’t pull your completed cuts out immediately, while holding down the uncut material, gently lift at the corner/edge of a piece - if it doesn’t come out, close the lid and re-run the cut only (don’t change anything and it will cut in exactly the same place - if it doesn’t, you’ve either moved the material, or bumped the bed/head)
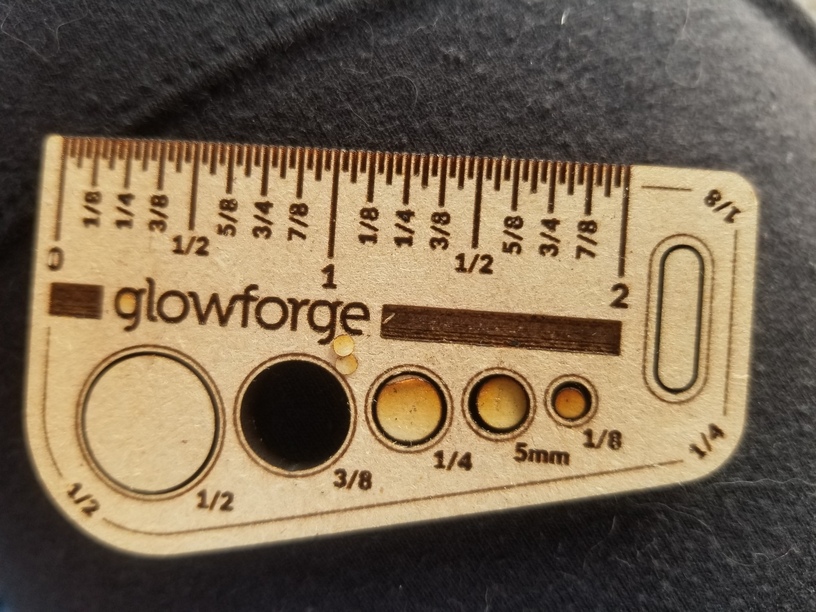
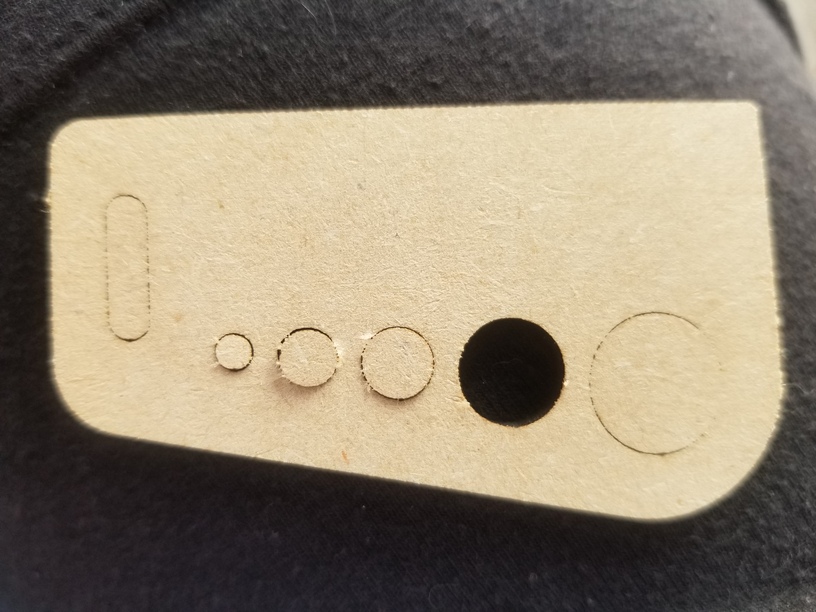
All that being said, Staff can look at your logs so print the Gift of Good Measure (free in your dashboard) on the draftboard and make note of the time you start the print. Then take photos of both the front and the back and post all that here.
1 Like
I did all the troubleshooting steps, and it’s still not cutting all the way through. Lenses/windows looked good and clean.
Sigh
1 Like
Great - list the time you did these (presuming shortly prior to 2:45pm Pacific) and the staff can look at the logs and get you more info. It frequently takes a few days to get an answer.
1 Like
I keep a a shop vac on hand anyway and if the piece is loose the shopvac will grab it right up and the tiny nubbins at the same time so not to mess with the sheet getting to flat.
If you have not cleaned the lenses, clean them, regardless of how clean they look.
I had the same problem and was in a panic - or course assuming there was something wrong with the machine I calmed down, cleaned all of the lenses/mirrors (dont miss the one on the left deep inside the machine) and I was back to normal. They did not look particularly dirty, but it made a huge difference to clean time. For me, this seemed to happen after very few hours on the machine. I have cut way more since with no issues and no further cleaning.
1 Like
Cleaning the lenses is highly underrated. I keep lens cleaners / microfiber cloths next to the GF and use them all the time.
Microfiber cloths are wunderbar and before every cut / engrave the very least thing I’ll do it clean the camera on the lid with one.
1 Like
Looking closely I have seen the slightest speck that you need a magnifying glass to see , and you think “that can’t be the issue” but surprise! It can be plenty enough to be enough…
Also any flame while cutting even just the smoke catching fire for a moment will not cut as deep as where that does not happen. I did not think so at first, but it appears to correspond.
I see you already emailed us about this and we’re working on it there, so I’m going to close this topic.