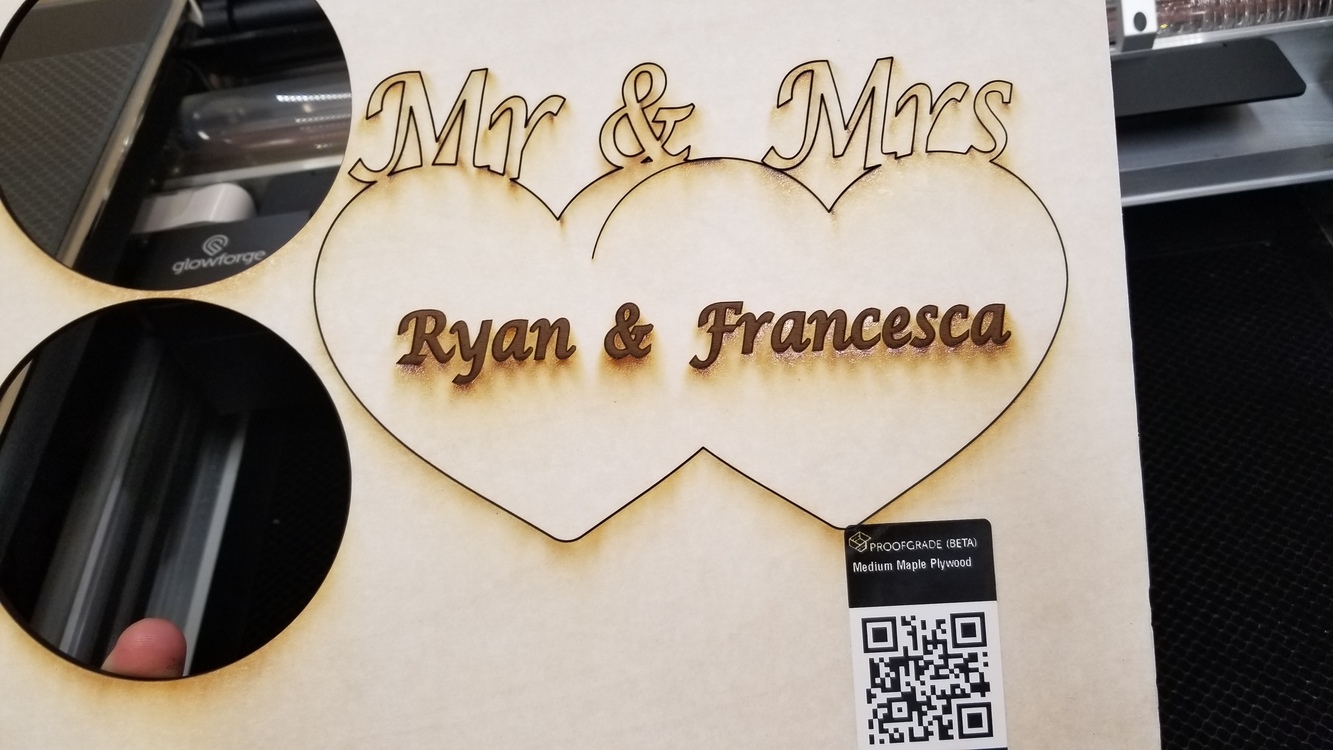
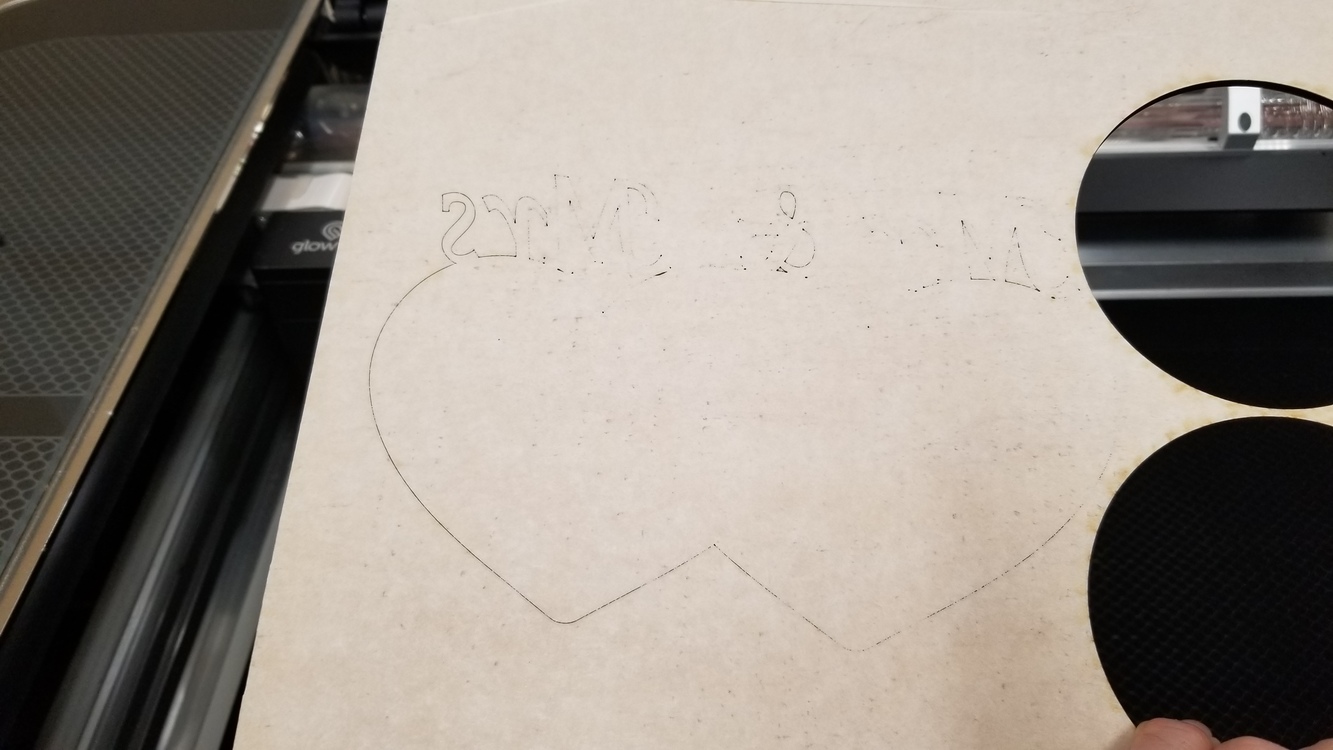
Anyone else have issues with the proofgrade settings? I’m getting really tired of completely wasting material using the proofgrade settings. and before anyone says it wasn’t flat to the work surface… I use magnets to ensure it is. I can slow down the speed or use manual settings and get a consistant cut but should’t the settings specifically created for the proof grade material work?
If PG settings aren’t working support will need to adjust your machine profile. You shouldn’t have to do anything but make sure your cuts and scores selected properly.
Great photos, but give them the day and time of the cut so they can check the logs.
I get in the habit of always slowing down the cuts on specific material with manual settings, as the proofgrade settings do not work for me for everything. I have a spreadsheet where I track the results. Also, the default thickness of proofgrade settings is not always correct either, so I manually measure the thickness if it’s a piece I really want right on the first try. But normally, I just slow it down by about 10 on the speed, and that usually does it. In contrast, certain proofgrade settings are skewed too heavy when scoring, and I have to speed things up. I’ve ruined a few nice pieces of cherry and walnut because the proofgrade scoring settings cut all the way through the material. Best to always to some test cuts, and track your results. Yes, it would be nice if the proofgrade settings just worked, but they don’t. Good luck.
Don’t forget clean optics, too, and make sure you don’t miss any of the parts that need to be cleaned. Not cutting through is always the first sign I’ve left mine too long.
I will usually check to see if the cut is loose by holding the material from moving and see if a piece of tape will lift it out. If the material hasn’t moved you can run the cut again.
If I was experiencing incomplete cuts regularly, I would take @pubultrastar’s advice and slow it down until you hear from support.
I should consider that. However, I’m reluctant to do anything since this is my 4th machine, and I have one that works, but have to make small adjustments to the settings. I’m in the habit of doing that for every job, but having them change the profile is appealing. Thanks for the suggestion.
Thank you for reaching out. I’m sorry your print didn’t make it all the way though the material.
Unfortunately, magnets don’t always hold down warped material reliably. Natural products like hardwoods and plywoods can warp when they are exposed to temperature and humidity changes. It is especially common after shipping or during the Glowforge printing process. In both cases, the warp will diminish with time. However, improper storage can cause permanent warping. Your Glowforge can print beautifully on materials with some warp, but here are some tips to reduce it.
Give your materials time to flatten
Humidity and heat from shipping and printing may cause your materials to temporarily warp. If this occurs, unwrap them and store them, per the instructions below. They will relax, and their warp will lessen over the course of about a week.
Store your material carefully
Upon arrival, immediately store your materials in a cool, shaded, dry place
Stack materials on a clean surface. Stacking warped material on top of other warped material can make the problem worse.
To prevent discoloration or damage, keep them out of direct sunlight
If your materials need to be stored in a humid area, wrap them with plastic wrap or shrink wrap to keep moisture out
Set heavy objects on top of your material
To ensure your materials stay flat, stack heavy objects on top of your materials
Distribute weight evenly on top of the material. If possible, use a flat object like a textbook.
If your material is so warped that it cannot print successfully and these suggestions don’t help, please let me know.
Also, are you experiencing problems with prints on Draftboard? If you’re not sure, could you please do the following?
Turn off your Glowforge, then turn it back on
We included an extra piece of Proofgrade Draftboard with your materials shipment for troubleshooting. Place Proofgrade Draftboard in the bed and load the Gift of Good Measure design.
Set the score and engrave steps to ‘ignore.’ Print the Gift of Good measure using the default settings. Allow the print to finish.
When the print finishes, leave the lid closed and wait until the fans stop and the picture of the bed updates.
Check the completed print:
If the Gift of Good Measure fails to cut, please let us know the date and time of the print
If the Gift of Good Measure cuts successfully, please try another print of the design you saw the issue with, and let us know the results.
If the issue still occurs, please let us know the date and time of the finished print.
It’s been a little while since I’ve seen any replies on this thread so I’m going to close it. If you still need help with this please either start a new thread or email support@glowforge.com.