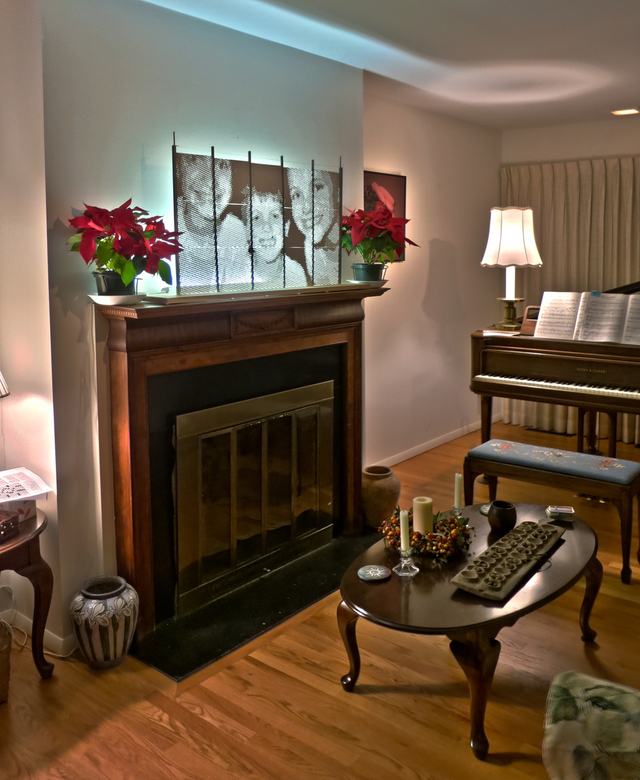
Another technique which will translate easily to laser operations
http://makezine.com/2015/12/27/create-stunning-illuminated-art-rasterbated-images/
10 Likes
I agree with the author about how mind numbing and tedious it would be to make this picture without a Glowforge. Changing drill bits and lining up each hole perfectly is why many times pretty things like that are never made. With the Glowforge, however, I can see a great many new and beautiful things being created because the person can get past the hard part and just click print. I can see amazing light-changing-mood wall clocks and science fiction wall panels that have patterns that flow as you walk past created out of this.
1 Like
I agree. Very tedious. I did a similar thing with ceramics.
Fifteen porcelain panels, each made by pouring slip onto a plaster base, then poking many thousands of holes using brass tubing of five different sizes. Then firing, and assembling them with stained glass zinc came strips.
15 Likes
More recently, I used a laser cutter to do a similar thing in acrylic. It’s pretty easy to take a photo and manipulate it in Photoshop and then in Illustrator to make a file you can send to the laser cutter. I’ll try to put together a little tutorial on how to do it if there is interest.
8 Likes
I’d like to see that workflow (photo to acrylic). Hopefully quite a few others would also be interested.
1 Like
It pretty much would be photo -> http://rasterbator.net/ at the desired end size -> standard procedure for laser cutting acrylic. I think rasterbator outputs each segment of the scaled image as a separate page in the pdf file (I haven’t used it since 2004), so reassembly would be easy if you start with legal doc sized acrylic sheets
2 Likes
Super cool link by the way.
I couldn’t get the raster circles to not overlap on white areas (making you cut out large chunks of your pictures)
But its a good start.
I think if it still had the same aspect ratio as the material you were cutting, you probably could get around that with some scaling when laying out the design over your material
Here’s s link to a topic that goes into some workflow in getting the halftone image of different sized dots. Then the tedium can begin.
@nick07lee, you could probably solve that problem by adjusting the brightness of the image (e.g. using Levels in Photoshop or the equivalent in other programs) so that white is mapped to a medium gray. Then the circles shouldn’t overlap.
@marmak3261, there are significant drawbacks to simply creating a halftone screen of an image for laser cutting purposes. You’ll notice that the halftone has both white dots (in the darker areas) and black dots (in the lighter areas). In the medium-shade areas, there aren’t dots at all. For example, in this halftone:
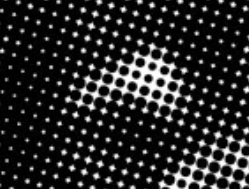
if you tried to cut it with a laser, you would be cutting on these lines:
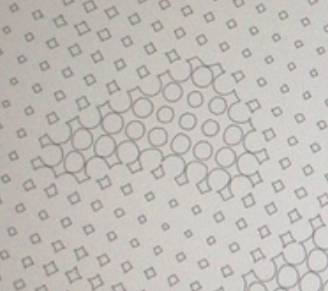
and a whole chunk of material would drop out!
Again, the solution is to adjust the brightness of the image so the brightest shade becomes a medium shade of gray, and only white dots (non touching) would be created in the halftone screening process. That is the “cliff notes” version of the tutorial I was envisioning.
3 Likes
halftone should work well for engraved images. I hadn’t thought about the issues with using it for through-cuts, but you are quite correct. Nice.
As an alternative, it seems like it would work to etch/engrave the white areas into clear acrylic, paint the back side black, and edge light it. I may just have to try that when our Glowforge arrives!
2 Likes
That’s a great idea!
Another variation on this idea is to use an acrylic with a thin black layer on the top, and either white or glow-in-the-dark acrylic underneath, like this: https://www.inventables.com/technologies/black-on-glow-in-the-dark-laserable-acrylic-sheet Then just engrave away the black layer. (update: just noticed the price: $52 for 12" x 24". Yikes!)
I personally love the precise, mathematical feel of dithering–it would be fun to play with various algorithms using your engrave technique.
There’s a lot of different materials one could experiment with here. In the office we’ve tried stacking thin pieces of wood as a sort of “composite” material. Engraved correctly, you might be able to remove the top layer to show the bottom one. Definitely something to give a whirl one of these days!
Of course, this edge-lit acrylic idea has been discussed elsewhere on this forum in the past, but generally with normal raster images in relation to the 256 grey scale thing. However, some of those discussions also included multiple layers of acrylic or glass, generating a 3D look (like this thread). Combining that kind of layering with this dithering technique, one could literally add a whole new dimension to a family portrait or even a landscape or wildlife photo with natural boundaries between identifiable layers (think receding hills in the background, a striking tree or an animal in the foreground, etc). This is quickly morphing into a really exciting way to augment my photography hobby now too!!
2 Likes
I have a half unfinished project where I take a photograph and highlight the object of interest by putting a piece of laser cut wood over that masks out everything else. I’ll post it when I finish.
The internal reflections caused by the multiple layers will attenuate visibility through the assembly. In some cases, that might be a good thing (sort of a fog effect). But I’m wondering, would it be possible to coat the layers with a glue having a similar index of refraction to make the whole assembly crystal clear? Then the engraved parts would really look like they are floating inside. The tricky part might be keeping the glue out of the engraved areas. Maybe we could apply the glue with a brayer?
What about etching on the back of clear acrylic then mounting the etched side against a black (or clear) background and edge light from the bottom. That would make it look like the etching was inside the acrylic.
2 Likes
I am guessing that internal reflections would only become really problematic with a fairly large number of layers unless it is placed in an especially bright environment, but yes, it would be prudent to do something to mitigate the effects of ambient light bouncing around in there to maximize the contrast.
I was also thinking about gluing the layers together using a solvent based Acrylic ‘glue’ along the lines of @jacobturner’s Acrylic scraps and Acetone recipe. That would be difficult at best to do correctly though; not only would you have to be really careful with the etched areas, it would also be all too easy to trap air bubbles between the layers when putting them together, especially with larger/thicker sheets.
What I plan to try is placing the whole assembly into a frame that closes in all four edges, rather than just having the individual layers perched on top of a lighted base with the other three edges open to the air. That alone should go a long way towards keeping stray reflections between the layers at bay. I also like the idea of etching on the back sides, as that would also keep the front surface completely smooth. Question to the masses: can you apply anti-reflective coatings to acrylic or just get clear acrylic that already has anti-reflective surfaces?