Re-fit Existing Model

So I was on Thingaverse and found something I want to make for a friend. It comes as a single Illustrator file, which is just fine by me. My issue is… The pieces fit together like the ol’ balsa wood dinosaurs. You know the ones I mean. It seems this was designed for “4mm plywood.” I’d like to use 1/8" acrylic. Is there some known-good method for adjusting each of the slot sizes? Or do I just resize the entire thing? Or…?

Thanks!

3 Likes

.ai files aren’t normally parametric, so I think you’re going to have to re-scale.

2 Likes

Depending on the relative size of the pieces and the slots, you could try doing an Offset Path to tighten up the notches. Half a mm.

10 Likes

I like it! I’ll have to try that next time.

1 Like

You mam, are a treasure trove. This is how the plug in in F360 does it but I’d have never thought to try it in ai or Corel.

2 Likes

I’ve thought about doing something like this before but you may be able to import the PDF into a CAD program like Fusion360 and put parametric dimensions just on those slots, which would make it really quick for testing and updating, or even making it a completely different size/scale.

1 Like

The best way is to bring the model into Fusion 360 or OnShape and redo the tabs with parameters. But that is not as simple as just saying it. Parametric dimensions for slots and tabs require different approaches and different measurements. I’m am eager to see a file that would take the fly design recently posted and make it totally parametric for different materials.

The outset command does allow you to sneak up on it, but changes the scale of the whole drawing, unless you disconnect the tabs and slots and just do offsets on them. Still have issues with a tab requiring different dimensions and adjustments as a slot.

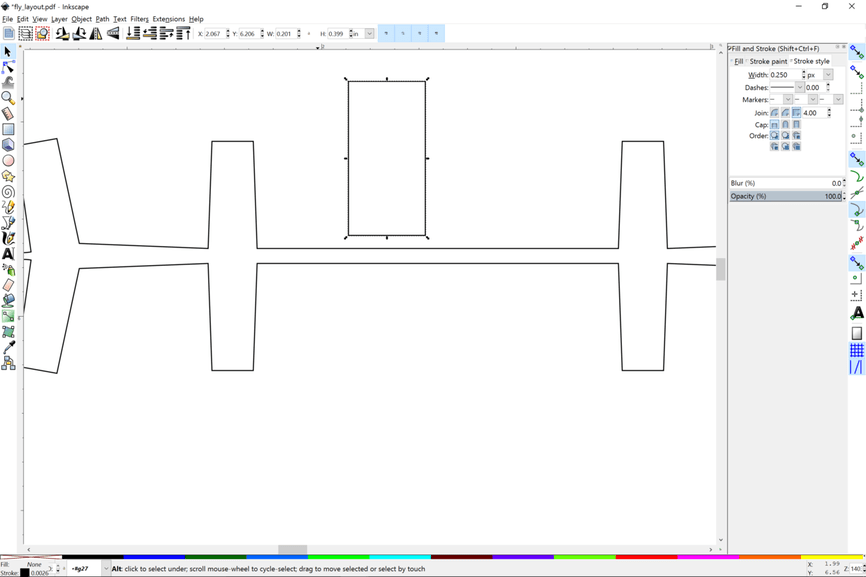
A more manual way that keeps the original design at scale and allows you to get precision in tabs and slots is to make a rectangle the correct dimension you need for the slots.

For my .207 " Chemcast acrylic, I need a slot of .201" to fit tight the normal thickness of the sheet.

Place the rectangle over the slot and do a Boolean difference to punch out a new slot.

This is going to be my test piece. Once I have the slot correctly sized, I’ll manually do other slots, centering them over the existing slots. I don’t have to do this to all the parts since many of them are mirror images or duplicates.

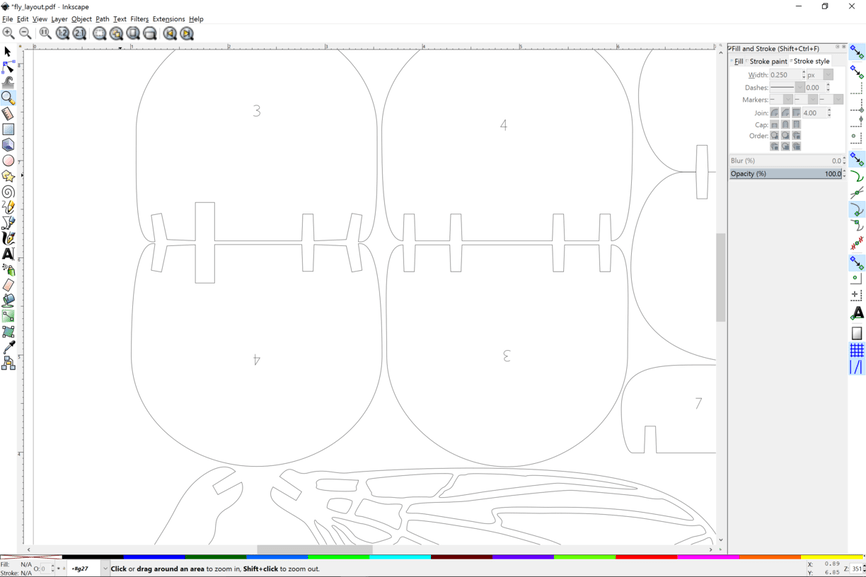
You also have to move the pieces around to find their mates to ensure you are matching the slots to its mating part.

It is a bit tedious, but with practice you can do it fairly quickly. Then you will have the file for that material.

Once again. This is not automatic and doesn’t solve for different materials. There is always the trade off. Learning a parametric 3D modeling program and getting the design perfected for all the materials (something I am working on but it takes too long).

For me it’s worth doing one design by hand. Then I have it. It’s easier to adapt for a second material once you know the work flow.

It’s a solution, but not idea. Just a practical way of doing it.

This is the central task that everyone faces. Designs are out there, but making them work for ProofGrade or your own materials takes effort.

I welcome suggestions and improvements.

12 Likes

That’s fine. I presumed as much

Well there’s a new term for me. I’ll investigate it!

Wow. Thanks for the detailed answer! I’m going to have to try this just to fully understand it. My very limited F360 use has yielded some positive results, but I need a lot of work in it.

Thanks all!

3 Likes

The fly model on Thingiverse is a good candidate for using offset path since it is all slots/notches and not tabs. Does AI round off the path like Inkscape does when doing offset? The only way I can get an exact duplicate of a path in Inkscape and dimension it correctly is the paths-to-strokes method. Otherwise the corners are always round

And here is a trick to ensure the notches stay correct. Overlay each notch of the rib sections and then as you fix a part, move it to another layer that is hidden and it gets out of the way.

5 Likes

No, Illustrator does a clean Offset. Inkscape has got that freakish rounding thing going on in it - it’s not a program I would use to try to Offset like this.

(It’s one of the things that Inkscape doesn’t do as well as Illustrator, in my opinion. There might be a way to do it that I’m not aware of, but the only way I know of to do the same thing in Inkscape is to do something like the kerf adjustment - where you widen the stroke and then convert that to outlines.)

2 Likes

Try this in AI:

Create rectangle that you need the notch to be. Place rectangle over all old notches. Use pathfinder to “subtract” the rectangle from the shape. Larger precise notches quick and easy! It’s a little more complicated if you want to make them smaller.

3 Likes

Bonus tip:

With the rectangle tool if you just click on the art board it will allow you to enter precise dimensions

1 Like

I’ve been doing 3D modelling/cad/cam work for about 10 years now, and you guys make me feel like an absolute amateur…I love it! I have been reading more than I comment on, I appreciate all the pointers and advice as I explore all the new software and features. I’m hoping it will all make more sense and I’ll retain more when I get my unit and start working with it. Thanks everyone!

3 Likes

That’s what I was trying to say. You said it much more simply. :thumbsup:One of the issues I’m running into is that when you go to a thicker material, It is a good thing to enlarge the whole model and then use the bigger notch. Otherwise you get some places on the material that get too delicate or narrow. The problem is that you have to be careful to keep the mating part notches correct. These models aren’t easy to do with 2D.

1 Like

I dug out some .125" cardboard to test the fly model to see how it fits together. As I resize this for thicker acrylic, there are a couple places where the material narrows and the holding area isn’t robust enough, so I need to see how this fits together. Makes me respect anyone who makes these models from scratch.

20 Likes

Fun fact, when I initially printed it I scaled it down not thinking about the notches, spent a good 15 seconds wondering what the heck went wrong. Also even printing it at the suggested scale doesn’t give enough tightness in the joint to hold everything togegher, superglue to the rescue!

2 Likes

I was wondering how it fit at its original size.

Lots of time into making something like that for sure, especially if they go through several iterations to fine-tune things like slot and tab sizes.

I was searching Amazon yesterday for model kits of a Black Widow. I was to make a GIANT. I didnt even think to cruise Thingaverse and save some time from scanning and tracing. LOL.

Using subtract to grow the openings leaves you with an issue of getting the angles correct on some parts.

A useful trick to get around that is the measure tool (talking Inkscape here, but all should have similar) to figure out the proper angle of the old slots.

Alternatively… find ONE piece which is true vertical/horizontal, and then subtract that notch from your new cut-out. Now you have a funky “C” shape for enlarging the slots, and you can visually align the gap to the existing slots.

3 Likes

You can align one corner of the rectangle to the existing slot then uses the rotate tool locking the aligned corner and then rotate and snap to another to math the angle without having to measure it

2 Likes

I’ve used all these techniques. It’s a challenge because you have to decide where are going to put the bigger slot. On most it just overlays and splits the difference. On others I’ve shifted them a bit to allow for more sturdy points of connection. That means hunting down the corresponding slot and making sure all fit together. Hence the cardboard model so I can see what affects what. The instructions for assembly are detailed, but nothing like having the model. Ready to print it iin .207 acrylic.