This is my first Problems and Support post. And, this is a deadline for my sons school and it just doesn’t work. I printed a test print on thin wood card stock (wth the plastic in the middle) set to 0.10", all manual settings - engrave, score and cut. And it worked beautifully except the round hole burned on the back. I flipped the piece over and set it in the hole, ignored the score and engraved the back - perfect. Changed the settings to try again, and it JUST WON’T get past ready. It scans and the button lights up quickly and then goes out. I didn’t move the card stock, I just moved the SVG.
I tried what another help topic recommended. Signed out, cycled the machine, and logged back in. I even deleted the SVG and reloaded it. Nothing changed. I even tried different web browsers, still no good. HELP! File is attached.
It’s working… with a work around that makes no sense. I copied the images in Illustrator rather than in the GF app, completely closed out of both web browsers, logged in again, deleted the old file and added new, but that didn’t change anything.
Only after I set the card stock on top of some scrap PG thick maple plywood, pinned down the card stock and the PG, did it finally allow me to press the glowy button. This IS NOT Good! Magnets are much better than the pins. Now the cuts will go through into my PG, and when I flip the tags over to do the back, I have to coordinate where the drop-out places of the scrap are. AND, I won’t be able to magnet down the 18 little tags to keep them from blowing around.
I’m starting to see the frustration others have with processing in the cloud. Ghosts in the cloud are the only thing that makes any reasonable sense here.
I don’t have a firm understanding of the original issue. The way you’ve described it seems like something odd simply happened. That it had nothing to do with the design or the extra material. Are you saying the screen told you to go press the button, but the button wasn’t lit? Where in the process did things go south? “Scanning your material?” “Preparing your design?”
Ok. I guess that’s a possibility except the first two prints went completely fine and I didn’t move the overall piece of material before trying to print again.
Thanks for letting us know about this, @rpratt. I extracted the logs for your Glowforge to investigate your report, and it appears that the reason for each of the failed prints on 5/31 is that you were trying to engrave shapes that weren’t completely closed.
When you upload a file to the Glowforge app, strokes (or outlines) become cuts and fills (filled-in shapes) become engraves. The prints on 5/31 failed because one or more of the shapes didn’t have a fully enclosed area to engrave.
I’ve let the team know that you didn’t receive a helpful error message in the app, and we’re looking into it.
If possible, could you please try to print the current design (which printed successfully using the workaround you described) again without the additional Proofgrade material beneath it, and let me know how it goes? If you run into the issue again, please reply with the date and time you tried the print.
Thank you in advance for taking the time to do this.
Hi Vee,
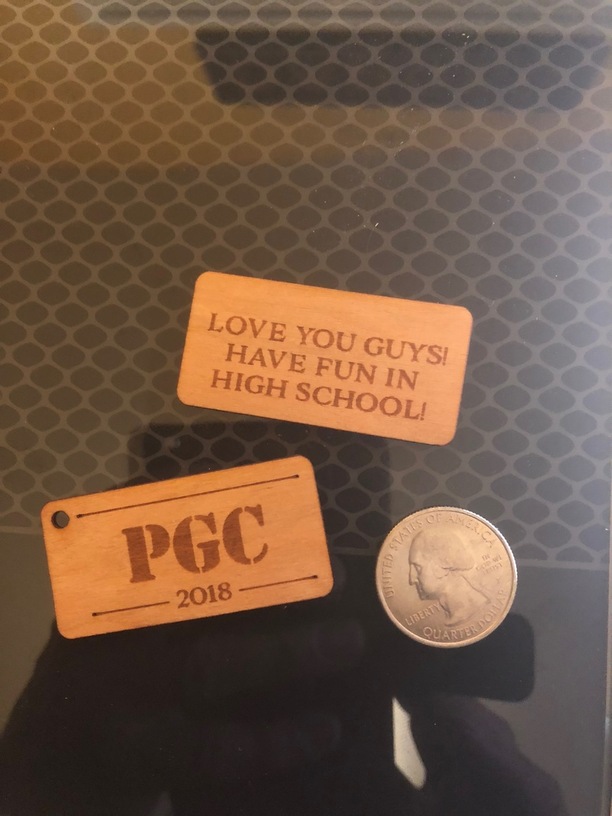
I removed the extra PG material, then deleted the design from the app and uploaded again. Set it in view vertically as it came directly out of Illustrator. (18 tags, 9 high and 2 wide). I set the material in the middle to make sure that the red dot found it and pressed print. It scanned and failed.
I cancelled, opened the lid and rotated the material - leaving it in the middle of the bed. I went back out to the app and rotated the tags clockwise 90 degrees. Pressed print, it scanned and passed. The button light came on. This was at about 8:40pm, June 2, 2018.