I started making miniature versions of some larger pieces I’ve done. I’ve slowed down the speed and power and they look decent but slightly blurry and the fine lines are faint. I’ve tried upping the power, slowing it down, speeding it up, adding more and less LPI so I’m just wondering when scaling things down is there a general rule of thumb to start with? I realize any time you scale something down you’re going to lose a little clarity but I’ve seen people make very small text using the GF and it is legible.
Are the images vector?
What engraving settings are you using exactly? (convert to dots? vary power?)
How flat and consistent is your material?
Is it masked?
What is the material?
Can you upload a sample art piece that you are referring to?
Engraving is complex, there could be a lot of things happening here.
3 Likes
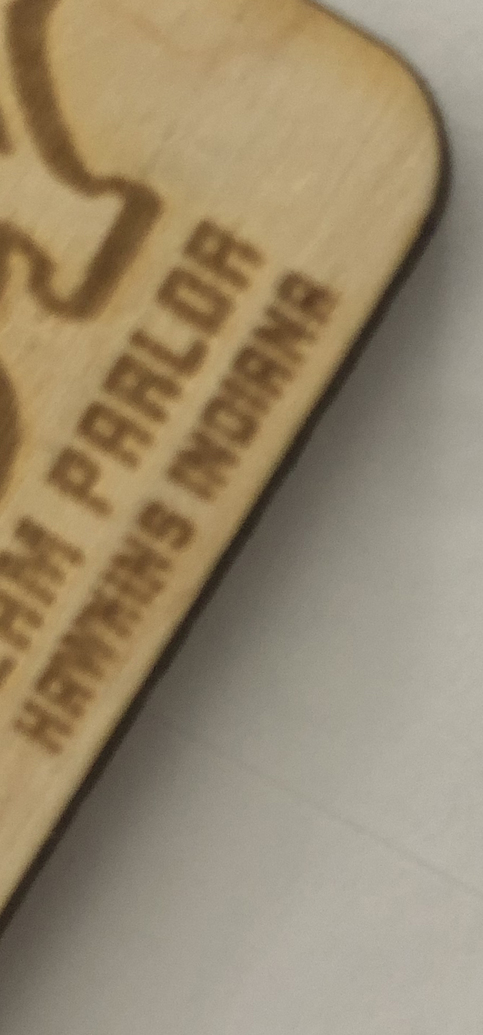
Yes, I was hoping there’d be some kind of ratio but I guess that’s expecting too much. So they’re all vectors which doesn’t allow me to convert to dots. Material is 1/8 BB, not super consistent as far as one board to another because it’s cheap Amazon wood but I’m using auto focus which may be part of the issue. It is not masked because I’m lazy and don’t like peeling it off and then having to stain. The stain I use easily covers any yellowing so I don’t worry about it. It’s hard to take a photo of it because my phone may as well be a potato but here it is. There’s just something slightly off about the text making it look blurry to me. The other issue is it’s not cutting correctly. You can see the bottom of some of them don’t line up correctly when it comes back around. I don’t have this issue on larger pieces. It doesn’t happen on all of them, (making about 16 per board), so I’m going to have to assume maybe it has to do with the wood.
My settings are roughly 700, 40, 270 but I do adjust the speed slightly for text otherwise thinner parts of letters don’t show up.
If it’s very small type, you probably need to go down to around 300-400’ish.
2 Likes
So some of that muddiness is the smoke residue, looks like.
Have you tried sanding after the engrave to remove the residue? Obviously you don’t want to sand too deeply, but you can probably crisp those edges up a bit.
Baltic ply is also “soft”, meaning I think that it engraves easily and so you can see some toasted edges. Maybe try on a scrap piece of something like maple to see if you get better results.
As for thinner parts of lines not showing, yes, you need to mind your speed to ensure that doesn’t happen. 700 is still pretty zippy, I tend to get better results at more like 600 for most things.
Are you scaling down in your editing software, or in the UI? In theory it shouldn’t matter, just curious.
Without seeing your art, right offhand it looks like some artifacts may be caused by the material too. I would try something more like 600 speed and 80 power, 270 lpi, then sand it to remove the residue, and see what you get.
3 Likes
Thanks, I’ll give it a go. These are smaller pieces that I’m testing at my next show and if they do well I may just invest in proof grade so I won’t have to worry about finishing. Sanding and staining 500-1000 little pieces every couple of days is a lot of work.
1 Like
Oh, and scaling it in illustrator.
Previously:
on BB limits.
on settings:
On thin lines failing me:
2 Likes
But then you’ll be on the hook for removing masking. You’ll want to learn about high speed masking removal techniques, if you don’t already know some.
2 Likes
I think removing masking might be easier if I know I don’t also have to sand and stain after. At least I can sit down and watch tv while I do it. Masking, then sanding, and then staining just seems like a lot right now when I don’t even know if anyone will buy them.
Also previously, and maybe relevant:
As you go smaller the wood will become a bigger factor, but I don’t think you’re quite at the limits yet. Evansd2 has linked the relevant information for figuring out the correct combination of speed, power and lpi for a given piece of material. As you do 1000 pieces every few days, a higer lpi and slower speed may present time constraints in the execution. On the other hand, as you do 1000 pieces every few days getting the settings perfect may be worth it.
1 Like
I’m missing something. Why not sand and stain a large piece, mask it and then cut and weed? It’s basically homemade proofgrade.
1 Like
So, I tried this three times and for whatever reason I can’t figure out how to make it look right. The engraving is lighter or similar color as the stain which makes it kind of all look one color and doesn’t pop. When I stain after the engraving becomes a lot darker, almost black, and the rest of the wood is more of a honey maple color. I’m sure it’s my settings but I played with it a lot and couldn’t get it to look right. Perhaps I’d have to slow it way down and increase the power to get better results.
1 Like
If all you’ve done is reduce the size of the design, you shouldn’t be changing your settings at all (assuming you were happy with them when the design was larger)…
Two possible factors that come to mind. The first is that when you burn through masking, stain and any finish over the poly, energy that was going into the wood is being used to burn away the extra layers. You can certainly adjust settings to create a darker engrave, basically going for more char, but I don’t think this is the biggest factor. My guess is the stain is reacting with the engraved wood and turning it the shade of black you like. It may also be doing that with the smoke left on the surface, where that residue is becoming an extra pigment. If you slow your speed, change the number of passes (change lpi) or increase the power to make your text sharper you could wind up adding more residue/pigment to the board.
There is one thing you could do to maybe speed up your total processing time.
- Cut each piece of your baltic birch to the same size, and by same size I mean plus or minus a millimeter or two.
- On your design (the whole sheet) overlay a baltic birch-sized cutout. Make this a different color than any other cut operation.
- Place a piece of cardboard in your glowforge and cutout the overlay. Make sure the outside of the cardboard is secure and won’t move. Remove the inner piece.*
- Put in your Baltic Birch. Do all the engraving - no cutting.
- Stain and any protective coat. (If this is when you do your sanding, sand.)
- Mask.
- Place back inside your piece of cardboard.
- Cutout all the little pieces.
I apologize if my explanation of jig-work was forgesplaining, but if not it seems like something you should know.
*Actually, this step isn’t really necessary at this point when doing full sheets. You could cut out the cardboard between steps 6 and 7. As long as you don’t move any single part of your design when it is in the GFUI, the glowforge will keep all parts exactly relative to all the other parts. This is why jigs work. If you cannot get exactly sized sheets of baltic birch, you can make a rectangle that is outside of all your little objects and still inside the dimensions of the baltic birch. In this scenario you cutout a slightly smaller piece of birch from the larger piece. Here it is important to do step 3 at step 3, or use a new piece of baltic birch. Considering your quantities, this may not be a bad idea.
2 Likes