See? He’s brilliant. <proud big sister grin>
9 Likes
Brilliant.
3 Likes
The latest and greatest cool gadget that none of us should be without!
Thank you!
9 Likes
Or practical and paint it Fluorescent Orange
(or use the fluorescent orange acrylic) ![]()
So with a UV flashlight you can find where it got to.
and using scrap you can score another practical star.
7 Likes
This has to be one of the most practical design must haves! Thanks for the share.
9 Likes
Thanks for the share! I also still have mine, but who knows how long…
5 Likes
Hmmmm, I have a 3d Printer (Creality CR 6-SE)… perhaps I could find a pattern for that and 3d print some…
I don’t have the know-how of how to design 3d Printer files (they use .stl format).
1 Like
Sure, or just buy them from GF, since the ring magnet is most of the cost.
It would be an ideal first file to make in Blender.
Now that’s a practical use device!
1 Like
First thing I thought of was something spring-loaded that would back the magnets away when it’s in place.
1 Like
Genius!!  And due to my earlier post about my magnetic ring coming off, I look forward to trying this!
Could I buy One of these from you?
Sorry, my limited GF time has been spoken for, with a stack of projects waiting to be done. 
Perhaps another forum dweller would bite, but simply ordering a replacement from the mothership would be my recommendation if you don’t want to order magnets and assemble your own. (It’s fun, you can do it! And the magnets are great for future projects.)
1 Like
A great idea. Thank you for sharing.
While I have never had a problem with my “Blue Thingy” I knew that it was only a matter of time before “Murphy” came aboard.
So I printed the components on my GlowForge the day after you posted this great idea and the magnets came in today.
I’m having trouble getting my head around the assembly instructions.
I have no problem understanding magnet polarity. After all, I was a Boy Scout. Note to self: " iPhone compass is not affected by magnets."
Step 1 is no problem.
However, in Step 2 you say to press 4 magnets into the holes of Part D, but the drawing of Part D in Step 2 only has 2 magnets while the drawing of Part C in Step 2 has 4 magnets.
In Step 3 you instruct “Press parts C and part D together so that the magnets hold them together.
However, there are no magnets in Part C.
I am obviously missing something, somewhere.
1 Like
Use these annotations, from the SVG:
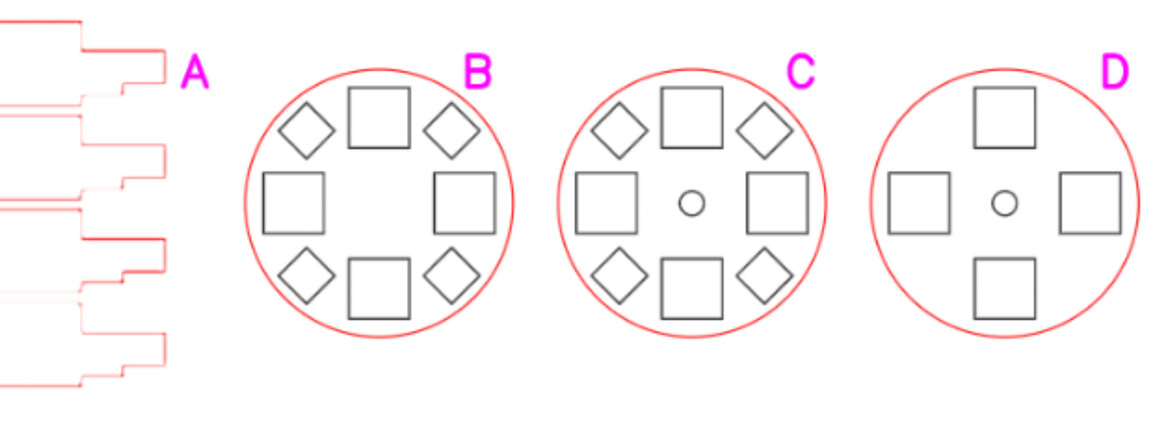
The magnets protruding from part D will be pressed into part C, giving you a friction fit.
This is why GOOD instructions show step by step progress. ![]()
5 Likes
but how do i download this design? i run into this all the time.someone shares a design and i see the pieces that can be cut at the bottom,but dont know how to download said designs,am i missing something?
Right click the part of the post that looks like a line drawing and an option menu will pop out. Select save as svg and it will be downloaded to your computer
3 Likes
thank you very much! cant believe i didnt think about that. lol
2 Likes