Same problem, different day, Will not calibrate

Same problem, different day. I posted a few days on this issue. I did a LOT of troubleshooting steps and it finally calibrated after I removed the material from the bed. Next day, went out to do another job, same thing. Been having this problem often but it seems to be down hard now. I cleaned the camera lens, turned it on and nothing happens. Crumb bed is installed with no material on it. The lights in the lid come on, fans starts up then immediately slows down, I can hear and feel a few sets of clicks. At the end of the clicks, an audible, quick “thud” occurs (seems like it is on the left side, I can feel it also), then it just sits there forever. Sent an email to support on Thursday, no reply. Please let me know if you need any other information. Thanks, Stacey Hines

The sounds are normal, just various things getting ready to got to work.

If I am understanding you, the machine went through the calibration process, but you had no material for it to mark onto?

No. Machine does not go through calibration process, that is the issue. The last time I had this problem, I had to remove the material from the machine bed in order for it to do the calibration. After that, it worked great (for a day) before doing it again. But this time it problem was fixed by removing any material. After I turn it on, the print head does not move.

Sorry it took so long to reply. Material on the tray should make no difference. I do my calibrations with poster board (it’s cheap). I had troubles with the calibration routine and it turned out to be wifi/internet issues.

Hello @hinesfamily ,

I’m sorry to hear you’re having calibration trouble with your Glowforge.

I took a look at the logs for your unit and the issues you’re seeing might be caused by a poor connection with the cables on your lid. Please follow the steps below to check the lid connections:

  1. Turn off your unit.
  2. Open the lid.
  3. Using both hands, gently roll the laser arm to the front of the unit.
  4. There are 5 clips pictured below. Check each one to ensure it is closed. The clip should lie flat, and you shouldn’t be able to flip it in any direction.

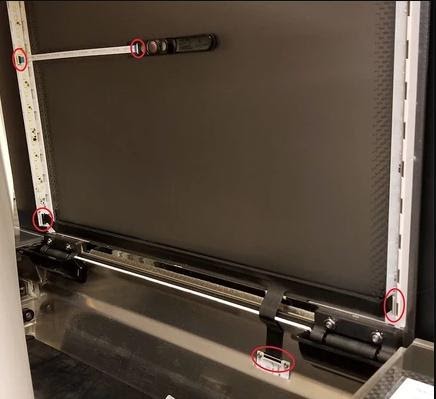
  1. If any of the clips are open, ensure the cable is inserted straight into the clip and close the clip.
  2. If any of the cables are misaligned in the clip, take a photo of the clip and cable and send it to me so I can take a look before you proceed. Do not try to adjust or reseat the cable.

If everything is connected properly, it’s likely that the black cable on the lid has a problem. I can send you a replacement for that cable, along with some instructions on how to replace it so we can get you back to printing as quickly as possible.

If a new cable is needed, please let us know and we will move our communications over to email since we’ll need to confirm some personal information.

Please let us know what you find. Thank you!

Pretty sure I need to go with the new cable option. What do I need to do now. I need to get my machine up and running, like, yesterday. Thanks, Stacey

Hi @hinesfamily - since we’ve been in contact and moved to getting that cable ordered for you via email, I’m going to go ahead and close this topic.