Set Focus Creates Error

Hey, this is for my second machine, Fyre329. When I use the Set Focus tool, it gives me the error message stating that error occurred and I should restart the Glowforge and browser. I’d assume this was a file error, or perhaps some browser extension, except I don’t get this error when using the same files, or browser, or the Set Focus while using my other machine H. Forge.

It doesn’t prevent me from being able to use the machine, but it renders the tool unusable which is a bummer. Wondering if there’s some software bug that got left in an update at some point or maybe something else, not sure. I’ve had the problem for months, but it’s never been too bothersome, but if it can be fixed, I figured I’d mention it to get someone to look into it.

Thanks.

Ah,this time it has made the machine go offline if I tried to proceed with the print after getting the error, then ran the centering, but showed the offline message again after it centered. I’m able to print like normal if I don’t use the Set Focus, so I’m curious what could be causing this.

Alright, now I’ve got the error on the first machine, H. Forge. Guess I can wait until I get a reply, but thought I would continue adding updates as I found weird things, but it worked once I restarted the browser for this machine. I can never get it to work with Fyre329.

I would expect they would need to know the time/timezone of when it occurred, so they can check the logs for that time.

@raymondking32 I’m sorry to hear you are having problems with the Set focus tool. I’m afraid we’ll need more information to investigate further

If possible, could you please send me a screenshot of what you see in the Glowforge app when this happens? Make sure to include the rulers in your screenshot and show as much of the bed as possible

To take a screenshot:

Mac: Press Shift-Command-4 and click and drag a box around your image. You’ll find the screenshot file saved on your desktop.
Windows: Click on the Start Menu and type “snipping tool”. Open the Snipping Tool > New then click and drag a box around your image. Click the Save icon and name and save your file.

Send us the screenshot, and we’ll be happy to take a look.

Sure, added the GoGM with default settings to show that it isn’t my file setup.

This was done at 12:39pm HST

Figured this was the only thing I’d done today on this machine and I’d posted about it when it happened, so maybe they’d just see it. Good to do so anyway, I suppose - I’ve looked at those log files previously and they’re a mess.

1 Like

@raymondking32 Thank you for the screen shot.

I extracted the logs from your Glowforge to investigate, and it looks like the Glowforge is having trouble communicating with the printer head. There are two key connections I’d like you to check for me.

Could you please do the following?

  1. Turn off your Glowforge.
  2. Holding only the finished black surfaces, grasp the printer head as shown. Pull gently up and back to disengage the magnets and remove the head.
  3. There is a small tab in the center of the wire ribbon. Push down fully on the tab to release it, and gently pull the wire ribbon plug from the printer head.
  4. Take a clear photo of the gold pins inside the printer head where you just unplugged the wire ribbon. It should look like this.
  5. Pick up the printer head and wire ribbon. Make sure the tab on the wire ribbon is facing up. Slide the ribbon back into the head until it clicks.
  6. As shown, lower the printer head over the metal plate so that it rests next to the two round posts. Then push it gently away from you – you’ll feel a “click” as magnets pull the printer head until it sits snugly atop the metal plate.
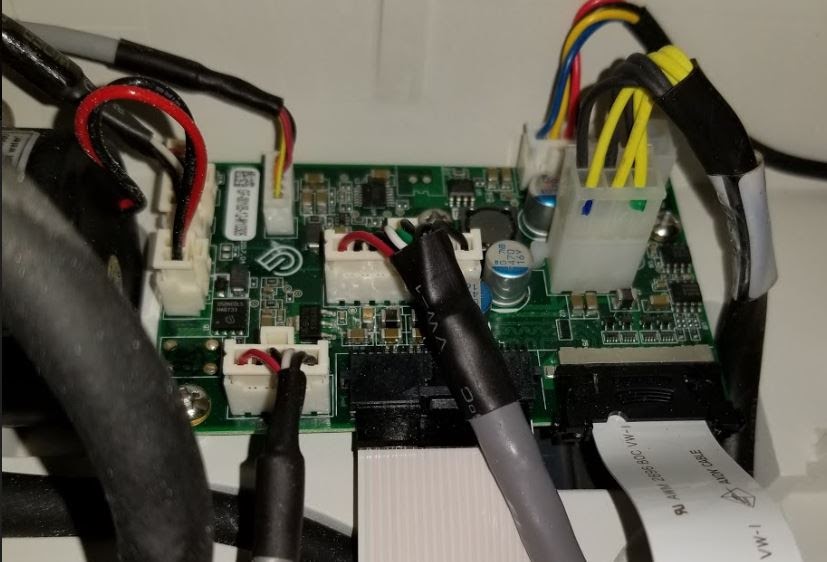
  7. Pull the laser arm all the way forward.
  8. Reach over the laser arm, and to the left of the inside of the unit and you’ll see this circuit board:
  9. Take a photo of this board.
  10. Turn your Glowforge back on.
  11. post the photos you took in step 4 and step 9.
1 Like

I’ve been able to diagnose the issue, it’s with the circuit board. I’ve had to replace this part before on the machine that is currently working fine, so since I know that part is working, I swapped it into the machine that is having issues and that fixes the problem. To further investigate, I put the suspected bad part in the working machine and now have the error message appearing on that machine.

I’ve inspected the part for any potential damage, and found some corrosion joining adjacent pins that the white ribbon cable connects to underneath the board. Seems that it may be a small design flaw as at this point there’s also regular buildup on my replacement part.


This is after my attempt at cleaning the pins


Replacement part from working machine


Highlighted to show normal use buildup directly over pins

I had to replace this part before due to centering/scanning issues, and this flow may have something to do with others having issues, such as me now having set focus problems. Anyway, thought I’d bring that up.

If I could get a replacement circuit board sent out to me, I believe that this will solve the issue with the added benefit of not needing to send my machine in.

2 Likes

You’re in Hawaii right? Is there high saltwater humidity where you are? I know you’ve had to replace your machine a few times, and that corrosion looks like something I’ve seen in other locations right on the coast. (And you popped in on the other thread with the ten replacement machines, so you probably see it too.)

It’s not a good coincidence. :frowning:

I agree, it would be nice if there were a a light hydrophobic coating on all of the electronics, similar to what Motorola was doing on their phones a few years back. This is the view from the front porch, so it’s likely we get plenty coming this way.

I have my machines in the back room which is the driest and hottest, but that doesn’t mean that there aren’t just soggy humid days. I’ve suspected the humidity as a slow killer already, but it also seems that this buildup is where the problems start. If you look at the path I highlighted, you can see those pins have some corrosion building up versus the ones not in the path. I’m guessing it gives the humidity a place to attract. Some might says it could be I’m cutting dangerous materials, but I don’t cut anything out of the ordinary, and only use proven safe materials outside of the proofgrade stuff.

Anyway, this is definitely some bad news for those of us in high humidity situations. The west side of the island is noticably more dry, so I can see why I’d be having more issues than someone over there, or more towards the center of the island.

1 Like

I plan on adding some non conductive tape over parts where I notice this happening, hopefully that will help going forward :crossed_fingers:t4:

1 Like

It’s called “conformal” coating, and is readily available in a spray can.

5 Likes

I was thinking thin layer of Elmers glue. Or Mod Podge. Even clear nail polish, just wait till it dries. Whatever you have on hand should work to keep the salt and humidity off.

1 Like

Oh now this is exactly what I need! Yeah, cuz this humidity killing my parts is a real drag.

1 Like

Thank you for the update including the information that swapping in the board from one of your other units lead to your Glowforge running correctly. I’m going to close this thread, and I’ll be in touch with you via email so we can look into the question of sourcing a replacement part.

3 Likes