Completely a guess but probably similar to the filter change notification in a furnace controller. Operating time. Might add a fancy algorithm in the cloud. Lots of more accurate ways to do it but why over-design with local sensors?
3 Likes
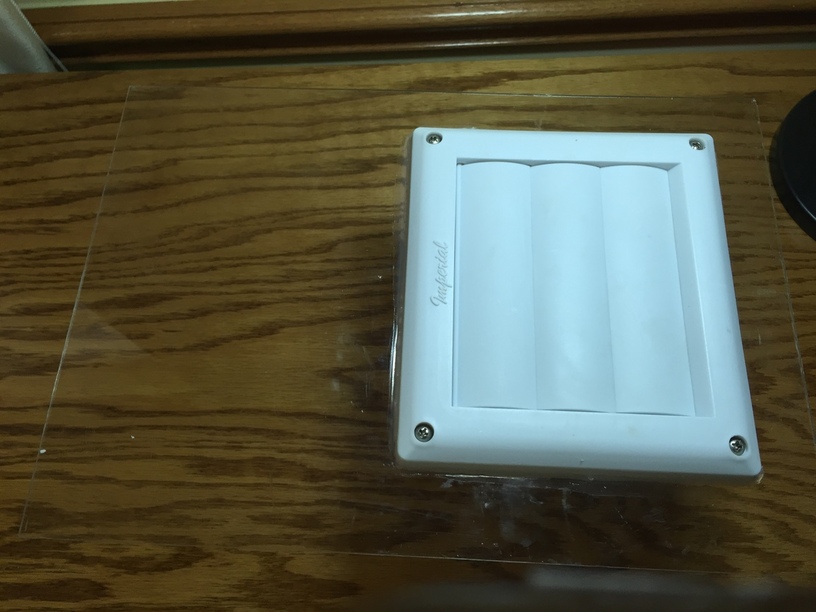
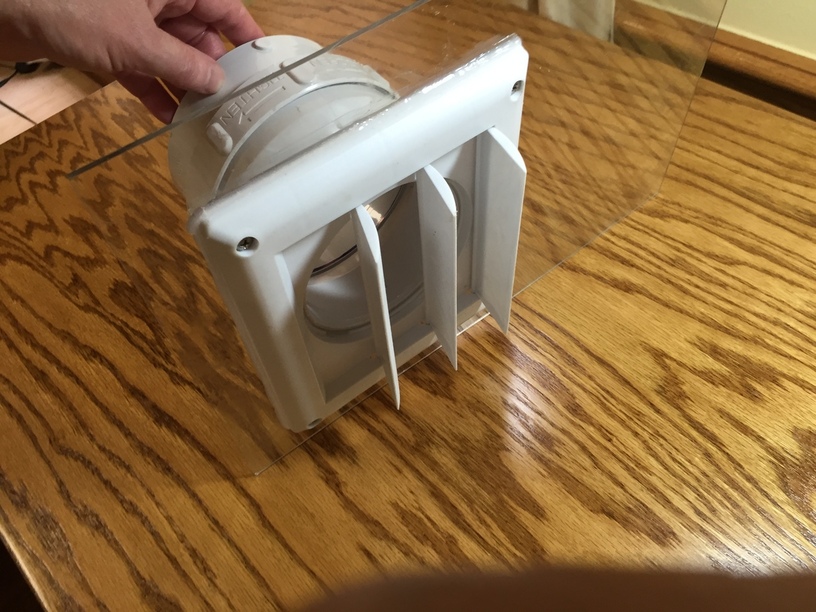
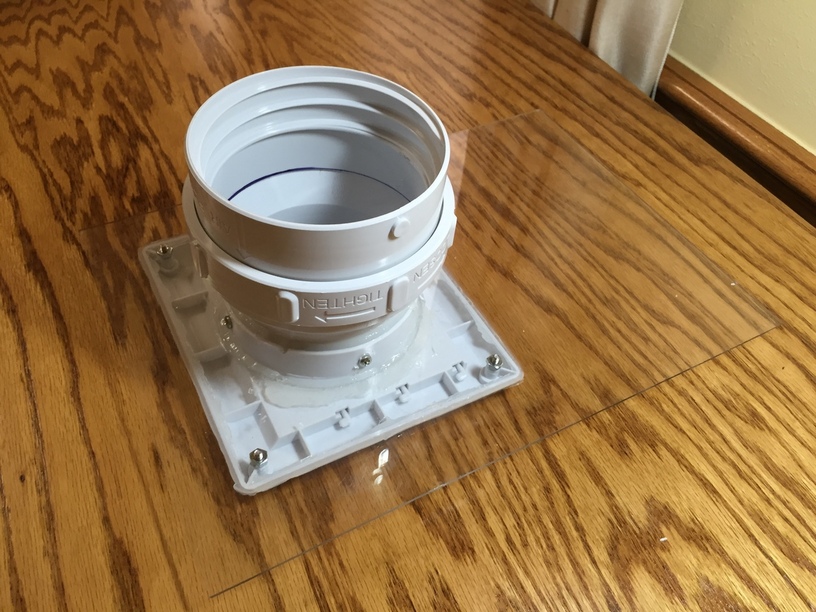
Some pics below of what my (ever-so-clever) hubs came up with for our venting solution.
We have the optional filter on order, but if the hose works better, we want to be ready to vent out the window.
We can’t keep the window propped open all the time, with a small board that the vent runs through (my original idea) because of the way the security system is wired.
So he came up with the idea of replacing one of the small bottom panes of glass in the window with plexiglass. That and a few screws, and a quick connect to make it easy to attach and detach the hose when it’s not being used, and we’re all set!
We’ll remove a pane of glass hidden down behind a bush, and no one will ever see it from the street.
It’s messy at the moment, but I’ll clean up all of the extra silicone caulk that he smeared all over the pane before he installs it. (He’s clever as a bug, but not the neatest in execution. ROFL!)
Ironic thing is - once the laser arrives it could be used it to cut the hole for the vent cap and drill the screw holes without having to resort to messy swarf-generating methods.![]()
Picked a low profile vent cap for the outside:
.
.
.
.
.
.
22 Likes
FWIW, plex is usually harder to break than glass, so if you set that piece in there properly you’re even more secure. (And you could put some hardware cloth across the opening if you’re paranoid…)
2 Likes
More concerned about lizards getting in than peeps. (The panel is too small for a normal sized person to fit through…guess I’d need to watch for child burglars.) 
5 Likes
Here’s another possibility I just bumped into: an adjustable window dryer vent kit. Seems a bit pricey ($60), so I might just cut my own with the Glowforge.
7 Likes
I’ll be making one from 2" foam insulation to fit in the window opening. It gets a little chili in MN in January.
3 Likes
Yeah, that was what I was originally planning to do. Easiest!
1 Like
This is the one I bought, as I needed to get my venting into a narrow area to get up and out a window. I’m hoping it will work.
https://www.amazon.com/gp/product/B000KKKGJ0/ref=oh_aui_search_detailpage?ie=UTF8&psc=1
2 Likes
Looks like some negative reviews mentioned the welds had tiny holes (not air tight). You may want to aluminum tape the seam to be sure - dryer air escaping is not as much of a deal as smells escaping when lasering…
4 Likes
Now that you mention it, I did indeed buy a roll of aluminum tape with it, too. Thanks for your input and info.
1 Like
That’s still in development - we’re working on a few approaches and will let folks know when we lock down which approach(es) we’re using.
2 Likes
I’m planning on something similar for mine. Are you planning on putting a blast gate in?
1 Like
I think that is viable, my first thought @PlGHEADED beat me to it. Definitely seal the telescope seam and any other cracks. Tape, caulk whatever.
Edit- depending on your winter temps, a one-way damper like Jules pics may be a good idea.
I have a standard blast gate to seal the vent line.
1 Like
I know large blowers used in bag houses for Coke plants read amp draw to determine when a filter needs changed but I have no idea how the filter for glowforge is set up, and I’m sure if it was that simple it would already be done lol.
1 Like
Blast gate or louvered vent. Either will work for me. My intention is to remove it and close the window when not in use.
2 Likes
Hey, if it works! 
1 Like
Seriously though, I agree with all suggestions that the OP should have a vent available.
But you all might want to wait until you have the unit in hands (it will take at least two and probably four) before you decide on final position and venting.
3 Likes
That’s far more advanced then my current plan of opening the window and throwing the hose out.
17 Likes
Just make sure you only throw 1 end of the hose out.
12 Likes