Hi GF Community. I am a newbie to Glowforge and am learning Inkscape with some success. I am impressed with what my GF can do, but I have hit a snag. I mostly will be using my GF to cut surfaces for decorative painting, etc. When using “New Design - Create - Capture Image from Camera”, I am able to capture the hand drawn outline and then click inside the closed design to cut out the shape. When I place the artwork on the wood, I get an engrave and a cut step. I have learned to tell GF to ignore the engrave step, but when it cuts, GF double cuts along the shape. This both doubles the time and makes a lots of crumbs in the crumb tray. Since I plan to do a lot of this type of cutting, I hope someone can tell me what I am doing wrong or what I can do to fix this. Thanks
When you are clicking to create the cut outline, do it just outside the figure, not inside. Do not click on the outline of the figure.
Thanks, I tried that. For one I just clicked inside and double cut, for the next I just clicked outside and double cut I even tried exporting as an .svg and then opening it in Inkscape and choosing Path~Combine. When I zoomed in on the original import in Inkscape, I could definitely see two pink outlines, but once I “combined” the paths. It only looks like one cut line no matter how much I zoom in.
That is really strange; I’ve never seen that happen before. Maybe the trace algorithm is going through a glitchy time. Hopefully when staff sees your results they can shed some light.
In Inkscape, make sure you have set your path to center. Perhaps this discussion will help: Avoiding Double Cut Lines In Your Designs
Oh no, I’m sorry you’ve hit a snag!
To better understand the trouble you’re experiencing, could you please send me a screenshot of what you see in the Glowforge app when this happens? Make sure to include the rulers in your screenshot and show as much of the bed as possible
To take a screenshot:
Mac: Press Shift-Command-4 and click and drag a box around your image. You’ll find the screenshot file saved on your desktop.
Windows: Click on the Start Menu and type “snipping tool”. Open the Snipping Tool > New then click and drag a box around your image. Click the Save icon and name and save your file.
Send us the screenshot, and we’ll be happy to take a look.
I have the bed image and have saved it as .png, but when I try to upload I get an error message. Is there another way to attach a picture?
Yes, hit Enter a couple of times to start a new line in your reply, then drag and drop the image onto the new line in the post. It will upload.
Jeremyh,
Sorry, maybe I should have replied via e-mail instead of in the Community. Here is a screen shot of the situation where the GF will cut around the outline twice. There really isn’t much different to see than when it only traces the outline once. I can’t tell from looking which it will be. I wait for the print to be processed and then can tell it will take twice as long from the time it takes. Thanks for any help you can provide.
Debbie

Oooh! I can actually answer this one! 
Don’t click on the trace line, click in the white area outside of the trace line to make a selection. If you click on the line itself, it will create two cut lines, one on either side of the pink line. (Inside and Outside.)
Thanks, but I am definitely not clicking on the trace line and it doesn’t seem to matter if I click inside or outside the image. Most times, double cutting, occasionally, a single cut. Here is another screen shot of the bed.


yes, I have tried just a single click outside the shape and still got double cutting of the outline. I have tried a single click inside the shape and still have gotten double cutting of the outline.
Huh! Did you try it with a filled (colored in solid) shape?
What the trace does is place a cut line into the interface anywhere there is a color change. (Black to white, or white to black.)
It should allow clicking and selecting just the outside, but if the line is thin, or the shape is not completely closed, it might be creating what looks like two cuts, but is actually a path that loops around on itself.
Use a really thick line, or try coloring in the shape to see if you can get a single trace for it. (You’re not interested in the engrave anyway, you just want the cut, right?)
Hi @rappee25407 I sincerely apologize the delayed response. I’ve noticed fellow community members offering some great tips to prepare the design to meet expected print results. I extracted the log files from your Glowforge and noticed a couple things I wanted check with you.
First, I saw some recent print activity after your last response, and wanted to see if the design issue was still occurring. The recent designs look like they were closed single path cuts, and let me know if you’re still encountering the problem.
Next, when I reviewed the log files from your Glowforge I noticed some re-occurring issues with the communication between the Print Head and the rest of your Glowforge unit. To address this issue, there are two key connections I’d like you to check for me.
Could you please do the following?
- Turn off your Glowforge.
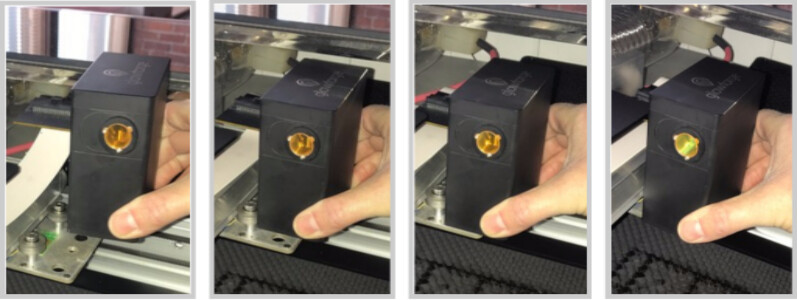
- Holding only the finished black surfaces, grasp the printer head as shown. Pull gently up and back to disengage the magnets and remove the head.

- There is a small tab in the center of the wire ribbon. Push down fully on the tab to release it, and gently pull the wire ribbon plug from the printer head.
- Take a clear photo of the gold pins inside the printer head where you just unplugged the wire ribbon. It should look like this.
- Pick up the printer head and wire ribbon. Make sure the tab on the wire ribbon is facing up. Slide the ribbon back into the head until it clicks.
- As shown, lower the printer head over the metal plate so that it rests next to the two round posts. Then push it gently away from you – you’ll feel a “click” as magnets pull the printer head until it sits snugly atop the metal plate.
- Pull the laser arm all the way forward.
- Reach over the laser arm, and to the left of the inside of the unit and you’ll see this circuit board:
- Take a photo of the circuit board. If the cable I’ve indicated above with the red arrow appears to be loose, please reconnect it and try printing again. This cable should ‘click’ back into place.
- Turn your Glowforge back on.
- Send us the photos you took in step 4 and step 9.


I apologize for any added inconvenience this may cause, and will look forward to hearing back. Thank you!
It’s been some time since we’ve seen activity on this thread. Would you let us know if you’re still experiencing trouble?
Thanks for checking in. Sorry it has been a very busy week and I have not had a chance to look at my GF. I was successful in cutting several camera capture or trace items in my last session about 10 days ago, but as I recall there was also one failure in that session. I cancelled that print because I could tell by the print time that it was going to double cut. I hope to have some time later this week to follow Brandon’s suggestions. Thanks again, I really appreciate the GF staff’s time and effort to help me solve this issue.
@rappee25407, Thank you for providing that update. I’m glad to hear you were able to print successfully last week. Definitely let us know how things go after trying the steps my colleague Brandon provided. We will leave this thread open for a bit longer and look for your response. Thank you!
It’s been a little while since I’ve seen any replies on this thread so I’m going to close it. If you still need help with this please either start a new thread or email support@glowforge.com.