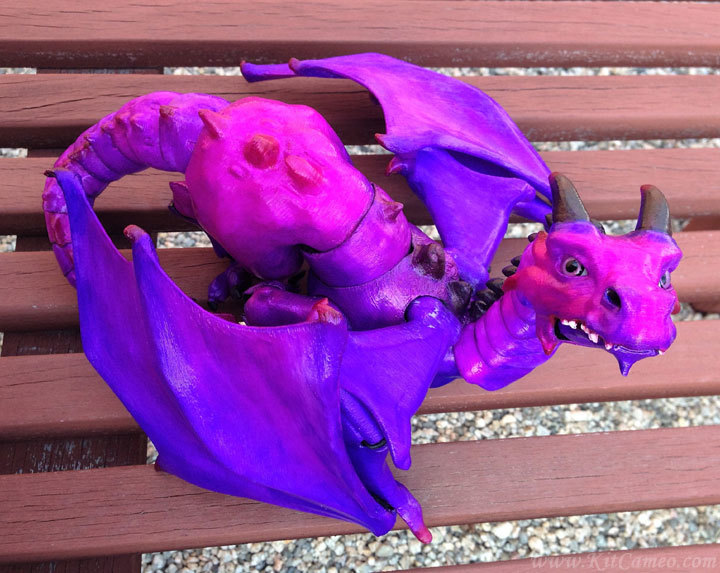
I just finished this last weekend. It’s a bjd dragon that I downloaded from bqLabs on Thingiverse (https://www.thingiverse.com/thing:854575), and printed on my UP! Mini FDM printer. I sanded the joints and support areas, and painted it in Silks Acrylics. I added glass eyes, and finished it with clear gloss acrylic before stringing it together with elastic cording.
No they don’t change color. I had ordered green also but I really liked the blue. Remi (the dog) isn’t too amused with my projects. Thanks for noticing the bench and table. i built those for my wife last year.
It works quite well, as well as a drop spindle but a bit faster. It takes a bit of practice to get a consistent thickness. (so I’m told)
Here’s a link to the original plans that I’ve saved to my Google drive. I’m sure you can find it elsewhere if you look.
And a YouTube video of someone using one.
Thanks! No, it was painted with a paintbrush and palette. I don’t have an airbrush, and I thought I was going to need one to get smooth results with 3D prints, but it turns out that using the good acrylics works just as well! The Silks fill in the layer lines of the print nicely, because it’s thick paint.
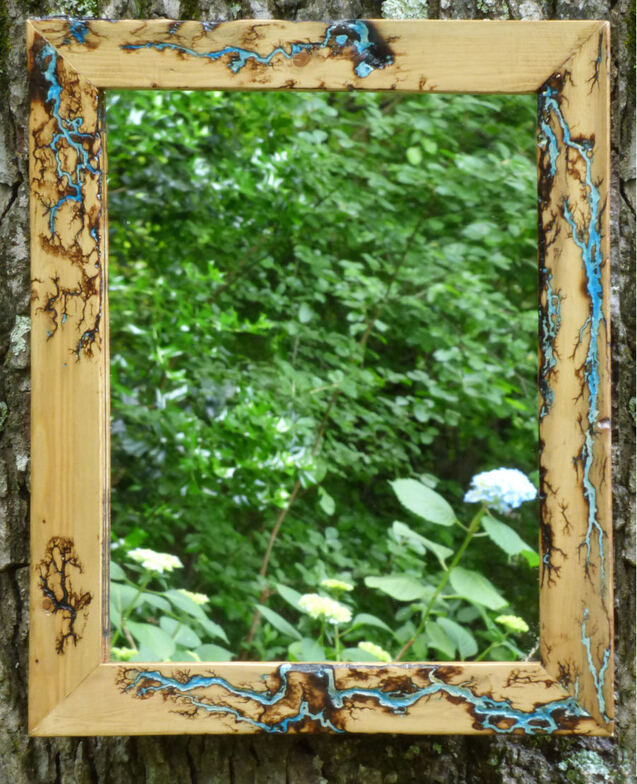
Trying other “interesting” techniques while waiting. This frame combines repurposed lathe mixed with a little cool technology (diy Lichtenberg generator), and the amazing power of God. Sometimes it looks like a Google Earth image of the Colorado River snaking through Arizona. Other times I see lightning in a summer sky. It over powers all but a simple mirror, reflecting beauty that abounds.
That is awesome! The blue lends itself to lightning or water. I tend towards lightning.
You know it is good art when it raises questions on how it was produced.
Thank you for sharing that with us!
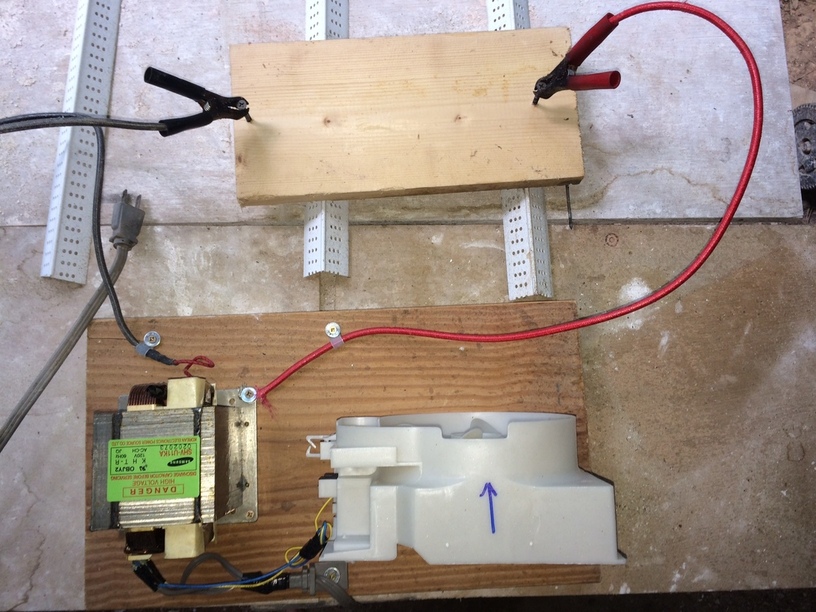
Before I began generating Lichtenberg pattern in wood, I first viewed many of the YouTube videos to learn the theory (very little) and practical experience. Frankly, I am surprised that some folks lived to make their YouTube video. The wiring is simple, but I wanted to be sure it was safe over time. The transformer, power cord, and fan came out of a Goodwill microwave ($5.00). The 110 volt side of the primary coil was obvious. The 4000 volt lead comes directly out of the secondary coil. The two other leads that can be cut off and tapped off. The high voltage circuit is completed with a ground wired directly to the transformer. I added the fan for my safety, since its a visual and audible indicator of a powered-up transformer meaning 4000 volts coming out of the secondary. It is not required, but also blows the smoke, improving visibility. Also for safety, I opted to directly connect the microwave’s power cord to the transformer rather than through a switch. That way I am always about 6 feet away from arching in the wood.
Since wood is not a good conductor, an electrolyte needs to be painted or sponged on to the surface of the wood before applying power. Baking soda and water (1 or 2 tbl per cup of water) is generally used, but I have found calcium chloride produced good results. Its safe (used in pickling, cheese making, deicing, and water treatment) and I read that it has more available ions than baking soda.
Experimentation is required to get the wood wet enough to conduct, but overly wet does not work. Some woods get dried out as high voltage is applied. I have found that longitudinally grained pine gives me consistent (but not predictable) results. Cedar worked ok and plywood burned too much. Method and placement of high voltage contacts on the wood is open to experimentation also. Generally I do not let a high voltage cycle exceed one minute. I like lightning-like lines, not charcoal gouges. I dont know if its a potential problem, but short cycles seem to keep the transformer from overheating.
I constantly remind myself that the transformer is putting out between 2000 and 4000 volts with enough amperage to stop my heart forever. Be safe.
I tend to use simple materials I have on hand. After I scrubbed the charred wood and soot from the crevices with water and dish soap and allowed it to dry, I gave it a light sanding. Then I filled the “valleys” with a water-based wood filler, thinned out to flow slightly. Another light sanding (trying not to remove the fine fractal details. I painted a blue water color paint (borrowed from my wife) in the valleys over the light colored filler. Three or four coats of shellac with a very light steel wool to cut the sheen. Thats it.