Here you can test out a design before you get one.
Yes! I have been using Tinkercad when I originally designed this!
It was a bit of learning curve, but I have a handle on it now. I will definitely check that out!
I have read that you can use birthday candles (probably made of beeswax) to lubricate the axle holes, but I haven’t tried that yet.
I found the same issue, that is why I created a front and backplate that holds the piece together. It’s not the answer for every job, but it definitely worked for mine. 
Loads just fine, holes are just over 3mm square in the GFUI.
I have to laugh that the guy who types up his own SVGs from scratch found that TinkerCAD has a bit of a learning curve… 
Not that I’ve learned TinkerCAD yet, but I did used to run AutoCAD on an 8MHz IBM PC clone.
Well, it took me a couple hours to fully understand what I was doing in it.
I still haven’t figured out how to share the designs properly, but I haven’t tried to hard either…
Planetary gears are cool, but are not to be confused with bearings. I did not see any benefit to the bearings in my design, but I believe that is because I do not have enough weight to warrant the bearings. I can definitely see how they would be helpful with a large axle and more weight needing to be distributed.
I am still playing with the idea of working the planetary gears into the wheel design, but I am afraid they could cause to many issues with normal use of the design and would just make it overly complicated to assemble… we will see what further testing uncovers.
Is there anyone out there that has experience with trying to use a planetary gear system upright? Most of the examples I have seen use it on a flat horizontal surface. It seems to be quite the balance to get the gears big enough that they don’t shift with gravity and lock up the device, yet small enough that they can turn freely.
It seems like if I implement the planetary gear system it should not bear weight, so I will need to brace it.
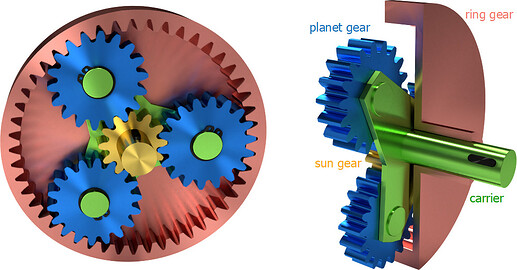
I would think it would need a carrier. Planetary gear sets don’t have “free” planet gears.
I think I agree… but what do you mean by “carrier”?
I know the planet gears will need to be held in place. Is that what you are referring to?
Or do you mean something that holds the inner and outer gears at equal distance as it goes around? Because I agree there as well.
Very interesting… Thanks for the pictures. That gives me some more ideas that might actually allow it to work more like a bearing construction, but will also greatly increase its complexity…
I have much to think about now…
That is how any planetary gear I’ve used is set up - only the sun and carrier rotate, the ring is the gearbox housing. Both the sun and carrier shaft ride in bearings that carry the load, however, not the gears themselves.
For this kind of application, I’m not sure it would matter, but you would definitely need to test it.
This is so cool. THANK YOU for posting the files and keeping the instructions up to date. THIS is why this community is so awesome.
Wow, I am a programmer and have told I am very low tech/old school at times.
I started using Fusion360 (a cad program) and have designed some simple 3d items that I then cut out on the forge. In theory it will do everything needed - gears, layout, tolerance checks, can even simulate the motion.
When I started thinking of doing something similar to what you did, I got lost in the tool, learning how to do what I wanted to do. Guess I should have kept to the simpler path !
Thanks for the design! I can’t wait to make a couple for my grandkids!
I too am an old school engineer and use text quite a bit.
If you want a very good free editor, check out “Notepad++”.
“https://notepad-plus-plus.org/downloads/”
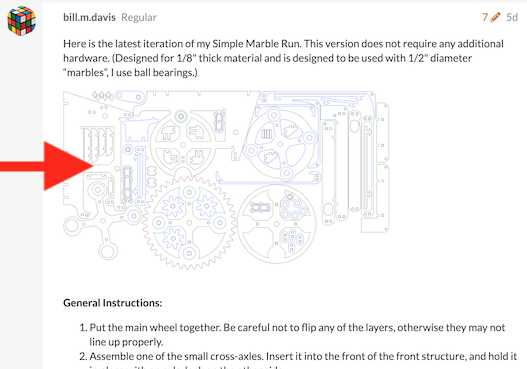
Hi, Bill, my GF ( basic) is due this weekend so I am looking for projects. I am a newbie to this community. How do I download these projects. I would like to try your marble run.
I use AUTOCAD v17.
Bob Varner
Download this file, upload to the UI and print.

@bobjulia1977, you can right-click on the image that @eflyguy is pointing to above, and choose “Save Image As…” then you can load that image in the GF interface.
I was sent a series of private messages, thanking me for my design from @garyellefsen.
I asked him to post his story, but he said he didn’t want to upstage me. I told him I wasn’t worried about that kind of stuff and just wanted to share ideas and stories with the community. I then asked if he was okay if I posted his story? He said “Sure”.
My favorite thing about this community is how we share ideas and learn together. I know some people make a business out of this, and I can understand how they want to be protective of their intellectual property, and we need to respect that. But some of us here just do this for a hobby, and we just want to help support the community to make everything better for everyone. We want to help others learn what I have learned, and learn from others and their experiences!
@garyellefsen, if you do send me your file, are you okay if I post of version of this design that uses the larger, more regular, actual marbles?
bill.m.davis
I would like to applaud your NESTing for this project.
But just a couple of things would make construction / instructions much easier.
" Put the main wheel together. Be careful not to flip any of the layers, otherwise they may not line up properly." - Engrave some thing like CS-1, CS-2, … on the main wheel parts (CS-1 = Crank Side 1st piece)
This would stop any guessing for layers and flipping.
“Assemble one of the small cross-axles” - When I first read this, I was totally lost. What the heck is a cross-axle? There are lots of little crosses that are waste.
Some text on the drawing would have stopped many minutes of - What is he talking about?
“Three axle gears (aligned)” - Again; Engrave some thing like CS-A, CS-B, CS-C.
“Be careful with the upper braces, they are small and can break easily.” - If you already know they break easily (yes, I broke one). Make them bigger, you have room.
One word of warning for anyone else building this -
Marbles just slightly larger then the 1/2" won’t work. I had 0.545" marbles that don’t fit thru the drop holes.
