Been working with leather for about 6 years now, but very new to Glowforge. I recently got a Glowforge Pro and have been loving it.
The first few weeks of ownership has been me learning the ropes on how to use Inkscape, make .svg files, and use the machine settings. I’m getting more comfortable with these things, but there’s one area that keeps causing issues and it might seem terribly stupid, but I can’t figure it out.
Many of my patterns are multi-sheet, some needed 15-20 individually cut out pieces. How can I ensure that the patterns are the correct size each time I print? For stitching holes to lineup and everything, I need to be sure that each piece is sized correctly. In the past, these patterns would be all printed on A4 paper and it wouldn’t be a concern.
I’d recommend putting a 1"x1" square way on the edge of the file–somewhere it will print but not interfere with other pieces. Once everything is ready, very lightly score only that box. Don’t move the work, but now measure to make sure your results are correct. It’s an extra step in the process, but will ensure the right size.
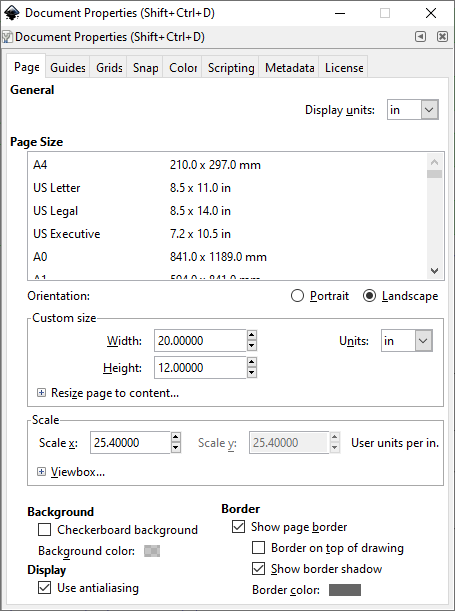
So presumably you have been having problems with unintended re-sizing? When glowforge first launched this was an issue and the workaround was to set the Width and Height in Inkscape’s document properties to 20 and 12 and the Units to inches.
That’s no longer necessary. Inkscape went to a 96 dpi standard a long time ago and that solved the scaling issues. Document page size doesn’t matter anymore when coming from Inkscape, only the page dpi setting.
In fact, you’d probably be happier if you changed your default document size to be 10.9 x 19.5, because then it would be a direct indication of the working area of a performance unit. You can rest assured that whatever you put inside your page will fit in the working area of your machine at that point.
It’s really easy to make a default template if you’ve never done it, I’ve been using this template ever since they switched to 96 dpi standard and it’s rock solid
I have so many files with this setup, and I know what I need to set my x and y coordinate to so everything fits. I’ll consider it, but I am an old dog.
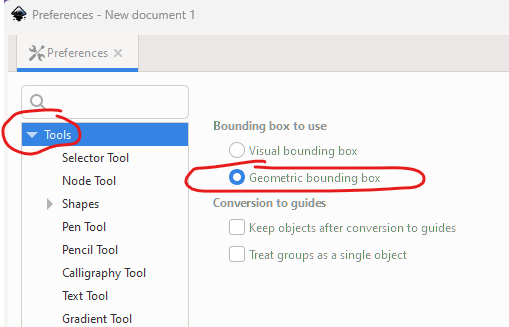
Make sure you’ve set it for Geometric Bounding Box. The default is visual but then the sizes you see include the stroke (line) thickness. But the GF ignores stroke thickness and will cut down the center of the line. With the bounding box setting changed to Geometric Inkscape’s measurements will not include stroke thickness.
I’m on my phone so I can’t grab screenshots from Inkscape, but click on Edit on the menubar. Then click on Preferences. Then Tools. In the popup there will be an option of which Bounding box to use - visual or geometric. Select Geometric.
The bonus of continuing to do the 20x12 art board is that I won’t even notice a future update that changes the dpi, but the number of “what happened???” posts on here will let me know there was one!
It’s unlikely to change away from 96dpi. The SVG standard was modified at some point to recommend using 96dpi and software is supposed to assume files are 96dpi if not otherwise specified. (Previously programs were allowed to choose to scale things however they wanted when scaling wasn’t explicitly specified.)
Inkscape tries to adhere very closely to the SVG standard and it would take a lot for that spec to change again.
But I always use 20"x12" too. It doesn’t hurt anything and provides an extra layer of assurance. (And I tend to use PDF too, for the same reason.)