This is a bit of a long post, but there are more pictures at the end. ![]()
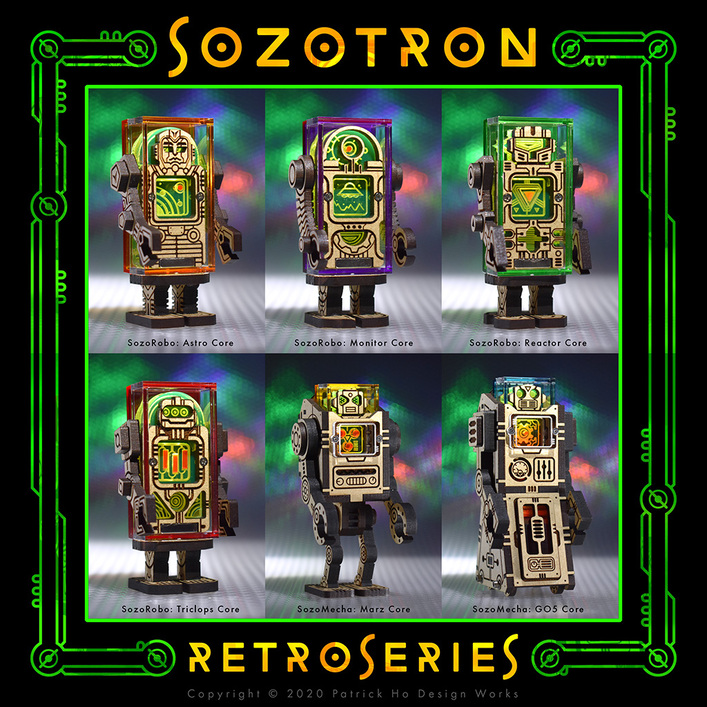
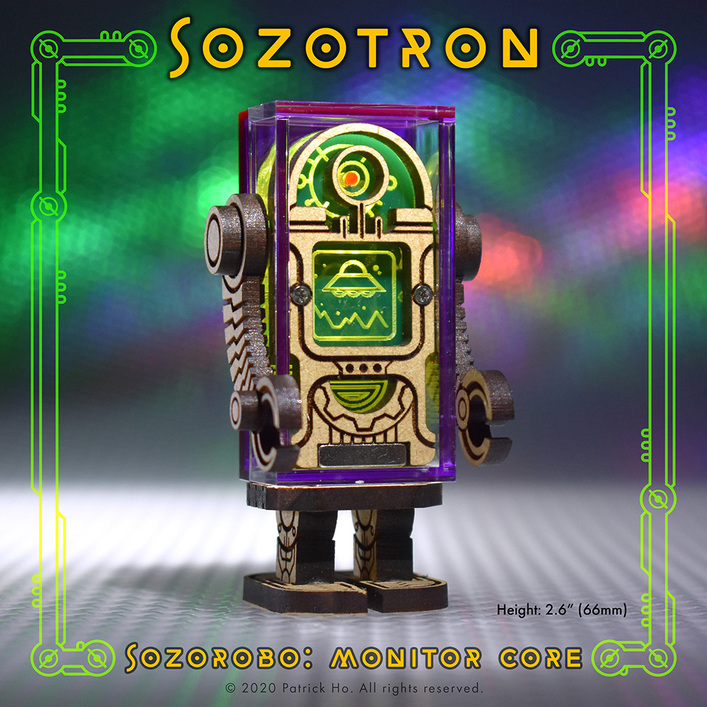
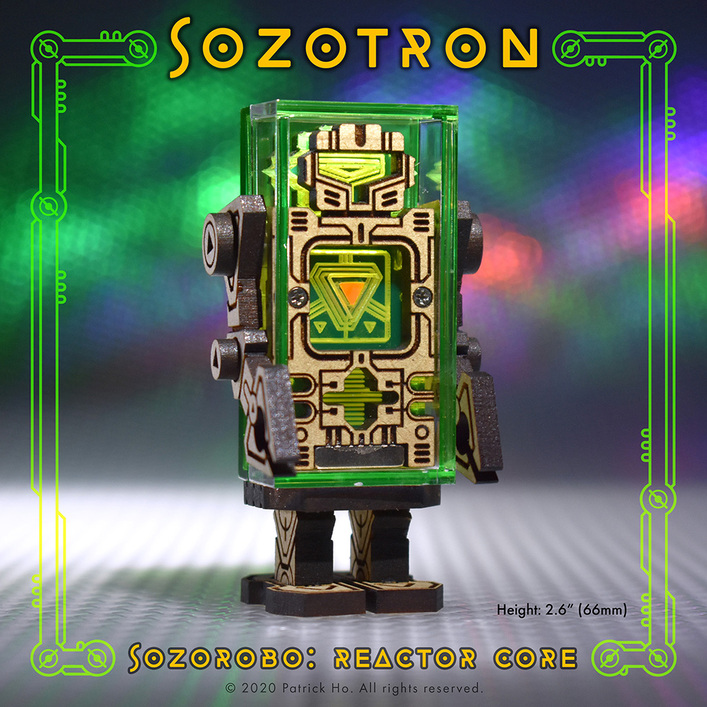
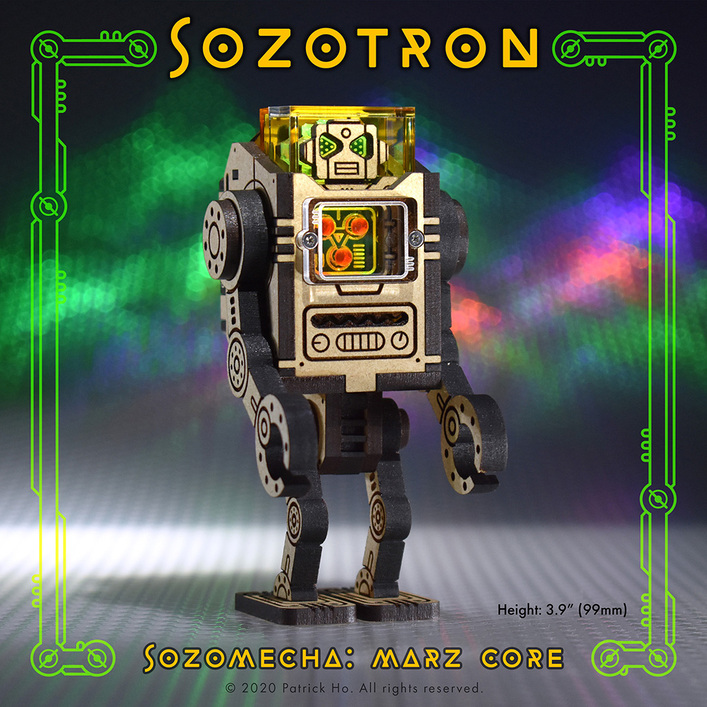
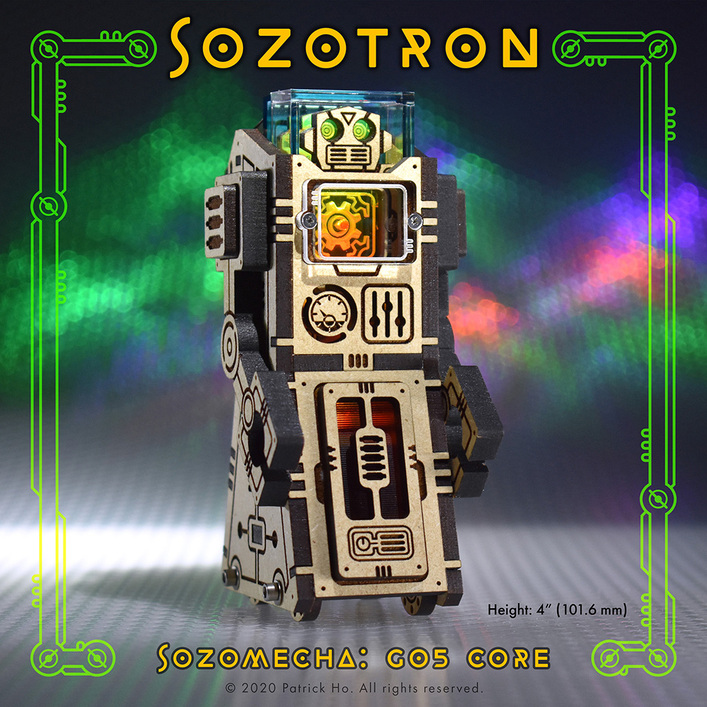
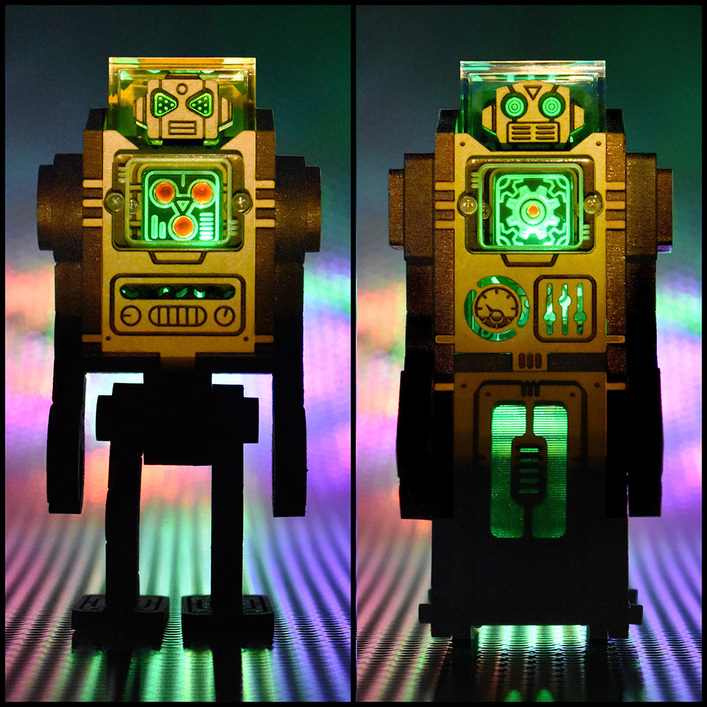
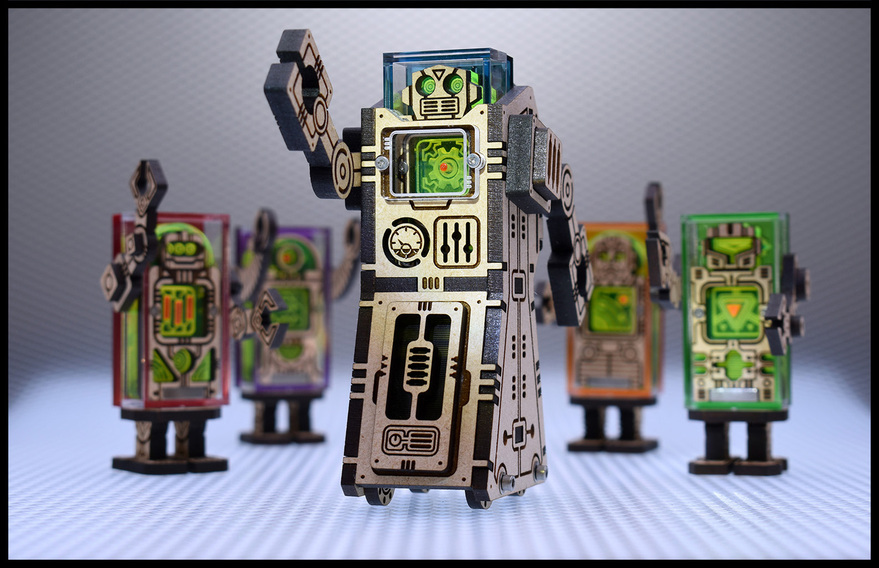
I intended to make this post much earlier in the year, but was sidetracked with work and other projects. An artist by profession and a life time toy collector, I invested in a Glowforge as a means to create my own designer/art toys and other dimensional art. This is Sozotron, my first line of designer/art toys and my very first project created with a Glowforge. Sozotron is inspired by the tin robot toys of my youth, but with a few creative twists of my own. The line consists of four smaller SozoRobo (Astro Core, Monitor Core, Reactor Core, Triclops Core) and two larger SozoMecha (Marz Core, GO5 Core). Any of the “cores” can be swapped to pilot the SozoMecha and all of the SozoRobo limbs can be swapped with each other. Each robot features limited articulation that varies between the SozoRobo and SozoMecha. SozoRobo features rotation at the shoulders and hips. Both SozoMecha feature shoulder rotation, but Marz Core also features partial leg rotation and GO5 Core features a wheeled base. SozoRobo are slightly over 2.5 inches tall and SozoMecha are just about 4 inches tall. One unique feature of the SozoMecha is the slow fading color changing LED installed that highlights the engraved graphics and other embedments in the clear neon acrylic. All robots come housed in their own display case supported by a custom framework. All robots were made with draftboard, transparent acrylics, AMAC plastic containers (core bodies and display cases), neodymium magnets, tiny hardware, and super glue. As mentioned, the SozoMecha also contain a color changing LED, which is powered by an included CR1220 coin-cell battery and holder with on/off switch.
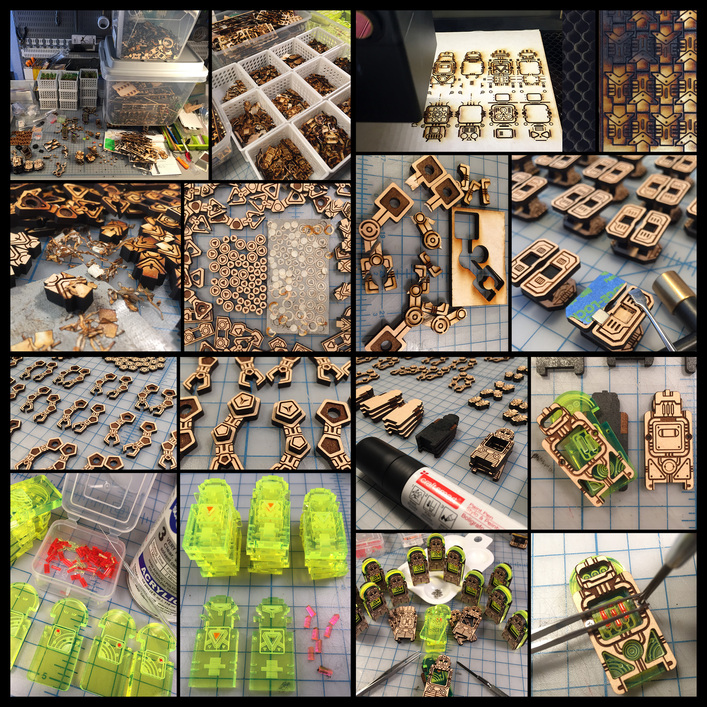
The Sozotron Project started out to be a very simple project. I set out to design something aesthetically pleasing, fun, a bit nostalgic, and hopefully easy to produce. While I’m happy with the designs, features, and functionality I came up with, they were deceptively difficult to make! I spent the better part of a year and a half prototyping and iterating my designs. And with each step attempting to add more features to make it “cooler” while becoming more difficult to make in the process. Like many Glowforge owners, I was new to lasers and there was a lot of time and money spent navigating material properties and settings. Thankfully the forum and its many members are here as a resource, but there were also times I simply had to figure out things on my own. Imagine that ![]() For me the single most problematic thing was to get a two sided engrave in “perfect” register on a consistent basis. For the limbs of my Sozotron, I became obsessed with having engraved details on both sides. I could have left the interior side blank, and that would have been much easier, but it just looked unfinished. I mean, how hard could it be?! Apparently VERY!!! I tried different methods for jigs to hold things in place, but the best results for me at the time came from using an entire 12”x20” sheet of material as the jig. I learned that I needed to create a bounding box around the art I intended to engrave and that the art for the bounding box and engrave had to be centered to each other. On the first pass, graphics were engraved and then the bounding box was cut. I would then turn over the cut piece along the appropriate axis to engrave the second side and cut out the actual shape intended. This seemed to work but not consistently. Before making a batch of pieces, I would often do a test beforehand. When the test turned out perfect I would proceed to make a batch. Unfortunately the batch wouldn’t always be in perfect register like the test! And sometimes the disparity was was off as much as an 1/8”! And for something as small and detailed as the pieces were, that was a huge deal. Plus a lot of time and material wasted. I tried to figure out where the variables might be coming from? Was it user error (entirely possible by the way)? Was it my setup? Or was I asking more of the Glowforge than it was capable of doing? Are industrial lasers even capable of doing what I wanted? If I’m not mistaken, at the time, I vaguely recall someone mentioning in the forums that the axis of rotation mattered in registration and that one direction is better than the other? I tried that, but results were still inconsistent. I also tried making the cut for the bounding box active on the second side, thinking that maybe the overall size of the designated “active” area needed to be identical on both sides? That did seem to garner better results in general, but not all of the time. Sometimes the art in the UI would move after lifting and closing the cover to turn over the piece! Also, there was talk of Snapmarks, which seemed like it might be the answer to my prayers, but it was in beta and only offered to select members for trial at the time. I haven’t been in the forums for a while, so I have some homework to do. But if anyone knows off the top of their heads if Snapworks or any of the latest functionality improvements might address my issues, please let me know!
For me the single most problematic thing was to get a two sided engrave in “perfect” register on a consistent basis. For the limbs of my Sozotron, I became obsessed with having engraved details on both sides. I could have left the interior side blank, and that would have been much easier, but it just looked unfinished. I mean, how hard could it be?! Apparently VERY!!! I tried different methods for jigs to hold things in place, but the best results for me at the time came from using an entire 12”x20” sheet of material as the jig. I learned that I needed to create a bounding box around the art I intended to engrave and that the art for the bounding box and engrave had to be centered to each other. On the first pass, graphics were engraved and then the bounding box was cut. I would then turn over the cut piece along the appropriate axis to engrave the second side and cut out the actual shape intended. This seemed to work but not consistently. Before making a batch of pieces, I would often do a test beforehand. When the test turned out perfect I would proceed to make a batch. Unfortunately the batch wouldn’t always be in perfect register like the test! And sometimes the disparity was was off as much as an 1/8”! And for something as small and detailed as the pieces were, that was a huge deal. Plus a lot of time and material wasted. I tried to figure out where the variables might be coming from? Was it user error (entirely possible by the way)? Was it my setup? Or was I asking more of the Glowforge than it was capable of doing? Are industrial lasers even capable of doing what I wanted? If I’m not mistaken, at the time, I vaguely recall someone mentioning in the forums that the axis of rotation mattered in registration and that one direction is better than the other? I tried that, but results were still inconsistent. I also tried making the cut for the bounding box active on the second side, thinking that maybe the overall size of the designated “active” area needed to be identical on both sides? That did seem to garner better results in general, but not all of the time. Sometimes the art in the UI would move after lifting and closing the cover to turn over the piece! Also, there was talk of Snapmarks, which seemed like it might be the answer to my prayers, but it was in beta and only offered to select members for trial at the time. I haven’t been in the forums for a while, so I have some homework to do. But if anyone knows off the top of their heads if Snapworks or any of the latest functionality improvements might address my issues, please let me know!
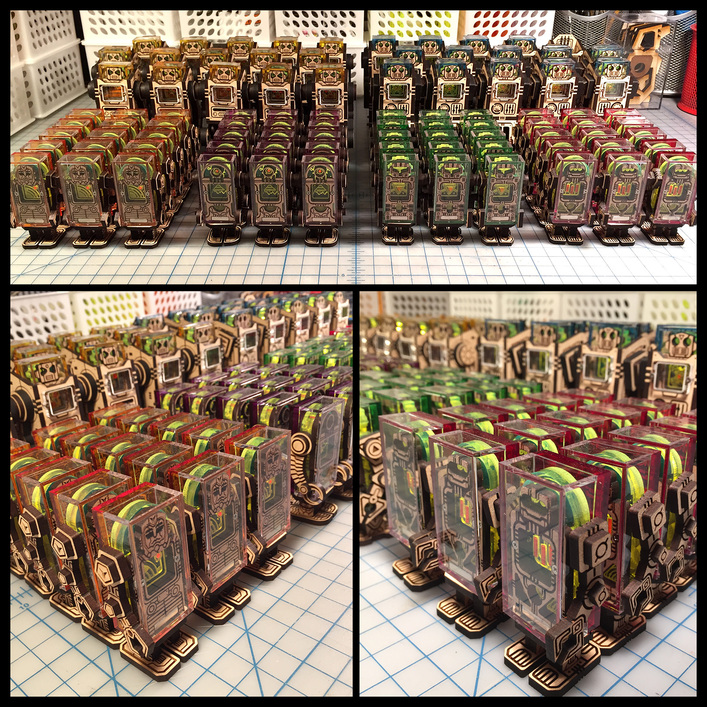
Anyway, towards the end I had become really burnt on the project, but had to finish what I started! So despite two-sided registration issues I forged ahead. The failure rate was high, as much as 50%! So the likely hood of being able to make a decent quantity, even a small run was getting slim. In the end, I was able to make 15 pieces of each Sozotron design with the parts that were successful.
My initial intent was to create and design something for sale. But after much trial and error it proved too costly and labor intensive to make, even for the small batch I had made. I did create my first online store and put what I had up for sale, which was also the goal all along. And I’m grateful to say I actually sold a few ![]() While I do have more ideas in mind for the line, the designs for this initial set will be laid to rest. There may be variations based on it in the future, but will probably feature different colors, graphics, materials, and construction methods. And unless I can figure out a better way to mass produce them, they will continue to be very limited bespoke pieces assembled by hand.
While I do have more ideas in mind for the line, the designs for this initial set will be laid to rest. There may be variations based on it in the future, but will probably feature different colors, graphics, materials, and construction methods. And unless I can figure out a better way to mass produce them, they will continue to be very limited bespoke pieces assembled by hand.
If you are interested in making a purchase or to learn more, please visit my store. I will say that SozoRobo: Monitor Core proved to be a “best seller” and is sold out. Also, I currently only accept PayPal and US domestic orders for now. If you’d like to see more photos, please visit my store blog and/or social media as well. This has been a huge learning experience for me and continues to be so. I’m also navigating FDM and resin 3D printing and hope to incorporate all of these tools along with the Glowforge to create unique designer toys and art ![]()
Store
Portfolio
https://www.patrickhodesignworks.com/
One last thing! If you’d like to support a good cause, I’m participating in an Instagram only art auction called #AWEtober beginning October 1st. All proceeds will be donated to entities affected by the California wildfires. I’m donating my SozoMecha: GO5 Core piece to the cause. To see what other artists are participating, the art they are donating, and auction dates during the entire month of October, please visit https://awetober.com/
If you’ve made it this far down in the post, many thanks for your time and taking a look. ![]()