I’m going to demo an alignment process below using my (ancient) version of Adobe Illustrator, but the process is the same for Inkscape or CorelDraw or Affinity Designer. Whichever one you like to use, you’ll do the same things, with the tools in that program. (I’m also going to give you the thought process that goes into creating a design with 2D Design software, to keep from having to write another one up, so if you can slog through it, you’ll pick up some stuff you need to know to make things easier .)
Suggested Reading:
If you haven’t read through these yet, they help with definitions and setting the stage for what comes below:
Glowforge Interface - Tips & Tricks for Using the App
How to Correctly Save a File as an SVG for the Glowforge
Designing a File with perfectly aligned Engraves & Cuts in External Design Software
In Adobe Illustrator: (Or your Design Software)
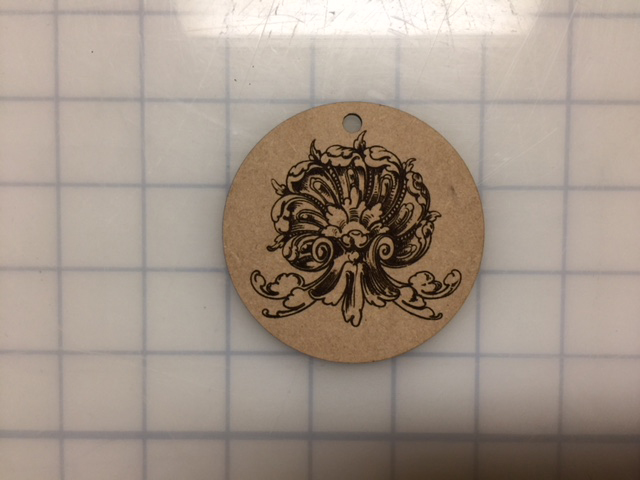
1. Step one is to think about what you want to do. ![]()
(Don’t skip this step, it’s the most important one in the process. By planning ahead, you’ll ease your files straight into the interface without having to fight your way past error messages a lot more frequently.)
Example: I want to cut out a little circular wooden ornament that has a bitmap (raster) engrave on one side, and a couple of different styles of text engraved on the other side.
I know that I will need to perform at least three different operations to create the design…
- Engrave the front side of the ornament
- Engrave the back side of the ornament
- Cut things out
You would think that meant you needed 3 colors to set up the operations for the design, and that’s generally the easiest way to do it…but…the GFUI also takes into account whether an element of the design consists of a Fill or a Stroke, or whether engraves are raster or vector, so you can get separate operations created for each of those as well. It can make batch production challenging, to say the least.
Having said that…the easiest starter method is to use separate colors for as many elements as you can, so that’s what I’ll do in the example.
-
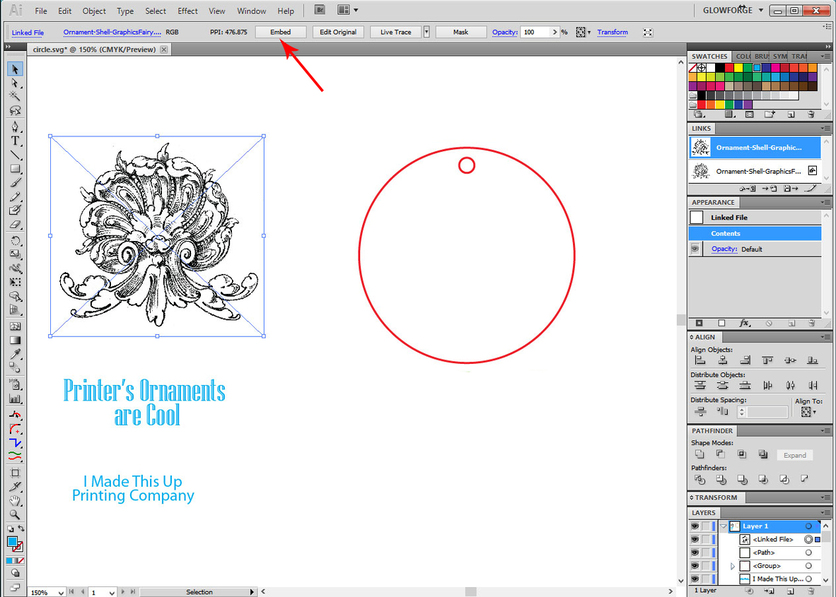
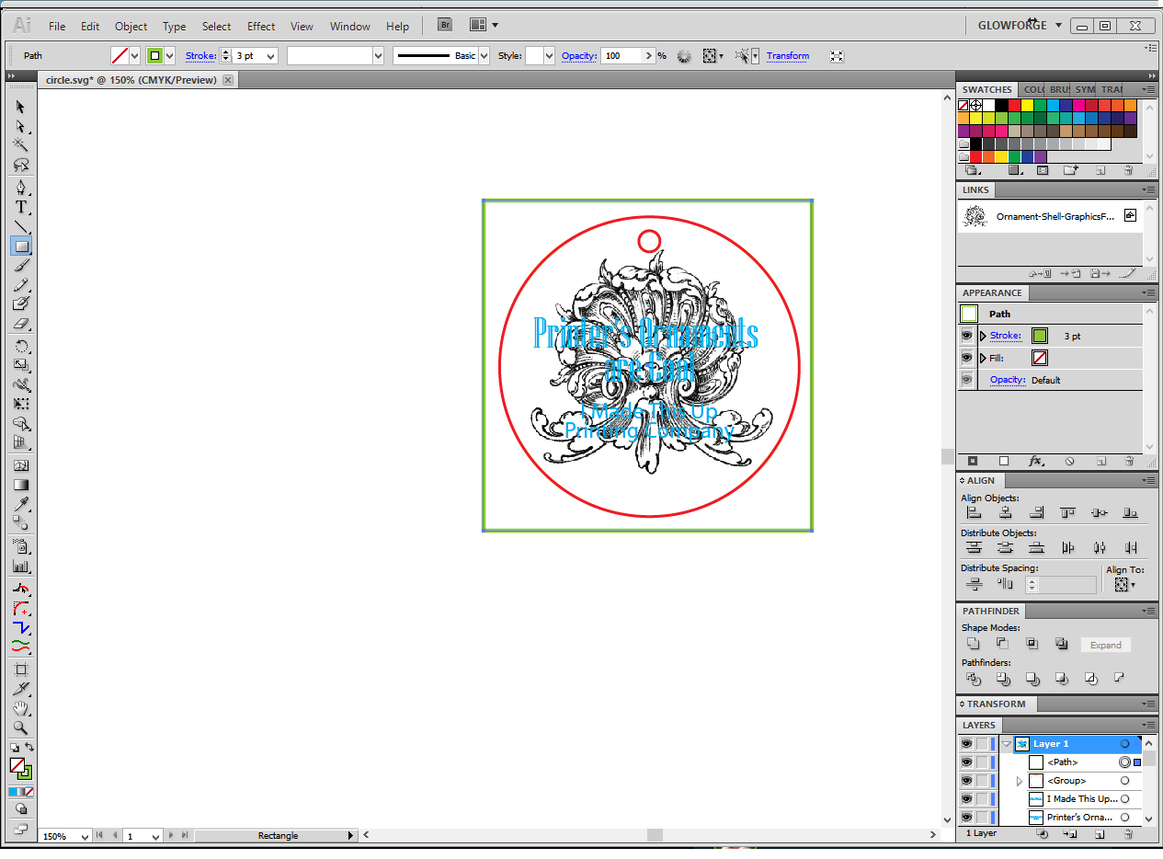
Collect the raster graphic you want to use on the front of the ornament, drag it onto the artboard, and (in Illustrator) click on the Embed button while the graphic is selected. (Raster artwork needs to be embedded, and in AI that means pressing a button.)
-
Type up the Text you want to use and make it a different color. (blue). Once you have the text the way you want it, convert it into a Path by selecting it and either clicking on Object > Expand or Type > Create Outlines. (Text has to be converted to paths or outlines before saving for the GFUI. Some software has the option to do this automatically when saving or exporting an SVG, so check the tutorial listed above to see if your software does it.)
-
Draw a couple of Circles and assign them a stroke color, and no fill. Those will be the cut lines. (Make them a different color - red.)
- Here comes the fun part…use the Align tools to combine the elements the way that you want them to be:

a. Group together the two circles after using Horizontal Align Center and they can be treated as a single unit for further aligning purposes.
b. Place the graphic over the circles for the front side and use Horizontal Align Center again to make sure that you have it squared away. Group it.
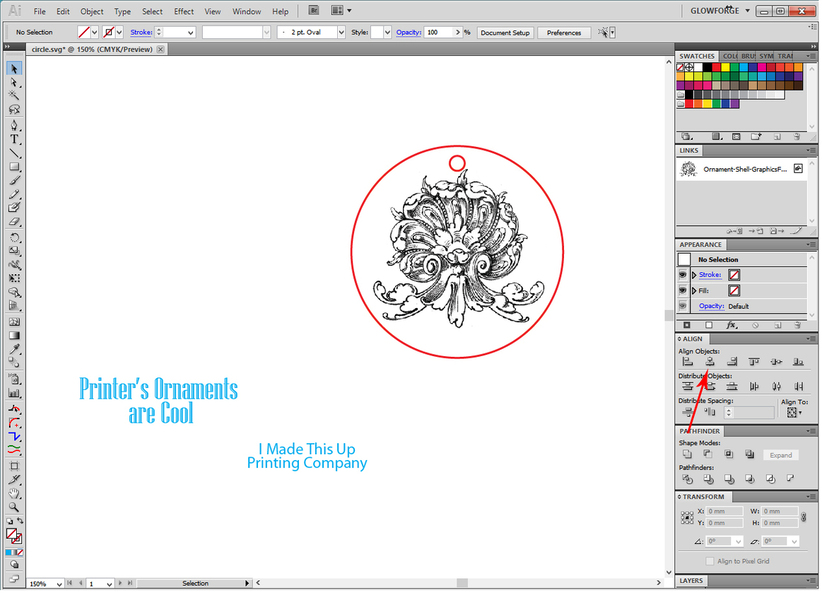
c. This part might freak you out a bit, but in order to place the engraving for the back side of the ornament (the text) you just place it right over the top of the other engraving and align it as you like.
(I’m going to temporarily hide the graphic image so you can see what the interface will see for the text when the time comes to process it. When you turn the wood over, you want the engraved text to read in the correct direction, so you don’t flip the text unless you are processing clear acrylic from behind.)
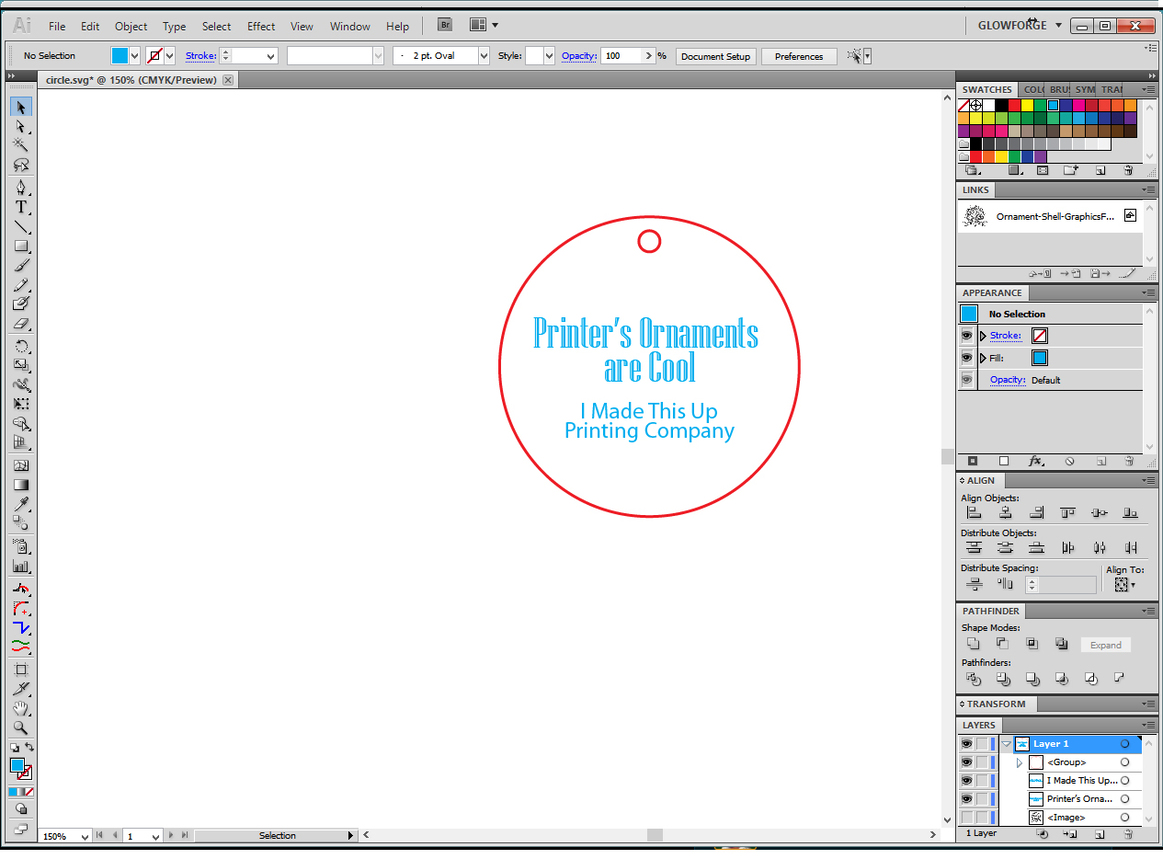
And here’s what it looks like when you have everything correctly in place:

- Okay, that looks great! But I have one other alignment that I want to do, and it would be difficult with a round cut shape. I want to make sure the text is oriented correctly with the little hole at the top, and if I try to flip a round tag in a circular hole, the odds of me getting that little hole lined up perfectly at the top go way down.
So I’m going to add a weeding jig around the circle. It’s nothing more than a rectangular cut line around the circle, that will let me flip the whole shebang in the correct orientation halfway through the processing. This can be used for odd shapes as well, or if you are making multiples, you can flip the orientation of oddly shaped cut objects around the Y axis and alternate cut holes when engraving the backsides.
So here is the final file with a last color and cut line added.
(I want to cut the square at a separate time from the circles, so I gave it a different color line.)
I did a quick Camtasia recording of the whole process… it took under two minutes. That’s generally a lot faster than trying to eyeball something with a camera, and the accuracy is 100% between the elements.

.
- Save As an SVG file to your desktop.
(Using the tested settings in the tutorial up top.)
.
.
.
In the Glowforge User Interface:
- Turn on the Glowforge, let it calibrate, and open up the App.
- Drag the SVG file onto the Catalog area to open it in the interface.

You’ll see that the file was correctly interpreted as needing two engrave operations, and two cut operations.
- We will set the backside engrave (text) to be Ignored, along with the Circle Cuts.
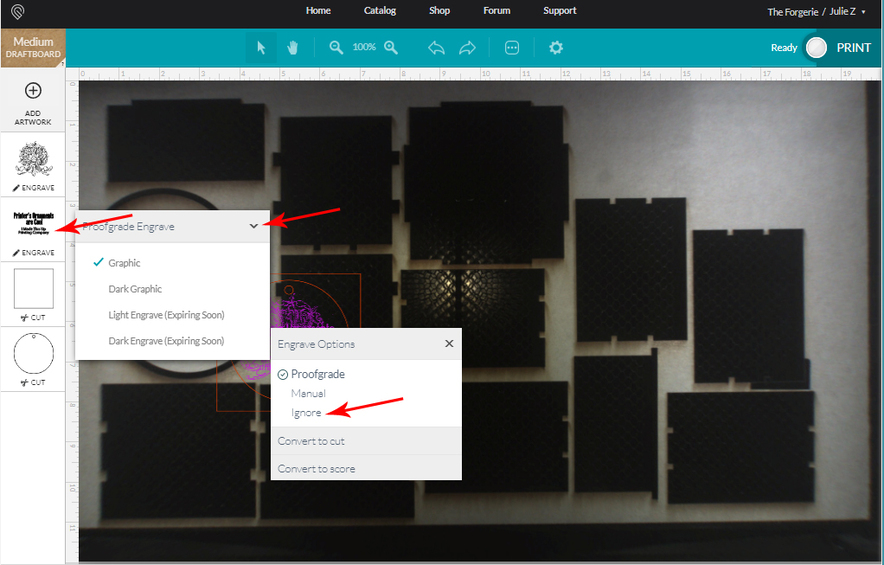
- Send the front side engrave and the square weeding cut to Print.
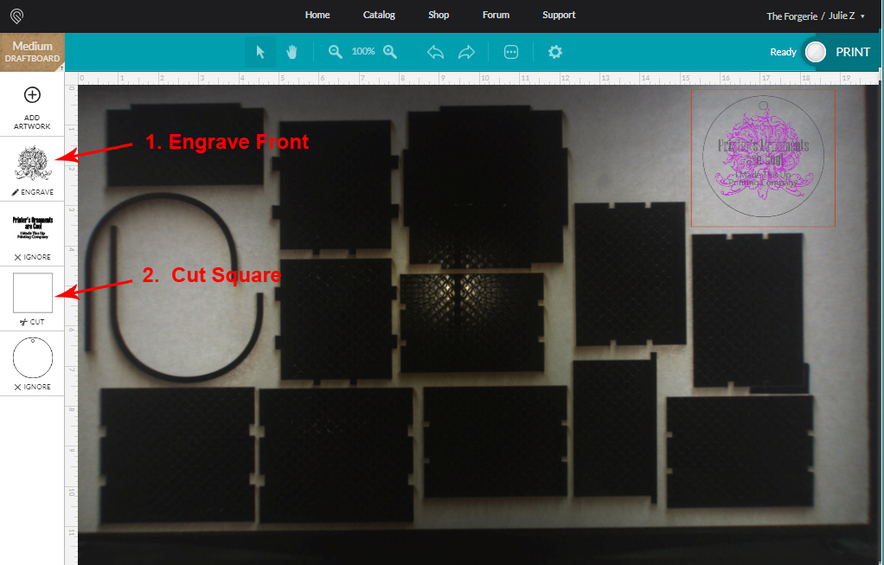
- When the first part of the print is finished, open the lid and flip the square center cut over around the vertical (Y) axis. (Use a thin pick to lift the cutout without shifting the backing.)
DO NOT ALLOW THE BACKING MATERIAL ON THE BED TO SHIFT.
(I like to tape the backing material to the tray on one side to remind me to not move it until I finish processing all of the engraves and cuts.)
- In the interface, without shifting the Preview placement or trying to align the preview if it appears to be out of alignment, set the backside engrave to engrave, and the circles to cut. Set the engrave for the front side to Ignore, along with the square cut.
You only want to turn things on and off in the thumbnail column…do not move the image placement on the bed.
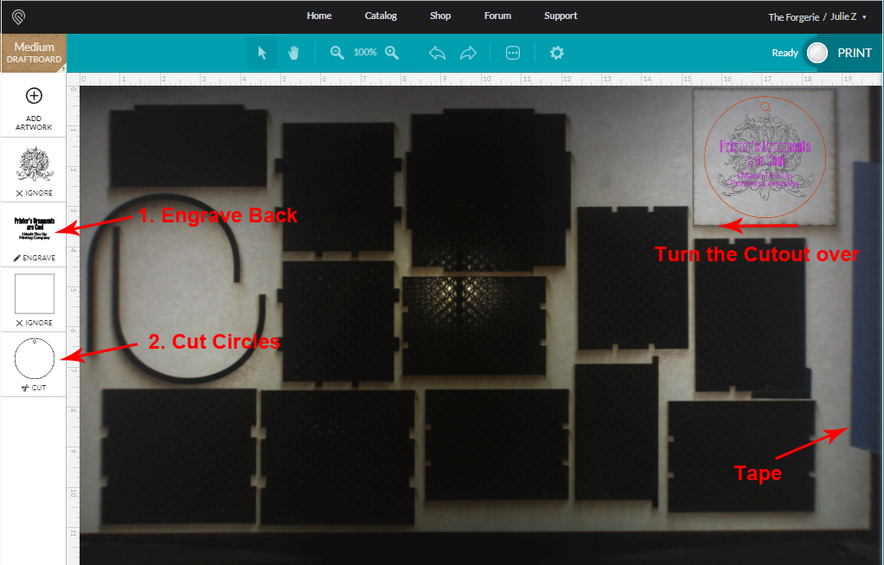
- Send the backside engraving and circle cuts to be Printed. (And you’re done!)


Everything lined up just right with no struggle. ![]()
(This happens because there are relationships created between the elements in the design, when it is created as part of the same file. Everything will be maintained as long as nothing is moved after the cutting or engraving starts.)
A final note:
This fixed relationship between the parts of a file makes it easy to create something that is perfectly aligned if you are both cutting and engraving on a piece of background material, but it can also be used to create a “jig” to get perfect alignment for placing engraving on something that is already cut out. (For instance, if you wanted to precisely place engraving on a purchased coaster.)
Simply create a quick rough outline that fits the dimensions of the object that you want to engrave, align the engraving to that in the file, then save it as an SVG. When you get to the GFUI, cut the outline out of some sort of jig material (cardboard or scrap plywood), remove the center part, drop the object to be engraved into the hole, then turn the engraving on and set the cut to Ignore. As long as you have not moved either the material on the bed or the image on the screen, it’s going to land where it needs to be…perfectly. ![]()