I’ve discovered that the engrave function of my GF pro isn’t quite calibrated, and I’m not sure if there’s a way to address this.
It seems as though the X/Y plane isn’t totally accurate, and I imagine this is because of the difference in the motors. When I engrave something horizontally, it ends up being about 3mm shorter than if I did it vertically. I’ve not actually tested this, but here’s a file that would illustrate what I’m talking about: engrave-test.zip (627 Bytes)
Although each rectangle is 10" long, I would expect the vertical one to be longer when it’s actually engraved. (Or the horizontal one is shorter… I can’t tell which it is, but one of them is off.)
I assume this is only with engrave? I just scored some scraps with your file and the rectangles are perfectly 10" long.
Can you verify the measurements, i.e. is one longer than 10" or is the other one shorter. It matters - I’m thinking the speed of the engrave might be causing the head to over-shoot. What are your settings?
To answer the actual question, there is nothing we can do on our end to calibrate the stepper motors.
But, I would think that to get help on this and determine what’s going on, an example would be helpful. The Gift of Good Measure would probably be fine; it’s a known good file that they can easily identify issues with. I’d burn that on a piece of draftboard and see what it looks like. And then post pictures here.
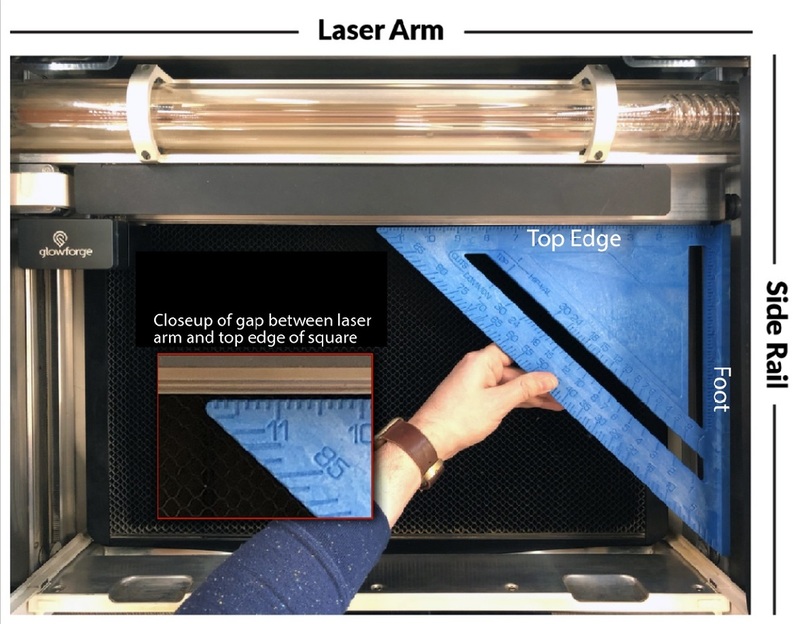
Thanks for letting us know about this. While I don’t have a test for dimensional accuracy, I do have a method you can use to reset your laser arm. All you’ll need are your own two hands and large square layout tool with a foot. If you don’t have one, you can purchase one here or find a similar one at your local hardware store.
Once you have your tool, please follow these steps:
Turn off your Glowforge.
Open the lid and the front door.
Gently slide the printer head all the way to the left.
Gently push the laser arm to the back of the bed.
Grasp the silver metal front of the laser arm with both hands.
Simultaneously hold the laser arm gently in place with your left hand and pull it slowly with your right hand until the front wheel on right end of the laser arm rolls off the rail. The laser arm will sit at an exaggerated angle.
Press the foot of the square against the right side rail as depicted in the photo using firm pressure. You may need to use the top edge of the square to slowly push the laser arm away from you so the foot of the square will fit inside your unit. Make sure the foot is flush against the right side rail and that the laser arm is still at an angle.
Still using the square to apply pressure to the side rail, continue pushing the square towards the back of your unit until the metal part of the laser arm is flush against the entire top edge of the square and the wheel pops back onto the rail. If the laser arm is not flush against the top edge of the square, try the process again starting from step 5.
Remove the square, being careful not to bump your Glowforge or the laser arm.
Turn on your Glowforge and wait for the lights and fan to go on.
Close the front door and the lid.
Wait for your Glowforge to calibrate and try a print!
If you’re continuing to see unexpected results after trying these steps, could you please provide the following?
Photos of the print results, including rulers for reference.
It’s been a little while since I’ve seen any replies on this thread so I’m going to close it. If you still need help with this please either start a new thread or email support@glowforge.com.