Hello. I haven’t used my glowforge in a couple of weeks since I’ve been on maternity leave. I gave it a good cleaning today and turned it on to notice a stuttering issue. Not sure if this is a belt issue or what else.
9/16/2020 8:45
Have you checked the belt tenstion?
If the tension is correct, if you power down the machine does the laser head move freely left and right? Also check that the black wheels on the laser head plate are not cracked.
1 Like
It’s trying to move left and forward, against the boundaries for some reason.
This usually happens if you have just the right size/shape hole in material that’s loaded in the bed, or excessive light coming in creating an odd shadow - either case it’s misidentifying that hole or shadow for the head and basing calibration movements off of that.
I’d clean the lid camera and remove any material, and make sure that no really strong light is going into the machine and try again.
2 Likes
When powered down it moves freely left and right and it glides back and forth easily. When it’s on, it doesn’t glide easily back to front
I will check the tension next. Thank you
not sure if it is your issue or not but its a quick few things to check. Its not a good idea to try and move the laser head while the unit is powered on unless directed to by the support staff just a heads up
Hello @LaserLlama,
Thank you for reaching out to us and for posting the video. I’m sorry to see your Glowforge is having some calibration trouble.
I extracted the logs from your Glowforge to investigate, and it looks like there might be a couple of things going on here. It looks like your unit is having trouble maintaining a stable WIFI connection which is affecting its ability to properly calibrate, and your Glowforge is having trouble communicating with the printer head.
First, it looks like your Glowforge is able to connect successfully to your network, but it may be having trouble maintaining a stable connection. When this is the case, you won’t need to go through Wi-Fi setup again, but you may see an “Offline” message.
The most common solution to Wi-Fi challenges is to restart all the devices involved in connecting to the internet.
- Turn off the computer, phone, or tablet that you’re using
- Turn off your Glowforge
- Unplug your modem
- Unplug your Wi-Fi access point
- Wait one minute, then plug everything back in and turn them back on
If that doesn’t work, we have two more suggestions that often make a big difference:
- Improve the signal path between your Glowforge and your Wi-Fi access point
Wi-Fi signals need a clear path. Remove physical barriers, and move devices closer together:
- Move your Wi-Fi access point up high and make sure it’s in an open space. Avoid locating your Wi-Fi access point on the ground, under a desk, in a cabinet, or in a corner where its signal can be blocked.
- Relocate your Wi-Fi access point closer to your Glowforge
- Move your Glowforge closer to your Wi-Fi access point
- Install a Wi-Fi range extender closer to your Glowforge
- Run an ethernet cable and install a second Wi-Fi access point next to your Glowforge
- Reduce electronic and Wi-Fi interference
If your unit is near other devices that use Wi-Fi or a large number of electronics, temporarily turn off other electronics and devices in the area.
Second, there are two key connections I’d like you to check for me. Could you please do the following?
- Turn off your Glowforge.
- Holding only the finished black surfaces, grasp the printer head as shown. Pull gently up and back to disengage the magnets and remove the head.

- There is a small tab in the center of the wire ribbon. Push down fully on the tab to release it, and gently pull the wire ribbon plug from the printer head.
- Take a clear photo of the gold pins inside the printer head where you just unplugged the wire ribbon. It should look like this.
- Pick up the printer head and wire ribbon. Make sure the tab on the wire ribbon is facing up. Slide the ribbon back into the head until it clicks.
- As shown, lower the printer head over the metal plate so that it rests next to the two round posts. Then push it gently away from you – you’ll feel a “click” as magnets pull the printer head until it sits snugly atop the metal plate.
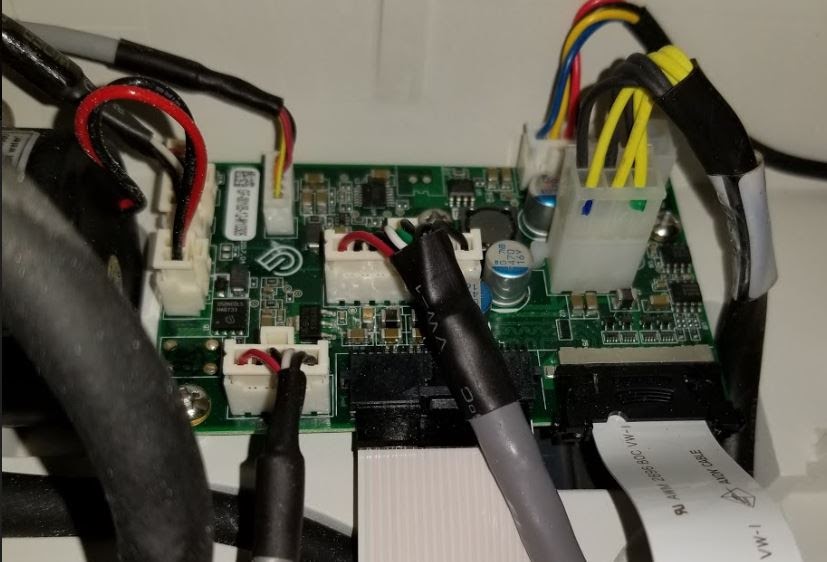
- Pull the laser arm all the way forward.
- Reach over the laser arm, and to the left of the inside of the unit and you’ll see this circuit board:
- Take a photo of this board.
- Turn your Glowforge back on. Let it run through calibration. Let us know if it continues to be jerky.
- Send us the photos you took in step 4 and step 9.


Once we have the photos and your feedback, we’ll follow up with next steps. Thank you!
It’s been a little while since I’ve seen any replies on this thread so I’m going to close it. If you still need help with this please either start a new thread or email support@glowforge.com.