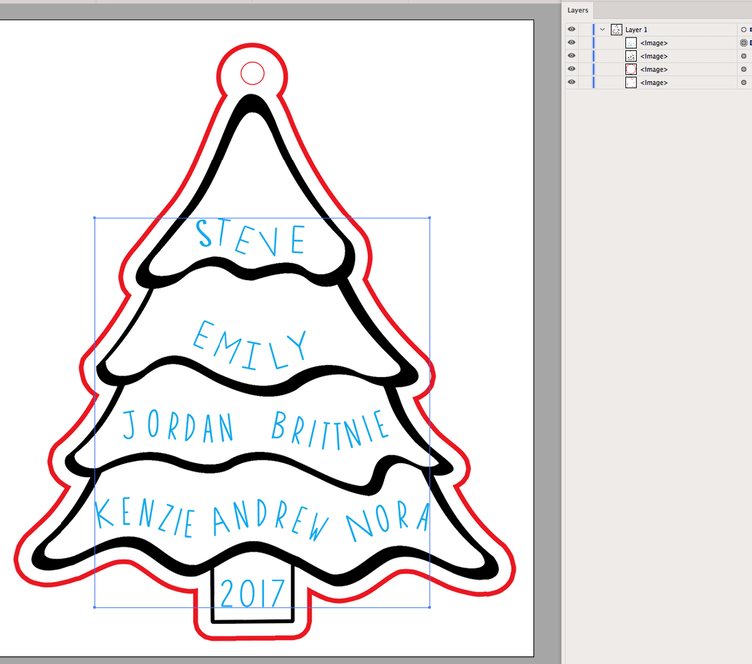
Y’all. I am about to go bonkers! I have created 3 layers, no smart objects, deleted all the work paths, and am saving a transparent file. What am I doing wrong?? Every time I drag the file into the glowforge app it readily recognizes all of my layers, but it does not allow anything but engraving.
The problem is that the file is composed of just bitmap images. Here’s what it looks like in Illustrator. See how it says Image (x4) on the upper right of screenshot? Those are all rasters, which can only be engraved.
To do vector work in Photoshop, you’ll need to use the pen tool. Or, that’s the only way that I know to do it. If you know how to use the pen tool, you know just about the hardest thing to learn in Illustrator.
I did convert the tree so I could get an offset path, then deleted the parts I didn’t want. Drew a new couple of circles and joined them to the offset path. I was right where you’re at a month ago. Check out a couple of the videos that @chris1 did, they were just the jumpstart I needed.
Thanks, everybody! I went ahead and redrew a new one with a custom shape. According to my husband, I have been living in the dark ages of Photoshop for far too long Thanks for the video suggestion! I’m about to make some papercut family Silhouettes with geometric shapes in the negative space… looks like I’ll need some definite vector/path knowledge to make that happen!
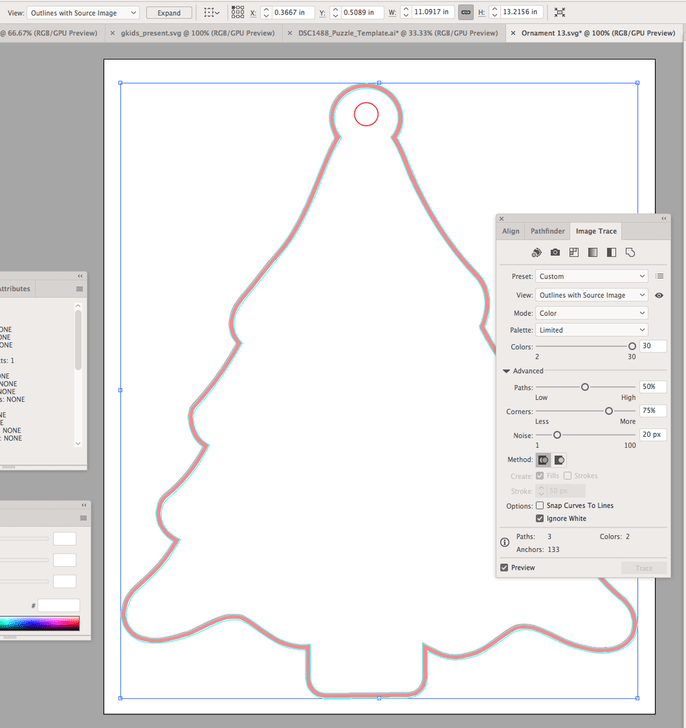
It’s a pretty simple image in the grand scheme of things. I guess you want the red outline as a cut, the black and text as an engrave?
Bring it into Illustrator and turn off the two layers that are the black engrave and the text
This leaves you with just the red tree outline and the cut hole at the top
For the next step, you can either trace it manually or do an autotrace. It’s a really simple shape, so honestly, I would just trace it manually but that’s just me.
If you want to autotrace, select the red tree layer and go to menu item Window > Image Trace
Clicking the outline preset should get you there pretty close.
Click the “Advanced” dropdown button in the image trace window, select Ignore White and select Preview. Here’s the settings I used - the view is set to Outlines with Source Image so I can see how close it is.
If that looks good, just click the Expand button up on the top of the screen.
That will convert it to an editable vector shape. If you selected Mode: Color on the image trace screen, it will match the color of the outline, otherwise it will be black. Either is fine.
Then, do the same thing for the little cut circle up top.
You could, at the very beginning of this select both the tree outline and the cut outline layers and go to menu item Object > Rasterize, and it would combine those two bitmap images into one and then the trace would trace both elements at the same time… but, you gotta run before you can walk
I originally had both on the same layer but was wondering if it wasn’t registering the cut lines because of it. I was totally scratching my head.
After all this, I ended up designing a more modern one in illustrator while waiting for the answers to come in that ended up working great, I’ll upload a photo once it’s done cutting.
@jbmanning5 - thanks for the autotrace tip. I think I’m going to need that once I figure out the silhouettes. I might upload one on this thread in a couple minutes in case I have issues.
You can absolutely stay in Photoshop if you want to, though as a daily user of both I would strongly encourage you to learn Illustrator for vector work if it’s available to you.
For your tree example - select one color at a time (either with the magic wand or ctrl+click on the layer if you have them in separate transparent layers). Once you’ve got the appropriate marching ants pull up your Paths Palette (by default it’s under the Layers palette). There are three little circle icons along the bottom. Click the 2nd from the left (a solid lined, unfilled circle). This converts your marching ants to a Work Path that will now appear in the Paths palette.
To save that path double click it’s name in the Paths palette and rename it. Repeat for any other paths you’d like to make.
On your red line I’m guessing that’s intended as a cut, you’ll probably want to edit that resulting path down to a single line (the operation above will result in a double line tree donut). Use the Direct Selection tool (white arrow) to select one of the anchor points and hit delete a couple times.
Once you have all your paths to your liking (and you can include raster elements in your design if you wish, follow the instructions here to generate the SVG.
Think of cuts as the path of a knife rather than the stroke of a brush - they have no inherent thickness other than the laser’s kerf. Unfilled/unstroked paths are like the knife.
Just tried this out with something different this morning and it worked like a CHARM! Thanks for the tip!! We have Creative Cloud and have for years, with little humans running around and everything else I just haven’t had the time to sit and figure it out, but I made a new ornament lastnight with it while waiting for answers and it wasn’t completely frustrating- it actually seems pretty intuitive.
 Thanks for the video suggestion! I’m about to make some papercut family Silhouettes with geometric shapes in the negative space… looks like I’ll need some definite vector/path knowledge to make that happen!