Cut and glue Tea_Box_Bottom. (Engrave the bottom before gluing, if you want.)
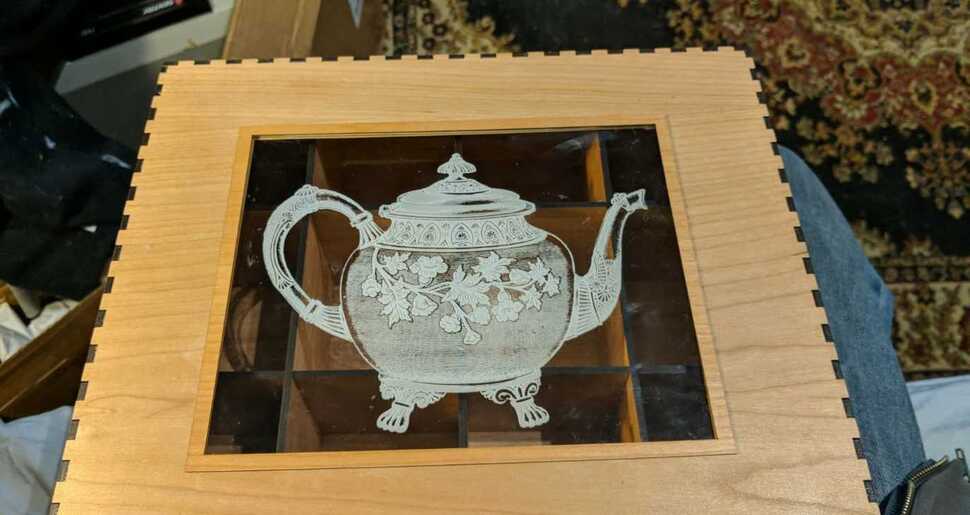
Cut Tea_Box_Top.
If you wish have the window in the top, the steps are:
Place the box top in
Open Box top window and frame.SVG. You can edit it to add custom engrave elements
Ignore black for processing. Use black to align to the box top. The window and frame center inside the black.
Cut Cyan, and score (draft is fine, it helps align the frame) yellow into box top. Engrave your other customization (I used Magenta for engrave when I did it for ease).
Take the top out, add clear acrylic. Cut Cyan. Can move, but don’t resize. This gave me a perfect window.
From another board, cut yellow twice for upper and lower frame.
Use the score lines to align and glue the upper frame to the top.
Insert the acrylic. Dots of CA in the corners can really help holding it.
Use the position of the upper frame to align and glue the lower frame (inside the lid)
Glue up the rest of the top.
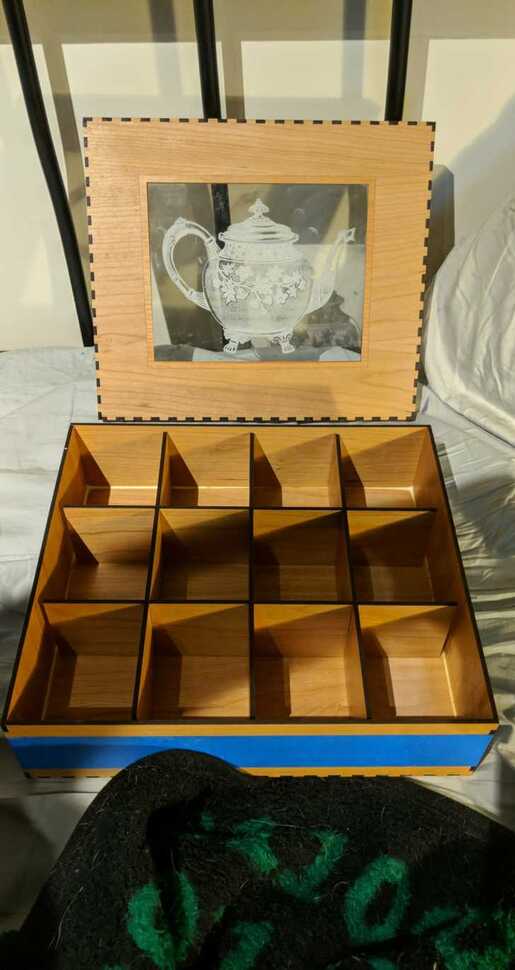
The tray insert gives you 12 partitions in the box. Cut TrayInsert.svg. It isn’t quite as snug a fit than I had planned, so you may want to glue the assembled insert in the bottom of the box.
When done, you have your own amazing version of this tea box.
I was attempting to cut your tea box, but the box pieces are too large to fit on the GF bed. How to you see the entire tea box bottom or top pieces and tell the GFUI to only cut what will fit on the currently loaded material (without reducing size of shapes)? I am a newbie here, I’m only used to using the Silhouette Designer software, so this is quite a change for me. In the Silhouette software, you simply move the pieces that you are not currently cutting, away from the cutting mat image. Just haven’t been able to figure this one out. Thanks so much for sharing your file and your time.
If you don’t have enough room for all of the pieces on one sheet, any piece that you drag off the artboard until it touches the gray area will be ignored. So you can space out the other pieces and then just put another piece of material in the machine and drag the uncut bits back onto the board for the next run.
Just to clarify, when you were saying artboard, did you mean the GF print area or AI? Just want to make sure GF doesn’t try and cut anything out of the safe area.
Four sheets in total. Cut the yellow box on the top. Had to fix several of the side pieces as tabs kept getting disconnected when I tried to drag them into the cutting area. Going to take a stab at fixing the files slightly more permanently to make it easier in the future. And to attempt to eliminate as much waste as possible.
I figured it was quick and dirty, the files certainly seemed that way, not complaining, or trying to point out anything I mean, you did upload them for free. We’ve all had those times when just knocking a thing out and worrying about the fallout later is just the way you have to do it. Like I said, gonna try to clean them up and re-upload them, if you don’t mind. The wife wants me to make a smaller version for findings, so I’d have to mess with them anyway.
I made mine out of cherry plywood, had to sand through to the cuts on one piece… not certain why, but it was the bottom so I could hide it easily. Refinished with beeswax.