I had used Sketchup before getting involved with the Glowforge but used it only for modeling ideas and not for real world construction. The awesome skills of the forum members like @karaelena and @henryhbk really inspired me to keep trying to learn either OnShape or Fusion 360. I kept dabbling with both but OnShape won the day for me with its cross platform, web browser utility. There is a drawback that my designs are public. Not worried about getting copied, more at getting embarrassed by my attempts.
It wasn’t until April that I finally crashed learned OnShape and was able to produce a design that worked well with the Glowforge and allowed me to resize parametrically. A simple enough shelf, but it took a long weekend to really get the basics of the workflow down and be productive. I know that this is bread and butter for a lot of folks on the forum. I just want to demonstrate that 3D design software is accessible and affordable and hope to inspire others to keep learning. The Glowforge just works. Don’t sweat too much about learning how to use it and and the stuff about settings. The most important thing next to having a good location and good materials is having good designs. Until the Glowforge design catalog goes live, you will need to learn design software to get the most out of your Glowforge. There are just few designs out there that you can print without needing to tweak it. So glad there are so many good free designs in that category on the forum for you to try out.
I was feeling a lull in the creativity with the production units coming out and my early version pre-release not quite able to have the full power profile available. I ordered a Prusa i3 kit and it was delivered after only a three week delay. The assembly went fine and after a little fiddling with getting the Z axis dialed in and understanding the PEI sheet and adhesion, I’ve been printing pretty much non stop for a month. After a few of the samples and test prints, I started focusing on fixing a few of the broken things that I would really like to keep around but are limited by having some small broken plastic parts. So I have already given examples in the main build and demo topic. This is for some other things I have since worked on: The Prusa is working flawlessly. Only one Chernobyl event caused trying to do two parts on the bed at the same time and not getting settings correct.
Nothing as intriguing as @henryhbk’s medical stuff nor engineered to perfection like @karaelena’s rotary device, but very, very practical.
The light switch knob for my brother’s 2002 F150.
What I got to work with:
![IMG_3769[1]](/uploads/glowforge/original/3X/5/e/5ec8187ef6100dd3523bb7d9572559327b6c3738.JPG) !
!
[IMG_3768[1]|375x500]
(/uploads/glowforge/original/3X/b/4/b49d007cb89c0c72bcb77978037c717ae7c8c63b.JPG)
![XNVX1109[1]](/uploads/db6859/original/3X/3/b/3b00cd8efbdb4a3b47e8088144d63e52a8f24949.JPG)

Eventually I got ahold of the actual broken knob and was able to make this:
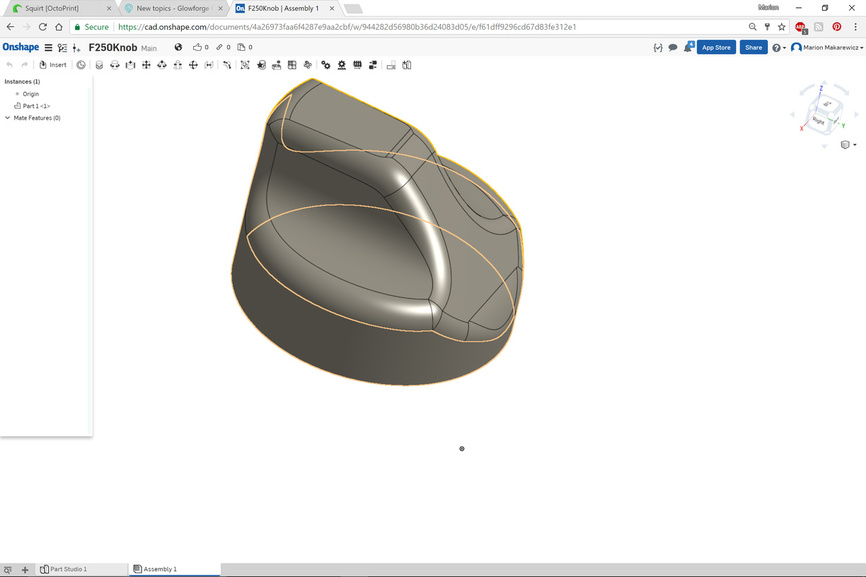
And finished knob that works fine.
![IMG_3721[1]](/uploads/db6859/original/3X/4/2/42e94043e3a67253920dcd4a45c3a6981a7e0bda.JPG)
![IMG_3720[1]](/uploads/db6859/original/3X/3/2/32f6b090c441bee8111dba8217763f4e59c48fde.JPG)
Going for functional here. I’ve since learned a bit more about the Prusa and getting better surfaces on the prints, but they just work great. I had to take apart the hot end and put it all back together and it actually is better calibrated than before now.
A raspberry pi camera mount.
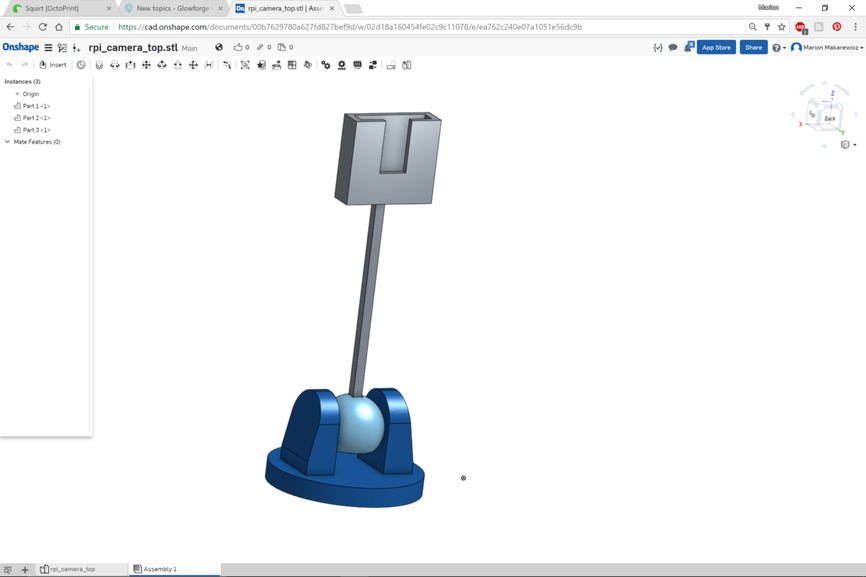
I took a design from thingiverse and redid it from the ground up to make it stronger and give it more extension on the camera post. It is now in use looking at my 3D printer bed and giving me a remote view on the print.
I have a laundry hamper that is about 15 years old. It works great. three mesh bags sit in a PVC frame on wheels. Over time the connectors for the PVC broke. I duct taped them but they didn’t quite work right. So I made much stronger corners and brackets. I think I might even make my own version of the whole set up. I need to get a three hole hamper set up for the Glowforge to put the cutouts and scraps into. The wood and acrylic just don’t work on the normal plastic bag and if I get some nice canvas bags I can collect the stuff for disposal or recycling. one bag acrylic, one bag wood and one bag other materials. Easy enough with the connectors now.
Broken parts:
![IMG_3733[1]](/uploads/db6859/original/3X/2/0/20d8be9c8b19c612212269e5e09c67e2d75d89c7.JPG)
![IMG_3732[1]](/uploads/db6859/original/3X/6/e/6e4b60f408d80791b4e28ea9b83da339763896c5.JPG)
Model
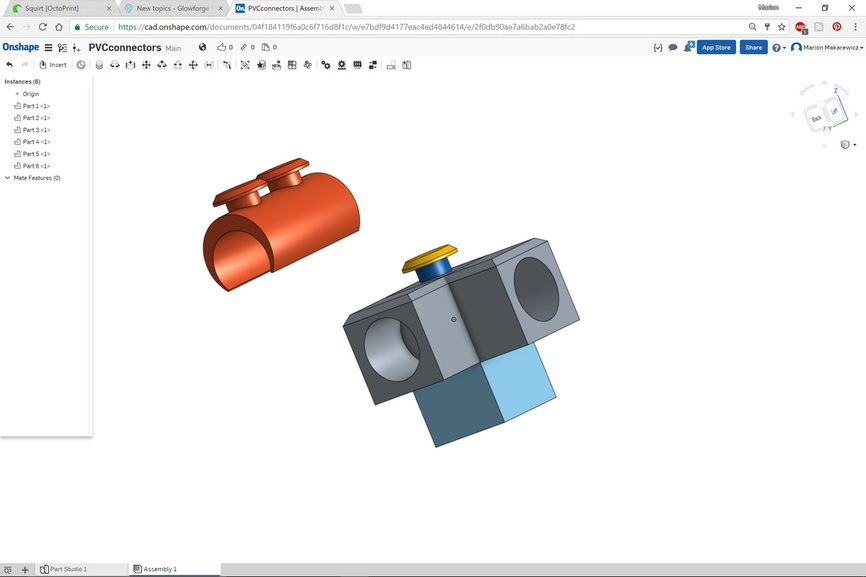
A couple corners and one bracket fixed. Did the other ones and it is more rigid than before.
![IMG_3738[1]](/uploads/db6859/original/3X/d/2/d2cb3fd12aded86d70ec99240e094278dd858e3c.JPG)
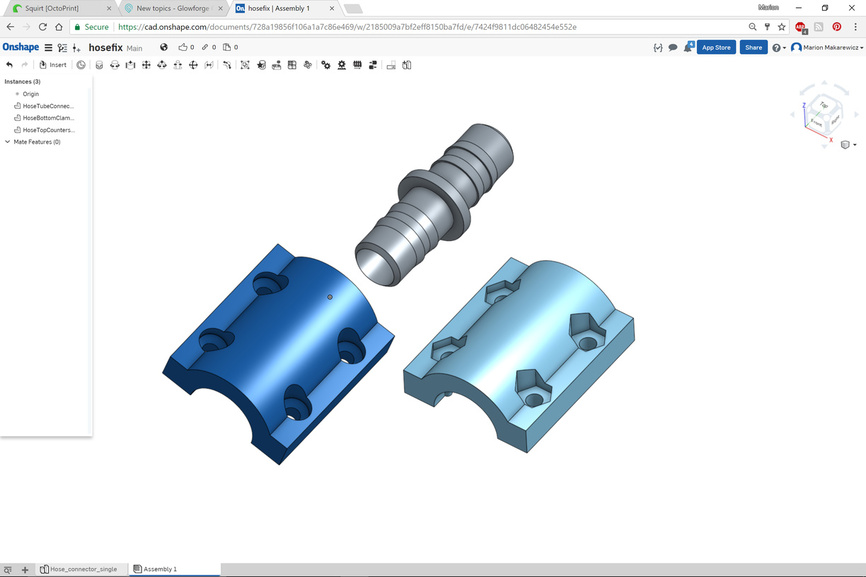
There are lots of hose clamps on thingivers (and one funny YouTube video where a 3D printing guy gives ten practical things to do with a 3D printer). I went ahead and designed my own using the chrome screws I had on hand. They are PLA at the moment, but will work for this summer until I get some more robust filament or get my enclosure done for ABS.
First iteration was a little over-engineered.
![IMG_3747[1]](/uploads/db6859/original/3X/7/1/71b0e3e64cfc11cda70a8555b3607c900463ab78.JPG)
Second one works great with just four screws. OnShape has a hole command that comes with standard profiles of nuts and bolts to get the countersink correct. The hex nut is simple enough of a sketch for the other side
![IMG_3752[1]](/uploads/db6859/original/3X/d/c/dcd8999e0be7328aca4d1dc8a1a5b6f3ed69c37b.JPG)
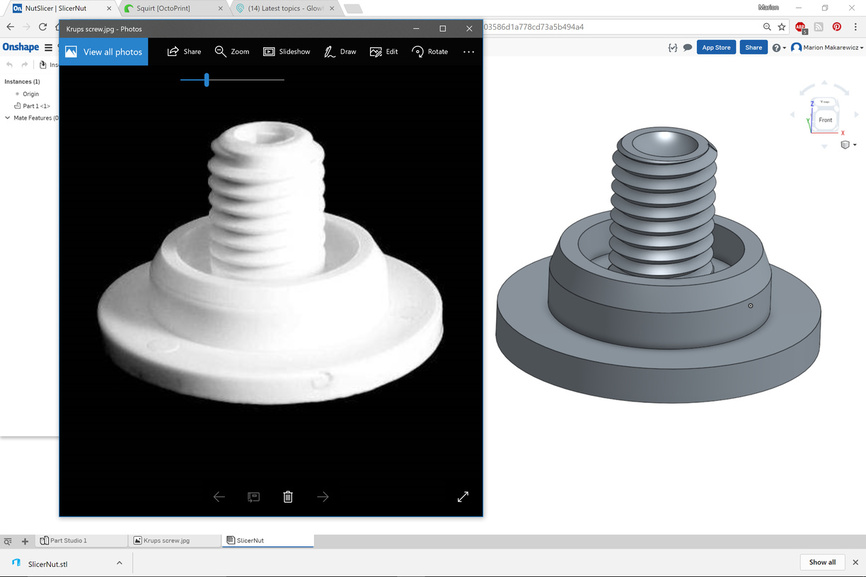
I have a decent Black and Decker blender that I use at my cabin to make up the pizza sauce. The ring that contains the blade unit and gasket that screws onto the glass pitcher has broken three times. After the first break, I ordered two replacements at the same time. The replacement was worse than the wimpy original part. Cracked when I screwed the ring in tight and not quite the full height to catch all the threads of the pitcher base. I did CA glue, I did epoxy, I did JB weld and nothing really worked but duct tape and just putting up with the leaky bottom.
![IMG_3755[1]](/uploads/db6859/original/3X/7/6/76ad3f975c20bf5cd6aff59e186d4a2601a3fde8.JPG)
This replacement ring was an important factor in the justification for buy a 3D printer. (rationalization?)
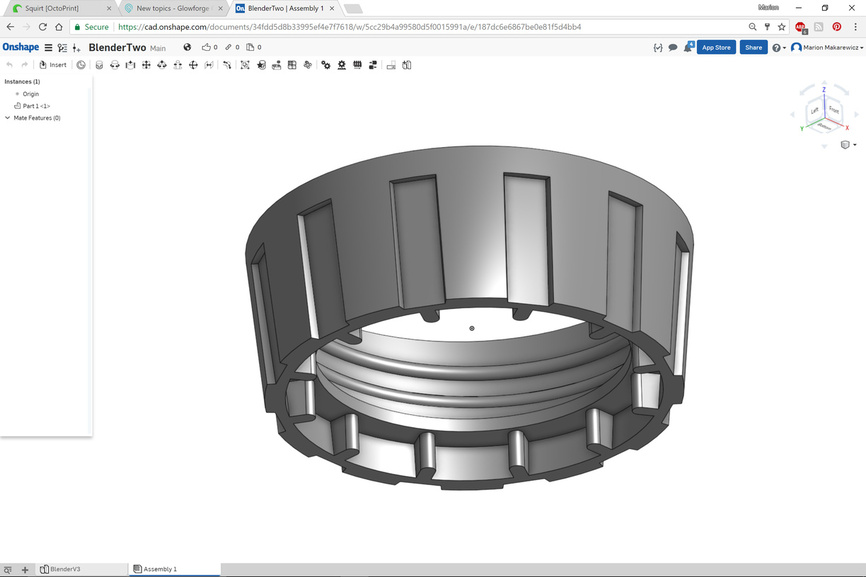
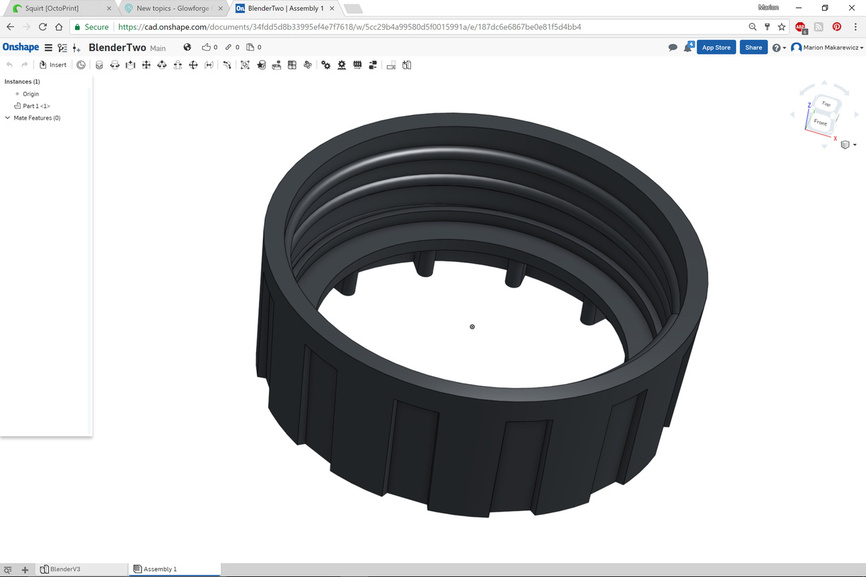
It’s has some complexity to it. I had to learn helixes, lofts and one big lesson about using thinking from every angle. I did my first model using a ring as the base profile and then used complex drafts to make the wider top and narrower bottom of the ring extruded up. When I was done with it, it wasn’t quite precise enough and then it dawned on me that I needed to do a front profile sketch and revolve around that to get the correct angle of the ring as it rises. So much simpler.
![IMG_3758[1]](/uploads/db6859/original/3X/9/2/925990ba31d05527007a7b2e33972fae11e5e345.JPG)
![IMG_3759[1]](/uploads/db6859/original/3X/b/7/b71897009ffe82958e6a239dcaba68e942afc1a9.JPG)
![IMG_3760[1]](/uploads/db6859/original/3X/6/b/6b72431be8e260c35d46a31eaebc7ad429570978.JPG)
![IMG_3762[1]](/uploads/db6859/original/3X/d/a/da32db79d64ebe8e693757dbadd082fd443af533.JPG)
![IMG_3765[1]](/uploads/db6859/original/3X/6/d/6defb47acd13b384ff429cd6a0f78bb2144b036f.JPG)
Reward for my labors. In the meanwhile I’ve still been doing a few things on the Glowforge. I have a project now that I am using the laser to make a part fast that normally would take a long time for the 3D printer.
So that’s what I have been up to.
 and a cnc.


![IMG_3798[1]](/uploads/db6859/original/3X/4/3/43a68b87fe034e24490dd6c296295d26cab31ba6.JPG)
![IMG_3800[1]](/uploads/db6859/original/3X/3/4/345cf88accf7d891a81c35b8cacf594e902204f8.JPG)
![IMG_3801[1]](/uploads/db6859/original/3X/f/e/fe3c3afab56653d59a453c9d480c90c1a61b649e.JPG)
