Congrats on your new GF and welcome to our little forum!
I tend to jump in with both feet full steam ahead too, but the tutorials really are helpful; have you gone through them yet and read up on what all the setting do? If not, it will really help you get better results and not waste quite as much material.
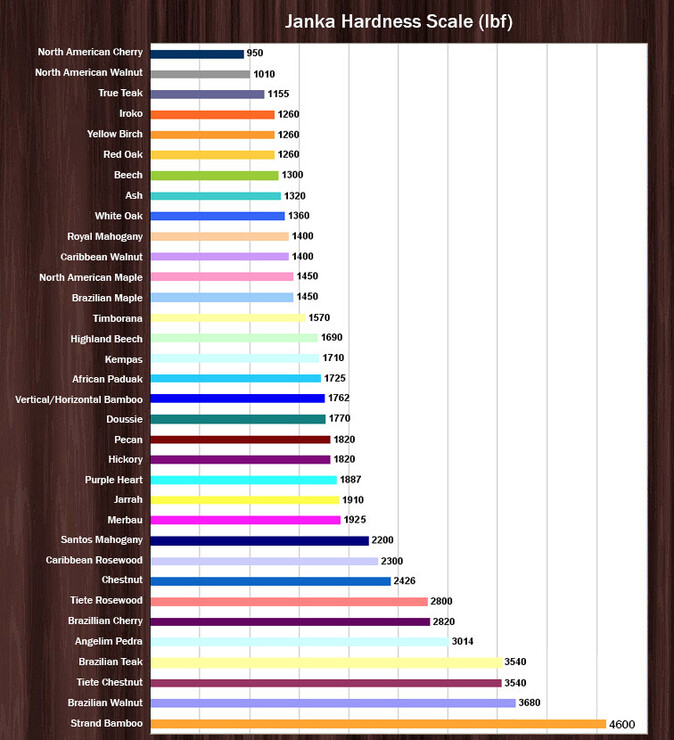
All wood has a hardness rating, and knowing it can really help determine what settings to use. (It’s called the ‘Janka’ scale.) You can look for a wood with known settings that has similar hardness and that will give you a starting point. (For example, I want to use Beech and it has a similar hardness to Bamboo, so I’d start with the Bamboo settings.) There also lots of info in the forum about testing new material, and it’s extremely helpful too.
And here’s a good starting point.
Vital info about what each setting does.
About material height:
There are two measurement the GF needs; material height and focus height and the difference between the two can be a bit confusing. The laser beam is shaped like a cone and the focus height is where you want the narrowest part of the beam hits the material. Most of the time (like 99.5% of the time for most people), you want the material and focus heights to be the same, and luckily the GF takes care of that for you. (Sometimes it’s useful to “defocus” the beam, and you can change the focus height manually. If you search the term you can find some good uses for it.)
The exact material height is needed for the GF to focus the camera on the top of your material so you can line up your file correctly, and that’s what set focus is for. (You can also set the height manually if need be, but obviously set focus is much easier.) Even when you don’t use set focus, the GF does its own auto scan and determines the material and focus height, but your file placement may be way off.