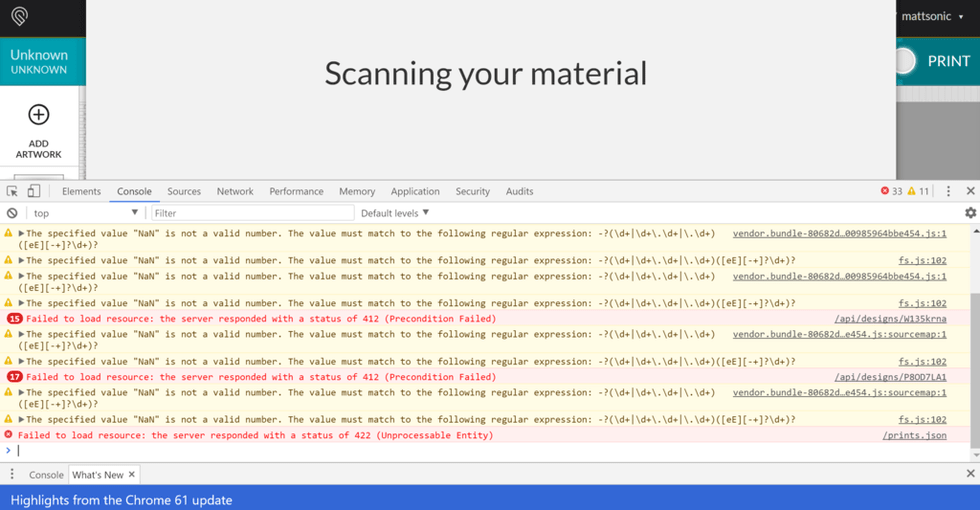
Unfortunately, I had several issues to the point where the device just isn’t functional. These issues include getting stuck in calibration, “PRINT LOAD ERROR” modal dialogs, “We’re sorry, an unexpected error has occurred,” and getting stuck in “scanning for material.”
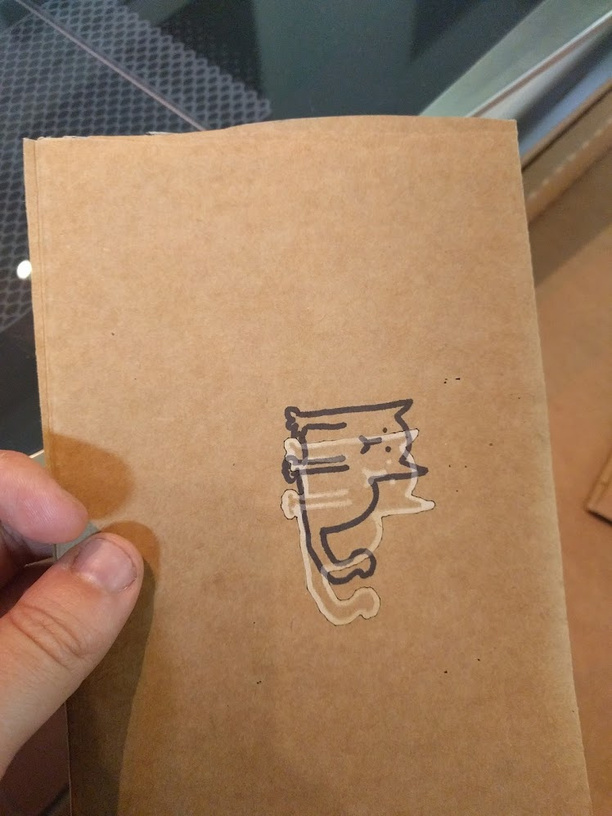
To take these one by one, the trace feature works offset to the right and sometimes stretches along the X axis. How does this issue arise and what are the fixes?
Looks like you’re using cardboard there…did you enter the thickness (in inches) of the material as measured with calipers in the Unknown Materials slot before attempting to scan the image?
Current status is that traces can be off by up to 1/4" at the far edges of the bed, but that assumes that you have correctly entered the material thickness first. If not, that can be a lot further off.
(And by the way, if you enter that thickness first thing when you open your file, the calibration is a lot faster.)
That’s a good suggestion. I did try that. However, out of what I would
guess was 8 power cycles, we only got it to print twice. And in both those
cases it worked incorrectly, as seen in the pictures. Seeing as this was my
first attempt at it, my success rate is 0 out of 8 tries. Was the cloud
service particularly bad last night?
I should also mention that it was a group of three of us trying to get it
to work. We’re all professional digital fabricators. I don’t think we did
anything ignorant in setup or use.
@Jules went right where I was going next. If you had your material height in there then you’re going to have to wait on support to get here
The only tracing issues I’ve had are to much fill area that doesn’t get included (like a solid box with a blob in the middle missing) which generally repairs by moving the image slightly left or right, or in extreme cases rotating 90 degrees. Those are the days I wish for basic paint tools or an export from the GFUI
I’m so sorry - that sounds like a frustrating start!
With regards to your trace, would you try one on draftboard and see if you get a better result?
For your printing overall, it looks like you are having Wi-Fi issues.
The most common solution to Wi-Fi challenges is to restart all the devices involved in connecting to the internet.
Turn off the computer, phone, or tablet that you’re using
Turn off your Glowforge
Unplug your modem
Unplug your Wi-Fi access point
Wait one minute, then plug everything back in and turn them back on
If that doesn’t work, we have more suggestions that often make a big difference:
Improve the signal path between your Glowforge and your Wi-Fi access point
Wi-Fi signals need a clear path. Remove physical barriers, and move devices closer together:
Move your Wi-Fi access point up high and make sure it’s in an open space. Avoid locating your Wi-Fi access point on the ground, under a desk, in a cabinet, or in a corner where its signal can be blocked.
Relocate your Wi-Fi access point closer to your Glowforge
Move your Glowforge closer to your Wi-Fi access point
Install a Wi-Fi range extender closer to your Glowforge
Run an ethernet cable and install a second Wi-Fi access point next to your Glowforge
Reduce electronic and Wi-Fi interference
If your unit is near other devices that use Wi-Fi or a large number of electronics, temporarily turn off other electronics and devices in the area.
We’re not finished! If the trouble continues:
Sign * on to your usual Wi-Fi network (the one your Glowforge is on)
Put the device on your Glowforge and navigate to speedtest.net
Press “Go,” then wait for the animation to stop
Send us the following:
The Download and Upload numbers displayed after the speedtest ran
A description of what’s happening, what you’ve tried, and what results you’ve seen so far
That’s correct. This process worked about 1/3 of the time. The other 2/3rds of the time were various classes of errors. It could be WiFi issues, but all other devices (a laptop and three phones) are all connected fine.
The Glowforge would always get the pic and accurately vectorize the outer shape. However, in cutting it’s always off.
My suggestion to the GF community would be to use more standard names for materials vs Proofgrade-specific ones. Unless draftboard is truly a uniquely new synthesis of materials.
While it can be confusing, in this case it is supposed to be very specific. That piece was specifically included for running test results as asked for by support for test purposes such as this. Glowforge ought to know exactly what you’re cutting with(eliminates some of the unknowns to help diagnose and all that).
It’s not that it’s ‘a uniquely new synthesis of materials’, but rather a uniquely known synthesis of materials. There is a huge variety in MDF, which leads to differences in settings needed to cut through. GF knows the exact behavior of Proofgrade Daftboard, and so can set the settings for best cutting. I believe they assume their target market wouldn’t know the differences between MDF and OSB and glulam and a capybara, so they don’t bother with standard names.
Note this also means that their plywood isn’t what digital fabricators would call plywood.
I don’t think WiFi is the issue. The Glowforge’s software endpoints are failing. Sometimes it’ll work, sometimes it won’t. I get success about 1/4 of the time. I don’t think there’s anything I can do to address or improve the issue on my end:
I have the same problems with alignment being way off no matter how many times I refresh the bed image. Example… Having set all the parrameters then setting depth etc of 1/8" none proof grade plywood. I ran a test cut. After cutting I could see that the cut had not enough power to go all the way through. So back to the mac without changing anything other than power level to full and then repeat print/cut again.
This time it cut all the way through but was offset by approx 3/8" Now that I’m using the GF more for testing materials I can see that the image alignment is horrid!!. So seeing that this machine is two years plus in development and this basic feature of the machine is not working to what was sold me. I’m beginning to think that the Pro pass through feature will never work since it requires dead accuracy to match longer than bedside cuts.
Are you saying you placed an object on the bed, cut it, found it to be not enough to cut through, went back & changed the power and hit Print again but did not move the material or move the design and when it cut the next time it was off by 3/8"?
Or did you move the design piece somewhere else on the material, changed the power level and then saw that it was 3/8" off from where you thought you placed it?
If it’s the former, that’s a problem. While the view of the job after it’s run will look offset on the bed, hitting print again but not moving anything should drop the 2nd operation exactly aligned. If it doesn’t that’s a problem. It will look off if you’re looking at the magenta lines in the GFUI vs the cut that you see on the material on the bed, but it will not be displaced if you don’t move anything.
If it’s the latter, and it really is 3/8" and not just approximately, then your machine is out of spec - GF says that at the current state of the software, 1/4" at the edges is acceptable. If yours really is 3/8" off, then that’s out of spec.
Put in Proofgrade. Hold it down dead flat with magnets, only held down can you be sure there is zero warp. The smallest lift will show huge error in the preview image. Run a simple cut, maybe a small square or even the test ruler using automatic settings. Only then can you see the real error offset. If it is less than 1/4" the intent is to update S/W to reduce it.
If you see less error than you originally thought there are user induced sources of that extra error.
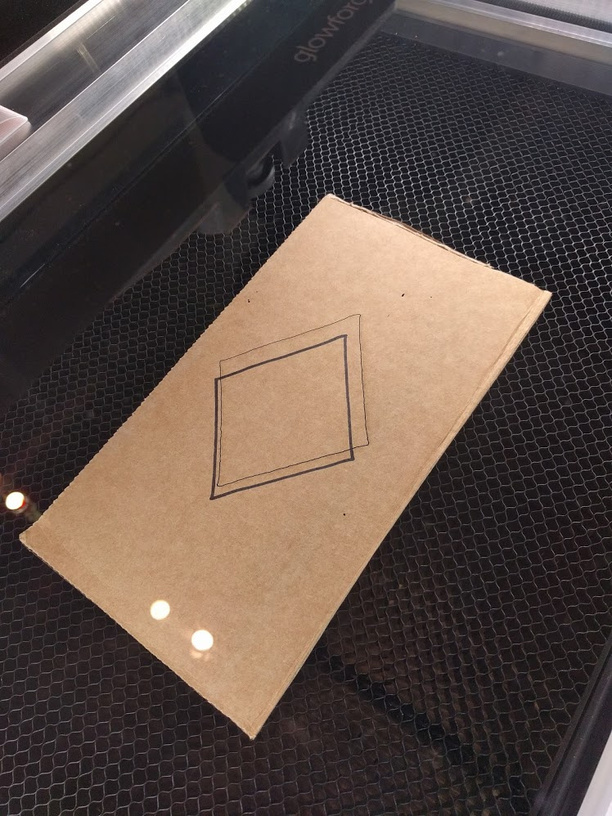
I should mention this is a trivially simple design. It’s an SVG of a square with an oval in it created via Illustrator. It sometime will work and sometimes not. It can’t be a file issue.