Quick tutorial for those of you that want to make a stamp with a sloped profile, but dont want to mess with 3d generated depth maps. This is really helpful when you have thin areas or small details standing by themselves.
Bring up the logo you want in your image editing software. For this example Ill just use the unity logo
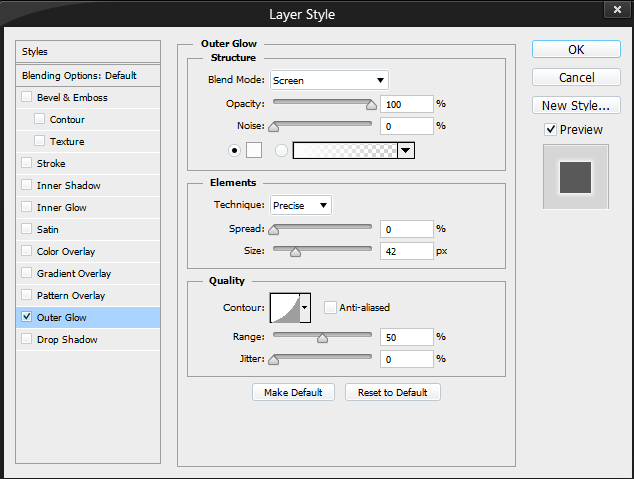
Next open up your layer effects on the logo itself and go to outer glow. Follow the settings in the screenshot as a guide. but make sure to set the size of the glow to what best suits your material. firmer materials will need less support.
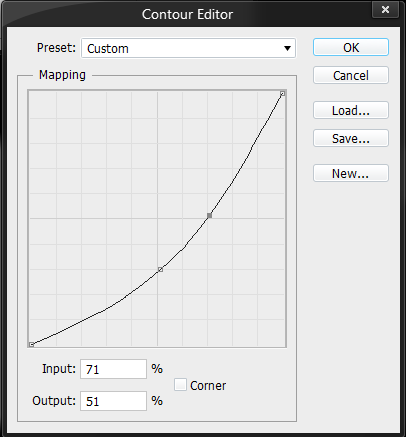
Now for the contour at the bottom you will want to play around with this setting a little. A straight contour will give you a little bit of bleed at the edges, but provide more support. Using a slightly more arcing slope will give you a bit more edge definition. This is going to need to change depending on how squishy your material is, and how thick your ink is.
More squishy materials will need more of an arc to prevent bleeding than those that are more solid.
In the end once you get everything set you should have an image that looks like this:
The harbinger of the machines.
Are you the Oracle?
What’s really gonna burn my noodle is, would I have lasered it if she hadn’t said anything in the first place? But I don’t really believe in any of that stuff. I’ll have a cookie and by the time I’m done eating it, I’ll feel right as rain.
I used to live next door to some Rev-Heads (sigh).
They had amazing skills with fixing, modifying and making cars.
I asked them one day “You guys are so skilled, but you work as Joiners, why aren’t you doing car work? Mechanics, or Custom modding etc”
They replied, “…because we like it too much, if we started to do it as work we would stop enjoying it in our spare time”
For me Unity/C# started out as a Hobby but turned into a semi-lucrative side business.