How am I supposed to cut down on commenting when you come up with stuff like this? ROFL! ![]()
14 Likes
This cracked me up! Dare I say how far this might be taken…?
6 Likes
Such a cool stamp holder, too. Looks great!
1 Like
One added detail: put an engraving of just the initials on one side of the handle before assembly and match that with the top of the stamp. Didn’t think of that ahead of time to allow for stamping in the correct orientation
13 Likes
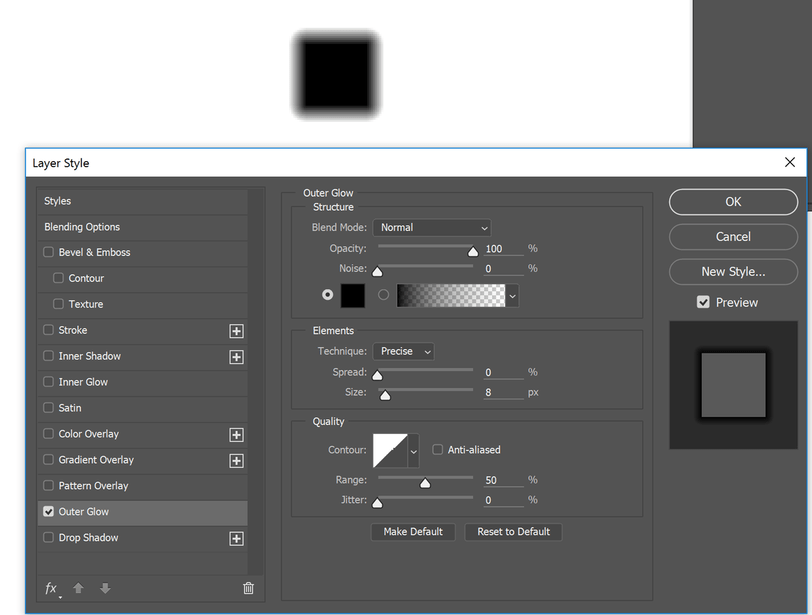
I haven’t tried rubber stamps, but if you wanted the effect of “rubber stamp mode”, I would try the following.
- Create your design in white (although my example here was black)
- Select the layer with your white design on it
- Set an outer glow for the layer with the options shown, except select white instead of black (in the color selector just underneath “noise”)
That should give you a gradient that rolls off to black (as shown, it rolls off to white), which will be treated as the rounded corners you were looking for when you engrave.
41 Likes
For real?! That’ll work?! I wanted that to be true! I’m REALLY happy about that. Now if I only had a super-cool lazery thingy…
12 Likes
I don’t know as I haven’t tried, but some variation on that should.
There’s a similar option with Illustrator and effect…outer glow, I think. You’ll need to rasterize before printing it, though.
9 Likes
Yep. You’d mentioned that on a similar post the other day. VERY cool. I want to try it so badly now!
4 Likes
I’ve been seeing others asking on the forums and waiting patiently for someone to finally show that yes, you could create your own rubber stamps from scratch with a Glowforge—thank you for confirming this! Ingenius job on a quick/simple handle too.
5 Likes
And on Corel, some version of the inside/outside feather should have the same gradient effect as the glow feature.
5 Likes
I played with Inkscape which has some text filters, but didn’t see an obvious solution. Actually Gimp might be something to try this out on. I figured I could just do an outset of a letter shape and make a gradient fill from the inner path to the outline path. Didn’t figure out a way to do it so I let it go for now.
It would be interesting to see how the height of the relief/depth of the engrave and narrowness of the material left affect durability in the natural rubber. Worked fine for this as a start.
2 Likes
Great project! This turned out really cool I think. Thanks for the inspiration
1 Like
Old printing plates used to have just a tiny bit of height difference just around the parts that needed to be printed, then a much deeper cut a bit further away. I wonder it you could do something like that, with a stepped engrave instead of the roll-off.
4 Likes
I think @paulw has the right idea using a stepped engrave instead of gradual fall-off. It should save time, and the idea behind it is improving stability so the finer details dont get pushed around while the stamp is being pressed down.
The stamp itself, I dont see physically wearing down over time unless it’s used in some serious high volume stuff or on abrasive surfaces, or maybe using caustic inks and cleaning solvents like those used for screenprinting on vinyl and plastics.
Or maybe just a shallower engrave overall would achieve the same affect.
4 Likes
Pretty dang cool. Now I have another item in my “to try” list. At least my son’s forehead won’t be safe when I see him. (In scouting they learned to NEVER be the first one to fall asleep or wear a sharpie mustache to breakfast!!)
2 Likes
That Photoshop dialog has a box labeled “contour” - theoretically it should map to the shape of the falloff, so you can tweak it however you like.
6 Likes
Ive got a couple of stamp blocks sitting around uncut. I can potentially try this in the next few days
7 Likes
I’ll look forward to that!
Bumping this up: There are a couple workflow issues I am trying to figure out to efficiently make these stamps. One is that Inkscape, When doing an exclusion or intersection it leaves the stroke out. I may be missing something here. I also needed to work on the Glowforge logo a bit since it ended up a bit too thin in the PNG I exported.
So I export a PNG with the reversed negative image for the engraving. Then I have to have a rectangle to cut out the whole stamp (which at 90% power at 20 in/min didn’t go all the way through the .08 rubber. That rubber is tough! I’m still trying to figure out what is the most efficient way to do a design like this, but for now it works.
Additionally, I worked for a little bit after services today seeing if there were a simple way to do a gradient fall off of text in GIMP. There is a workaround with the Light and Shadows filter, but it was not quite what we need. I don’t know how essential it is to have the support for the rubber, but it’s pretty cool what I have right now!
Also, it’s pretty retro. I could engrave a hallmark on any object I print, but I make a rubber stamp. Interesting.
10 Likes
I’m following your rubber stamping adventures very closely and really appreciate all your testing. Here’s an unrelated tip (from someone who has trimmed a LOT of rubber stamps): You can make that ghosting halo when you stamp go away by trimming the stamp very closely to the stamping portion. You really only need a fairly thin margin of rubber to support the stamp, the extra will just mess up your stamping every time. If you can also make the stamp support (wood) follow the shape of the stamp as well, that would also help but is not necessary.
13 Likes