USPS Keychains

I’ve always wanted to share some free files here, but I wasn’t sure which ones I’d actually like to share. Well during last month my wife bombarded our local post office with a ton of packages to mail out. They’re really great people and helped her out, and are always willing to grab my packages from the back even when I show up without the ticket for them :sweat_smile:

I’m sure I’m not the only one that was impressed by their local post office, so here is keychain design that you can print out for them and share some love! I actually intended to make some ornaments for them but Christmas came and went, so they’re just gonna have to put up with a reminder everyday instead of once a year :stuck_out_tongue_winking_eye:

USPSKeychain.zip (36.2 KB)

Here’s a pic to show you what they look. I should mention that I took out the name of my office as well as my signature, so you can use it as is, or add anything you like. The design is from the logo previous to the current one. I just liked it better, and recreated most of it:

97 Likes

As usual … high quality design by Ray :glowforge::sunglasses:

3 Likes

Oooh, one of those would have been handy to have this year. (We’re breaking in a new mail carrier.) :grinning:

7 Likes

Haha, thank you!

I like that rounded rectangle shape—it’s a bit unusual.

2 Likes

Great engraving, thanks for the file.

2 Likes

Thanks for the file!
I have a number of friends that work for the postal service. I’ll be printing some out for them.

2 Likes

Thanks! It’s just an extension of the original design, really. Somebody somewhere in the government thought it up way before me :grin:

1970-standing-eagle-logo

@curt no problem, I didn’t used to have friends there, but I sure do now! I’ll be swinging these by in a couple of hours, hopefully whoever is there gives them out to the other people who work there haha

1 Like

Beautiful work. I am completely new to this, received my laser last week. Thank you so much for sharing this wonderful design, I hope to print it some day, when I figure my printed out

3 Likes

Just make sure you learn quickly about turning layers off and on, that’ll save you a lot of headache :grin:

Still to this day, after having mine for over a year do I forget to turn layers off and ruin a project from time to time :grimacing:

:worried: Never been so nervous in my life, but Thank you so much for your reply and advice!!!

1 Like

Thank you for this! My best friend is a postal carrier and I will make her one!! You’re awesome!

2 Likes

You’ll do great! I made a list of rules to follow before doing a project, might be something to do for yourself just put it somewhere you have to look like a sticky note off of the side of your monitor :grin:

2 Likes

Welcome to the fun.
Start with stuff that can fail. No need for nerves… until you have somebody’s one-of-a-kind thing and they’re like, “no problem, just engrave it.”
And you’re like… “ummmmm…”
Hehehe.
You can try again on most things. Iterate in cardboard (WATCH IT) and enjoy.

Beautiful and thoughtful gift. I love these.
Well designed and pretty.

4 Likes

Beautiful and very thoughtful.

3 Likes

Oh I was supposed to post a pic of the rules I made for myself. I made them in veneer and stuck them right to my laptop!

15 Likes

These are very nice! I currently don’t know anyone with the post office … but, I’m very fond of using their facility. We never see them as they deliver at the roadside box.

Thank you for sharing your file!

1 Like

Wow, i cant wait for my plus to come next week, it seems your design is two sided, how do you cut and print both sides?

1 Like

Very kind

1 Like

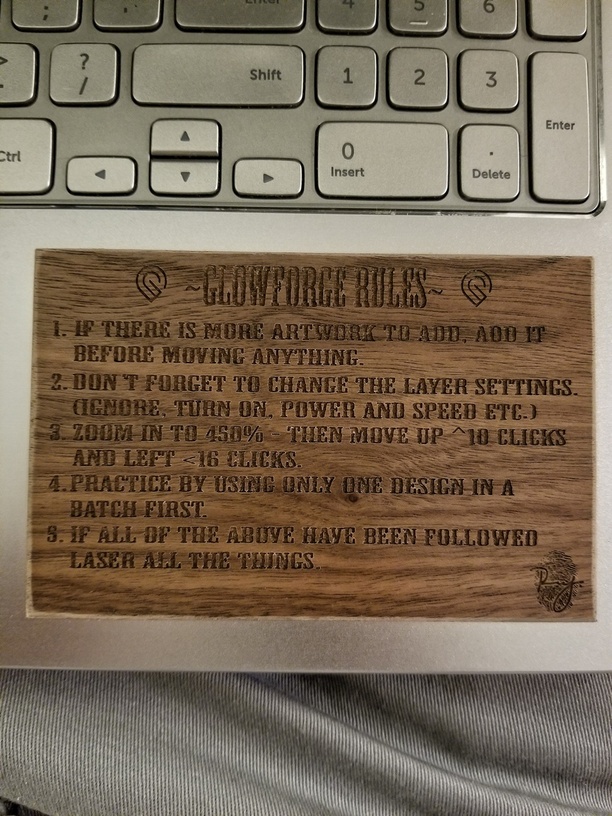
If you’re anything like me, you’re gonna have a failed print from time to time because you forget to turn layers off and on. In this case, that’s exactly what you’ll need to do! I’d say if you haven’t looked into ways to hold your material down while in the machine, now is the time. Between the holdown pins, or magnets, or whatever, it’s up to you what works best. In my image below you’ll see the magnets I used previously, but I use the pins almost every time, as well.

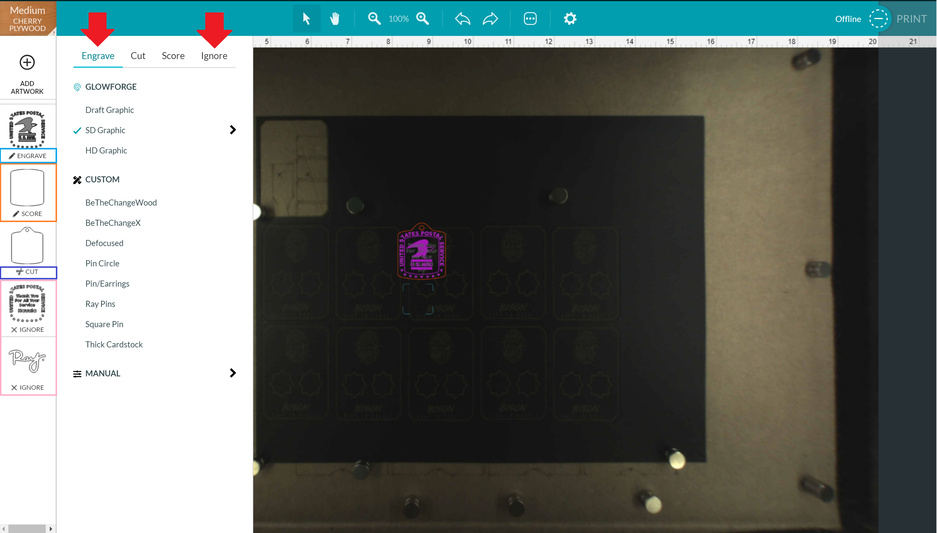
I’ve highlighted some important things you’ll need to know in this picture below:

It’s a fairly symmetrical design, so on the first side, you would turn layers off by clicking the step on the left, the prompt will pop up with options (ignore anything below custom, as those are my personal settings and you won’t have them until you make some of your own): It’s as simple as clicking on the word “Ignore” for it to ignore a panel, and it will let you know it’s ignored by saying “X IGNORE” on that panel, but it won’t move it’s place. I tend to move and group the panels after they’re uploaded by what steps need to happen in what order, and have highlighted the ignored panels with pink. If you become really proficient, people have found which colors correspond to the Glowforge order of operations, so you can set your files up accordingly, but I change colors in my files occasionally, so I don’t worry about it. Stroke lines are, at default, set to cut, so be aware of that when loading a design, in my photo I’ve highlighted the score orange, but again, this started as “:scissors: CUT” and I changed it to score manually.

With that said, after finishing the first side, you would ignore the stuff from the first side that has already been done. In this file, that would be whichever image you engraved first, and the cut, as the score can be done on both sides, it’s okay to leave it on. Flip over the piece(s) you cut - this is why it’s a good idea to pin down your material - and turn on whatever panels you want to be done, and print!

I don’t know how much of that made sense for you, but hopefully you get it down pretty quick. I haven’t messed up a print knock on proofgrade, for a while due to forgetting, but it took me at least a year before I was able to say that. Feel free to search the forum for any questions you may have whenever the need arises, and always be comfortable with asking for help. This community is full of great individuals who are willing to walk you through anything they’re able to help with.

Hope this helped!

4 Likes