Vary power glitch (+ workaround)

I’ve been trying different ways of engraving cork photo coasters (per my other post) and encountered an unexpected behavior with the “Vary power” option. First, the photo, followed by the result:

high_contrast

See those weird black lines? The laser is firing where a reasonable person would think it shouldn’t be. I spent a bunch of time investigating, and here’s what happens: the file I’m uploading is an 8-bit grayscale PNG, so let’s say it goes from 0 (black) to 255 (white). The parts of the image that are full white (255) never get zapped, no matter what the settings are. Even turning the min power up, it affects the rest of the image but ignores the whitest whites, which makes it really easy to see the spots. Here’s what it looks like on screen with min power low:

and turning it up to expose the behavior more clearly:

Ok, so I could sort of live with this even though I personally find it counterintuitive. One might say “we need to reserve maximum white for a background that should never fire”. But for my money, that’s what transparent means. Still, some formats don’t have transparency, so by some logic it makes sense… :shruggie:?

But back to what I actually got out of the machine. What’s the deal with outlining all of the white areas with a black line? That, IMO, is a bug. It doesn’t do that in dot pattern mode. It doesn’t make any sense to do that. I think there’s a math problem somewhere in the code.

For comparison, here’s the exact some file but using “Convert to pattern”. No weird outlines produced.

Finally… the obvious workaround is to not have any pure white in the image. I don’t know if there’s an easier way, but I did a select color range in photoshop, highlights, fuzziness 0, range 255, and then filled the selection with 254,254,254. More pain in the butt preprocessing.

Now, having invested a couple of hours finding, characterizing, and describing this bug with examples and a recipe for reproducing it, will it be closed because this isn’t Proofgrade? I’m on the edge of my seat to find out.

21 Likes

FWIW, I am trying to reproduce this on Proofgrade, but the difficulty is that the PG materials don’t engrave at very low power, whereas with cork all you need to do is look at it funny and it carbonizes. Those black lines that aren’t supposed to be there aren’t strong enough to make an obvious dent in my Draftboard. But you can see it if you look closely. Here’s a test file (link to PNG: Dropbox - Error - Simplify your life).

gradient_test

As you can see, it should be a box with a smooth gradient inside. But look closely in the white part here (full size helps):

See that vertical line? It’s doing something funny in the transition between 254-white to 255-white.

14 Likes

What happens when you try with a PNG24 version instead of PNG8?
(Will it even let you upload a PNG24? No idea)

2 Likes

I’m sorry you had trouble with your engrave. Thanks for posting this and for documenting all of your research. We’ll have our experts take a look.

2 Likes

Yes. It will upload and process PNG-24.

I don’t know what program @chris1 used to save the PNG…

I don’t know what the default compression and interlacing do for example on Photoshop’s Export function. When you do a Save As PNG, it gives you options to select (and also automatically saves it as a PNG-24).

Compression shouldn’t matter - since PNG is lossless compression.

I wonder how interlaced could possibly impact it, given that interlace is a web option and we’re working within a browser…

I really don’t feel like burning these. But, I did load up a few examples of a gradient file, like Chris created and then saved different ways.

On the left is a PNG24 with compression as none, interlace as none. (Save As)
In the middle is a PNG24 with compression as smallest and interlace selected. (Save As)
On the right is Photoshops Export and the only modification was making it PNG-8.

They show up significantly different for all being the same file (all with the same “Convert to Dots” setting).

12 Likes

Holy crap! I’ll say!

1 Like

Yeah, I figured something like this. I’ve seen other programs butcher 8-bit PNGs as well. I’m glad that switching to 24-bit improved it.

1 Like

Bit of a tangent here, as usual. My file is not “butchered” by Photoshop, as you can see. And the problem is not in convert to dots mode – in fact, that mode works fine. It’s vary power that generates a phantom line between white and almost-white. I know what to do to avoid triggering the bug, but the bug exists and it’s on the Glowforge side.

3 Likes

Fair enough. I wasn’t meaning Photoshop was the application at fault. I’ve had it happen with a variety of applications, mostly open source from what I recall, but it’s nothing I really bothered to track. I suspect ImageMagick libraries, which Glowforge might be using on their backend.

Looks like your vertical lines are wobbly too. Is this normal?

2 Likes

I set the LPI low on that particular test, to save time.

1 Like

This might be faster : make sure you’re in RGB mode on a flattened image without any transparency, with nothing selected open the Hue/Saturation adjustment diakog (ctr+shift+u) and drop the third slider, Lightness, down 1 so it reads “-1”.

9B3691E9-316C-47FA-8350-A8472C119F76-6256-00000643A3BBA409

This will darken your entire image a tiny bit but you will no longer have pure white. If you want to do this non destructively or you don’t want you flatten your layers you can apply as an Adjustment Layer above all other layers instead. And if you think you’ll be doing this a lot you can record an Action to apply the workflow in 1 click in the future.

Another way : set a new layer above everything filled with 1% gray and change its blend mode to Darken or Multiply for a similar effect.

4 Likes

Thanks. I’m working in greyscale mode on an image with transparency. Also, since there are specific color values here, I want to be sure to make a very specific transformation: 255 -> 254. It’s hard to say what “-1” does, and 1% is definitely too coarse (1% of 255 is 252, so there’s a loss of range there).

So even when Glowforge fixes the weird black border problem, there’s still the issue of what to do about treating maximum white different from near-maximum white. It’s a bit of a tricky problem if the product requirement is to reserve a color that implies transparent but isn’t actually. At the very least this needs to be documented somewhere as it can lead to surprising and non-intuitive behavior. My personal preference would be to not do this for file formats that support native transparency.

4 Likes

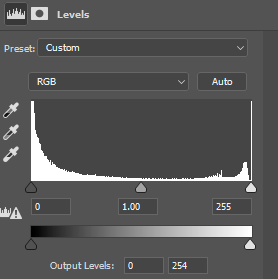
The levels tool would be the best way to go about scaling everything down properly. Just change the output level max from 255 to 254.

image

8 Likes

Perfect! Love it. Takes two seconds, and can be added as a nondestructive filter layer.

1 Like

I’m glad you’ve got a solution for now. Thanks for the help @takitus! We’ll keep working on improvements.

1 Like