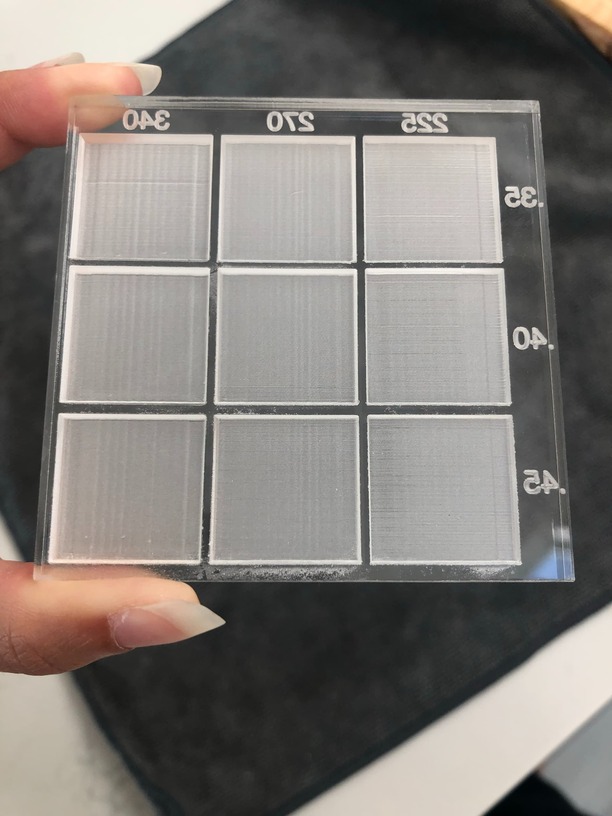
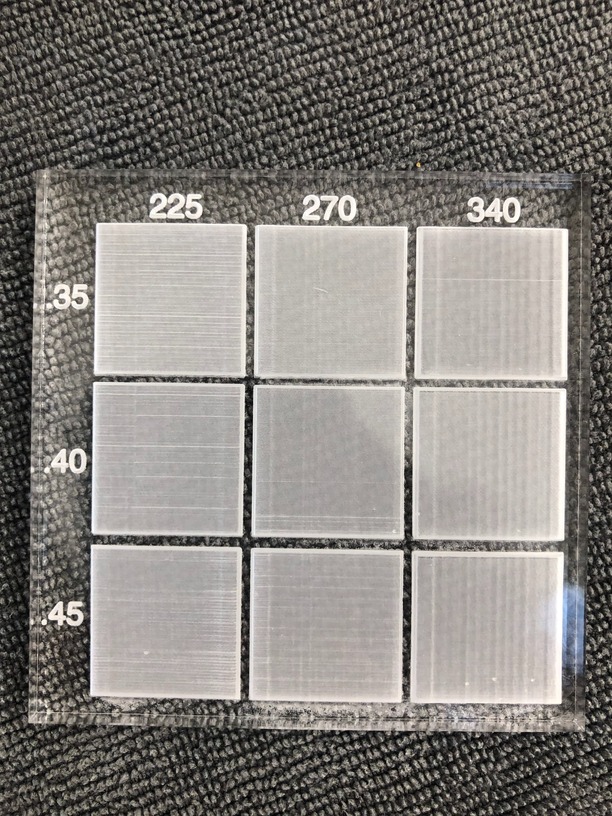
I’m trying to do a deep, defocused engrave in 1/4" cast acrylic. I used the method shown here (Guide to Defocused Acrylic Engraving) to test out some different defocusing heights and LPIs. My issue is that I’m seeing some vertical lines in my engraves, which I presume to be some sort of artifact.
(Sorry for the mirrored labels…I use these as embossers, so I wanted be able to read the labels when I tested it out). The LPI varies by column (225, 270, and 340) and the engrave depth by row (0.35", 0.4", 0.45". These are larger defocusing heights than the video because he was engraving 1/8" acrylic and I’m doing 1/4"). I engraved this test piece in the center of my Glowforge. Other settings are speed = Full, power = Full (Glowforge Basic), Grayscale = vary power, and passes = 2 (I need a deep engrave for my application). I know most people don’t need their acrylic engraves to be as deep or smooth, but my application uses these embossers/stamps to add patterns to a clay-like substance, so artifacts like this show up on my finished piece.
My test grid file is made of solid black svg squares created in Inkscape, so I don’t think it’s something to do with the file. I’m worried it might have something to do with the mechanism moving the printer head along the x axis; a result like this indicates to me that the mechanism isn’t moving completely smoothly. These vertical lines are apparent in the same place in the first engrave pass.
When I look at examples of other people’s work with acrylic, like in the Edge-lit crowd, I don’t see anyone else having this problem. I’d love to be able to get completely smooth, defocused engraves (who doesn’t!). If anyone has some experience with defocused engraving of 1/4" acrylic, I’d love to hear your thoughts (and settings, if you don’t mind sharing!).
The manual focus height is set to “thick acrylic”, so 1/4".
Maybe I’m misunderstanding, but I believe my engrave is a solid engrave…vary power is just a required setting to tell them machine how you want it to handle greys (the options are convert to dots, convert to patterns, or vary power, you have to select one), but my design doesn’t have any grey so that setting doesn’t actually come into play.
Also, I forgot to mention that I remove the paper masking before engraving and mask with dishwasher soap. So it’s not due to variations in the masking material either.
It doesn’t sound to me like you are defocusing the laser. To defocus, you manually input a height that is significantly different than the actual height. You are engraving 1/4" acrylic and telling the machine that it is 1/4" acrylic. That doesn’t defocus the laser.
I misunderstood your question. The material (for focusing the camera) is set to “thick acrylic”. The actual laser focus height is noted in my original post; 0.35", 0.4", and 0.45".
Thank you for your advice, I’ll check the color code when I get home. Do you know if it’s sufficient to check it in Inkscape, or should I open the svg in Photoshop to check the color values as a CMYK file?
Both of my passes are defocused, because it’s easiest to create the custom engrave setting that way. To do a regular pass and then a defocused one, do you need to create two layers, use different settings for both (same LPI/speed/power, but different focus heights), and then align them? That would add up to a lot more work since I usually print multiple designs at once, but I’m willing to test it out to see if it helps. Do you know why people do it that way instead of defocusing both passes? My guess is that it helps with a deeper engrave, or more defined edges, but that’s just a guess. If anyone has some experience doing that I’d love to hear your thoughts.
Hi Sam !
Welcome to the fun house!
When using low speed and low LPI any digital drive has a yes/no level that makes that vertical line (I think) It does not stop but the slightest change in speed will leave a mark. And of course each line will be like plowing a field. Defocusing will make those plow lines less obvious but they will still be there.
My personal solution is to max out the LPI and the power, and make up the difference in speed, or if still too strong at max speed cutting back on the power.
You have to experiment and watch the experiment like a hawk as starting a fire doing such experiments is a low risk but just one fire not caught in seconds can ruin your entire day.
Doing variable engrave will not have the full effect of 256 shades of gray if at some low power and your image does not go from full dark to full light, but fortunately the possible speeds are much higher.
The lines (I call it “banding”) has been documented many times, I have a thread from a few years back somewhere showing it. Support has never addressed it. It’s just an artifact of how the machine works. It happens at all LPI settings but some are worse than others.
Here’s a post showing it at various LPI settings. I thought I had a thread about this but couldn’t be bothered to dig deeper. These are all solid engraves.
I’m not well versed in Inkscape as an Illustrator person, everyone keeps saying it’s similar. in AI it’s very easy check color codes, you just select the object and then double click the swatch in the tool palette. In general I wouldn’t translate to another program to find issues, stay in the source.
As for the two passes, regular pass(es) get you to the depth you want and then the defocus is just to smooth it out and in most cases you want those settings to be a bit different. As you’re seeing imperfections, running the exact same settings/pass twice only compounds them.
It’s not much extra work, in one file make two copies of the engraved part exactly on top of each other (make them different fill colors if vectors. Don’t use vary power as your engrave method) - that way they’ll import to GF as different steps and be aligned already.
You can save your favorite settings so they’re quick to apply to each step.
It is available in Inkscape and will be accurate. If I want to make several things the same I can either use the Eyedropper on the color I want, or just make them a different color. They are so easy to adjust the order in the GFUI I mostly seek other needs if any at all.
I have not found this. With most wood there is usually a limit set by (or at least covered up by) grain, but acrylic has no such covering available and any horizontal or vertical “grain” caused by engraving will mess with say radial symmetry, even to the point of how a small shape turns out.
In this example, there is far more grain from the video screen I used for backlighting than the cut…