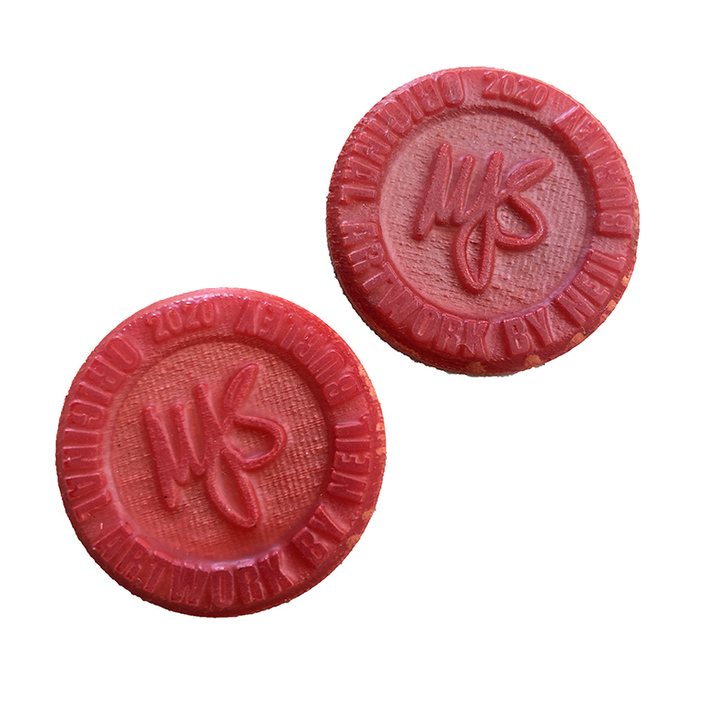
I am a mixed media artist, and would love to sign off my work with a wax seal. Having tried various means of making my own stamp, I gave up. It was also complicated by my design having an area where there would be trapped air - not good as it squeezes out and ruins the outer ring. After some trial and error, I have made these with my GF…
They are cut from 3mm red acrylic (PG 3D engrave settings, vary power, 675 lpi) and then painted with molten beeswax. Once the wax has cooled completely I gave them a quick buff. They’re 1.25in diameter.
They have the robustness of the acrylic, but the right feel and look of wax. The only thing I don’t like are the striations in the centre - how come they’re a cross hatch? I’d like to get it completely smooth, but haven’t got the hang of flame polishing (which would probably also ruin the fine text around the seal). Sanding isn’t an option as it’s in a dip and they’re too small. The wax does smooth it out a little.
The striations are from the distance in LPI. increase the LPI and they will be smaller. 1355 LPI will barely be visible but increase the speed as 1355 will burn very deep.
Alternatively if your wax seal has air holes to let the air out, you will not have bubbles.
I’ve not put one into the wild - but I don’t anticipate that they will be subject to any wear as they are normally on the back or occastionally the front of a piece of art that won’t be mauled about.
I’ve always assumed that it’s a result of the laser using PWM to control its power. At the right power levels and speed combos it could lead to a Moire-esque pattern.
Again, assuming because it could be lots of things at a micro level with the physics of ablating material, and I’m not even 100% that the laser uses PWM at all. Someone smarter will be along shortly…
I had a piece where I missed a spot - hit it with a torch lighter and it smoothed out the single section without making a noticeable change anywhere else…might be worth a shot if you’ve got some already “finished” but with the striations!
Cool idea to add the beeswax! It looks very authentic. I have had success making wax stamps from Delrin and didn’t notice an issue with trapped air, but my designs were simpler than yours.
Okay, here’s the solution but you’re not gonna like it: create a second figure at right angles to the first one and superimpose the two figures. Do a first pass on the first figure and cut out the coin. Turn it ninety degrees exactly and engrave the second pass.
What is the resolution of the source image, specifically how many pixels horizontally? Also, what settings (dot pattern or vary power) are you using for the engrave?
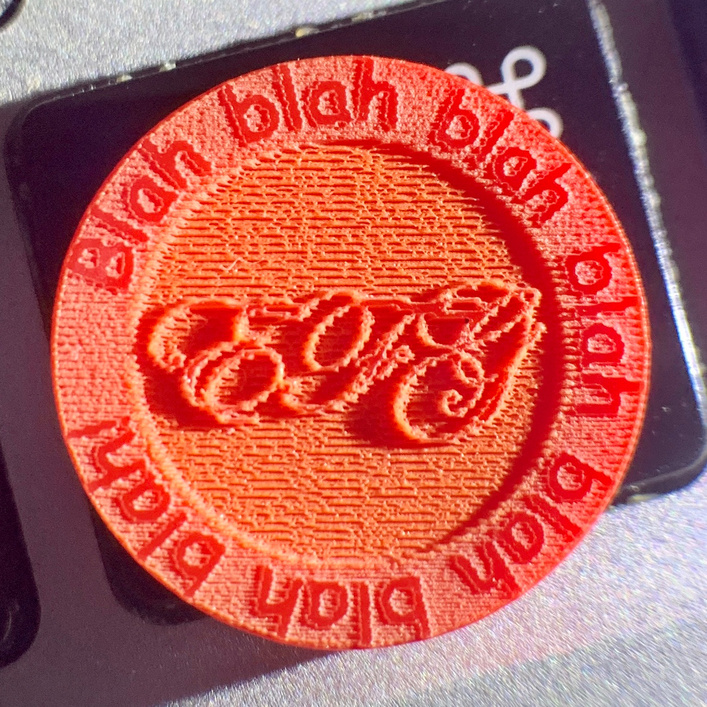
I just created and ran this. Source for the engrave is around 1200x1200, and is solid black, white, and grey. Default PG acrylic engrave settings (1000/F/195), so my horizontal lines are to be expected, but no trace of any regular vertical pattern.