WHAAAT!? You can mark uncoated titanium!?

Amazing! I’d love to see some of your work.

2 Likes

This makes total sense! I’ve heat anodized Ti several times, just using a propane torch. This isn’t as controllable as using voltage, of course, but all you need is heat. Great idea, and I even have some sheet Ti laying around so I’ll definitely have to experiment!

4 Likes

I would love to work in titanium, but drilling it is such a pain. >.<

3 Likes

I’ve mixed drilling and Ti bunches of times…of course it was the drill bits that were Ti coated drilling into steel but oh well.

Drilling Ti can be tough but, I do it almost every day without issue. First, I always use good quality cobalt twist drills. Cobalt drills have a higher heat range and tolerate the additional friction of cutting Ti with less dulling. I also keep my speeds low. Most of the tapped holes I drill in Ti are with a #55 drill which is about .055". Even being that small, I only run at about 800rpm. For tasks such as countersinking or counterboring, I prefer to use carbide tooling. I actually have custom carbide tooling made for the tiny 0-80 and 2-56 screws I frequently use.

Bob

10 Likes

I did a little testing to see what colors I could make. Here’s a photo of a few test patterns…


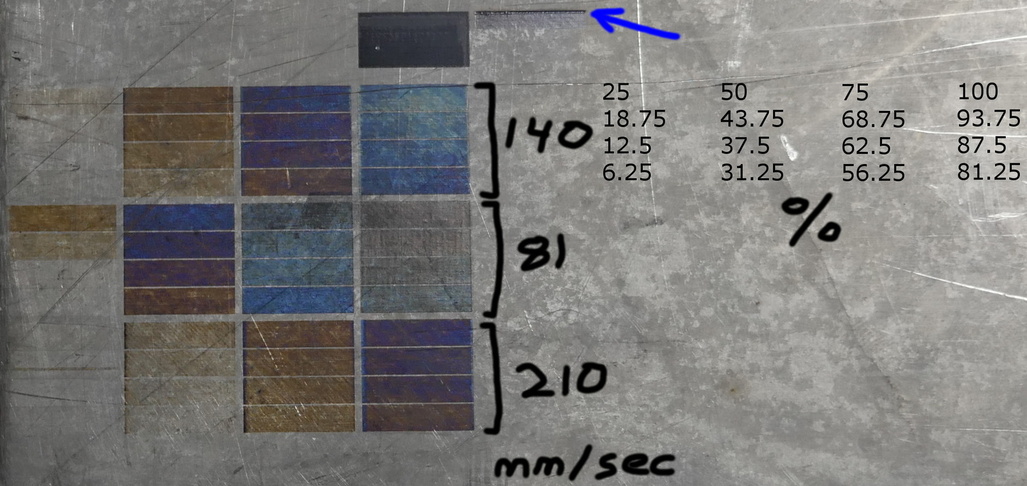
Mostly blues and yellows. I guess you could call a couple of them “red-ish”. All of these were done with the laser focused on the surface of the metal at 1000 lines per inch. I’d like to find a piece of titanium with a more uniform surface before doing any more testing.

Somewhere in the testing something interesting happened. I didn’t notice it at the time, but it seems that the laser actually removed some of the titanium. If you look at the line next to the blue arrow in the image you’ll see that there’s actually a small trough cut into the metal.

Taking those cut parameters (~2.8mm/sec at 100%) I did another test where I tried to cut a 1/8" diameter circle/hole into the piece of titanium. I knew it was a long shot, but I wanted to give it a try anyway. I made the machine take 400 passes on this same circle. 400 is WAY too many, but since I would have to remove the piece of metal from the machine in order to get a close look at it I just made it keep going and going in the hopes that it might eventually pierce through. It didn’t even get close though.

The circular slot shown in the video is the result of the 400-pass attempt. Based on the length of the bent section of that tiny piece of wire I’d say the depth of that slot is close to 1.2mm. Another circle I did (not shown) is approximately 0.25mm deep after 66 passes. I estimate the depth of the somewhat square shape that you can also see in the video to be about 0.15mm, and it was created after only half a dozen or so passes.

20 Likes

good information, I was going to try that when the forge gets here.
What was the thickness of the plate you used?
I really want to try this on thin titanium, to use as an inlay on some projects.
would like to see the video but it is listed as private.

1 Like

I think the video may be marked as private as I cant view it

thank you for the write up and the testing, I have never worked with TI, can a buffing wheel be used to clean up the surface ?

1 Like

Change the privacy settings to unlisted instead of private…no one will be able to see it without the direct link if you wish to keep it private still…

2 Likes

Even with just the blue and yellow you could get some really neat effects with two tone art.

Thanks for taking the time and effort to do this.
I really appreciate it.

2 Likes

Oops, I intended to only make it “unlisted”. I wondered why the thumbnail was a grey rectangle.

It should be fixed na. It’s only a few seconds long; I wanted to upload it directly to the forum, but I guess there is a 10MB limit to MP4 files.


@numosbk, This piece is approximately 3/16" (approximately 5mm) thick. I don’t think I have anything thinner.

@Clone, I think a buffing wheel would clean it up. I technically own one, I think, but I haven’t taken it out of the box yet. I bet a few minutes of sanding would clean it up, I’ll try that next.

Hey, this is exciting, both the colors achieved, and the engraving!
Can you remind me what the wattage of your laser is?

2 Likes

'Tis 30 watts.

3 Likes

HEY! thats the same as my 40 watt Chinese laser! :wink:

5 Likes

So it sounds as if TI foil is not entirely implausible to cut if you had a really good reason. Hmm.

2 Likes

I just got on eBay and ordered some small pieces of titanium foil (0.5mm thick, 100mm square) from China to try out. They should apparently be here next month some time.

Thanks! I hadn’t considered that titanium foil “is a thing”, even though it makes perfect sense.

3 Likes

There’s even a bunch on amazon. Btw, some of the large industrial suppliers sometimes let you have a few feet as a sample. Got about 10 or 20ft when I was getting my masters for free that way (was going to get the min $100 order, but by time the depth approved it they sold the spool…still send me the sample though…). Might have a little bit at home. It’s fairly thin (used as anneal bag to heat treat some high temp alloys)…

2 Likes

Ti foil to save leftovers while backpacking. Saves weight over that heavy aluminum stuff :laughing:

5 Likes

Cool! (I have some stainless foil that’s used similarly, but at lower temps. That stuff is sharp as the dickens, btw.)

Oh, and a quick gander at McMaster-Carr says this stuff is also available (possibly in a lower grade) as inch-denominated “shim stock”. Maybe for my birthday…

1 Like

I did another run of marking titanium, this time on an area that was sanded clean. The pattern is a little different this time; the top-left rectangle was 100% power. From there subsequent rectangles (by row) had the power reduced by 6.25 percentages points. This makes the left column 100%, 75%, 50%, and 25% power (from top to bottom). The lowest power, at 6.25%, is the bottom-right rectangle. The hand-written numbers are the engrave speeds (in mm/sec). All these tests were done a 1000 lines per inch with a pulse rate of 20kHz (I think) but I have no idea what effect changing this parameter would have (my guess: no effect). And as a reminder, this laser cutter is a 30 watt Trotec Speedy 100.

5 and 6 are only the bottom row of rectangles (25%, 18.75%, 12.5%, and 6.25%) run at 56 and 84mm/sec, respectively.

8 and 9 are only the top row of rectangles (100%, 93.75%, 87.5%, and 81.25%) all run at 560mm/sec. 9 is the same set of rectangles run twice with a small offset to see what effect “re-marking” would have. Not much happened, but maybe I should have run this one again at a different speed.

10 was defocused by 0.5mm (I moved the stock down half a millimeter making the laser beam 0.5mm longer).

11 was defocused by moving the stock down a total of 1mm.

12 was defocused by moving the stock up 0.5mm from the original focal distance.

I also tried 2mm down, 5mm up, and 10mm down. All of these resulted in the laser barely leaving a mark. I stopped these tests after the first rectangle or two and ran the next test at the same coordinates.

Separated image… (for clarity)


It looks like Discourse cropped this image in an odd way, if you click it a tall/skinny image should appear.

Original image…

I’m not sure what the quite-visible diagonal striations are but I’m thinking/hoping that they’re some kind of artifact of how the metal was manufactured.

25 Likes