My GF won’t properly calibrate. Keep getting pop ups that says GF is having trouble calibrating. Turned on an off several times. Unplugged, restarted computer, cleaned lenses, etc., in as instructed in cleaning and trouble cleaning guides, but nothing is working. I can see from the camera point of view, that way to much of door for the crumb tray is visible and not enough of the crumb tray or cutting area is visible. It’s like the angle of the camera has moved more toward the front (not even sure if that is possible). I also triple checked to make sure crumb tray was inserted properly. Not sure what else I can try.
I appreciate any ideas or suggestions. Thank you. Amy
That’s the normal state. It shows you only the area on the top and the left that you can cut, leaving 0.5" to 0.75" to the left on the tray you can’t see or cut and quite a bit more than that above. It shows extra on the right and bottom. You can include a screenshot here and I can tell for sure. How much you can see also varies with how thick the UI thinks your material is.
Calibration forever can sometimes result from intermittent wifi connectivity for your Forge. Its wifi gear isn’t as tolerant of distance to the router as your phone or laptop.
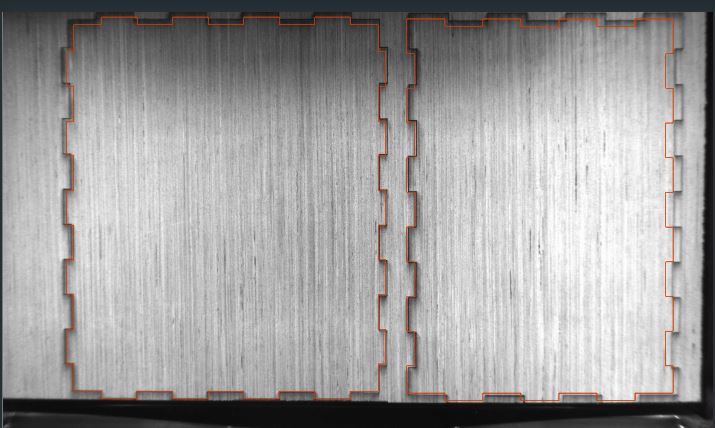
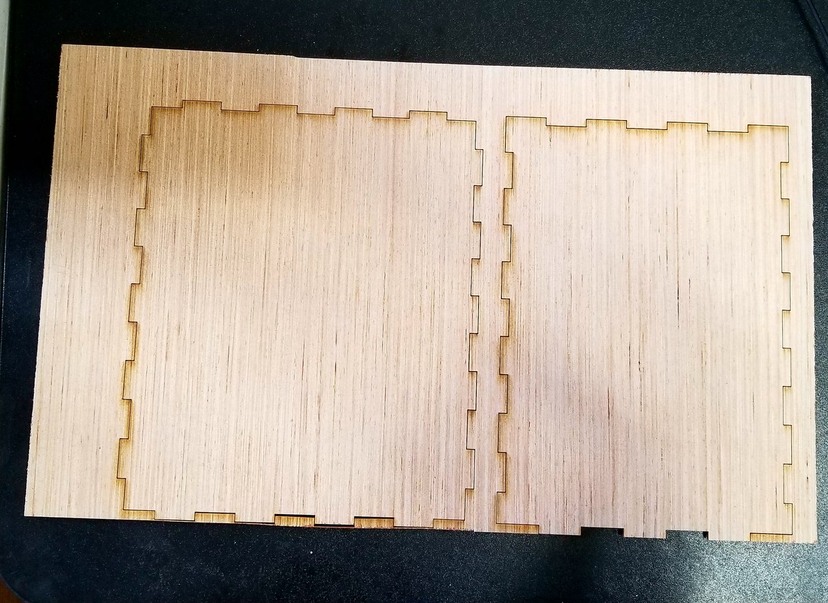
Thanks so much for the reply. I have attached a screen shot of what the camera showed me to lay out the box and how it actually cut it. I’m still a newbie, but I felt like on all previous cuts (prior to yesterday), I could see the full 12 X 20 board in the screen shot. But, my memory has never been anything to gamble on, so maybe I just hadn’t noticed the entire board wasn’t fitting in the camera shot, because I had not been cutting any objects before that were quite this large. Than you again for your reply!
BTW: Not critical, but anytime a problem is reported always include the user interface rulers in the screenshot. Provides so much more information and is standard practice for Support.
I made the box smaller and slightly adjusted the placement, knowing I can’t see the top 2." Of course, given the choice, I would prefer to always see the entire 12 x 20 area, it would make it easier for placement. At least I didn’t have any trouble calibrating yesterday, not sure why that happened, but hopefully it’s not a frequent problem.
Hopefully, I will remember the ruler and date and time and time zone next time. Although, no promises, creative brain at work (always onto the next distraction). Lol.
With the long turnaround times between post & response that happens here, it helps to give them everything you can upfront so you minimize the number of times you have to go back & forth. They could probably use a template form posted here so we could be reminded what would be helpful to them.
@alindblade Thanks for letting us know about this. I’m sorry your Glowforge was having trouble calibrating.
I took a look at the logs for your unit, and it appears your Glowforge was a little warmer than the operating temperature.
Your Glowforge Basic features a closed-loop liquid cooling system that uses the air from the room to remove heat. It is designed to be used between 60 degrees Fahrenheit (16 Celsius) and 75 degrees Fahrenheit (24 Celsius). You can learn more about the operating environment here. Printing outside these ranges may cause your unit to pause before starting, or to pause periodically during the print for cooling. This isn’t harmful, but it can make your print take a little longer.
You can try any of these things to improve warm-weather performance:
Try printing with no material on the bed (so as not to generate smoke and fumes) and no exhaust hose attached. If this works, then the problem may be that your exhaust hose is constricting the flow of air out of the unit, preventing cooling.
Examine the bottom-right side of your Glowforge. There are air intake vents, and if they become obstructed, it could make cooling less effective.
Try pointing a fan at the right side of your Glowforge. If there is warm air around the intake, this could help it cool off.
Power off your Glowforge and allow it to cool, then power it on and print immediately. When it sits idle, the fans are off, so heat can build up.
Just wait. Your print may take a little longer when it’s warm, but your Glowforge will protect itself and make sure it cools enough to prevent any loss of power or damage. And it’s clever enough to pick up from exactly where it left off, even if it loses Wi-Fi during the print!
I’m glad you are back up and printing and that you’ve gotten help with the printable area question as well. If you have any other questions, please post a new topic.