Won't cut through proofgrade draftboard

Brand new to this thing…I tried cutting the “gift of good measure” and at first glance it looks great. Score and engrave lines are perfect. It looks like it cut but it’s not cut all the way through. I thought maybe I took it out too soon or something so I ran it another time. Same thing. So a little research in here and I cleaned everything and ran the cut lines twice. Still not cut through. Almost, but just not quite. So I ran it one more time with the cut lines set to 3 times. Still had to work it to get it out.
Waited another day and tried again. This time the “gift of good measure” won’t load, so I loaded the metric version and ran through all of the same steps. Still not cutting through. This time, even 3 passes of the cut line won’t cut through. Thoughts? I emailed support but the auto response says it could be 3 days before they get back to me…?

I’ve ran into the same kind of thing recently with the new updates they have done. Although with 2-3 passes Im usually good. You can go into their settings and slow down the laser speed in the cut setting to make it cut a little deeper. That’s the only thing i can think of hope it helps!!

Make sure your material height setting is correct, you’ve cleaned all the mirrors / lenses / windows, and that your material is absolutely flat–holddown pins and/or magnets are crucial.

https://glowforge.com/support/topic/troubleshooting/cut-didnt-go-through-material

2 Likes

And also make sure your lens is installed in the right direction.

2 Likes

@steph1268: A screen-shot of the Glowforge control Webpage after the job is complete and a photo of the completed “gift of good measure” would be helpful. Us “Glowforgers” can often spot issues by looking at pictures. :sunglasses:

Maybe someone else has an opinion but the laser focus does not look right to me—looking at the scores. :sunglasses:

Is your PG draftboard absolutely flat on the honeycomb bed? Press down with your finger where you plan to cut. If there is any “give”, the draftboard sheet probably is warped. The typical “fix” for that is a magnet nearby or “pins” nearby. Also, be absolutely sure that the honeycomb bed is seated in the four depressions on the Glowforge bed and that the depressions are completely free of “cruft”.

It shouldn’t take three passes. Sometimes a cut might need a second pass, because the Draftboard is slightly thicker/denser than standard, or it has warped slightly in transit and folks don’t know to pin it down yet, but three passes does indicate a problem with the focus.

It might not be a bad idea to check the orientation of the lens in the head again, there are instructions for doing that here:

20170626_155607
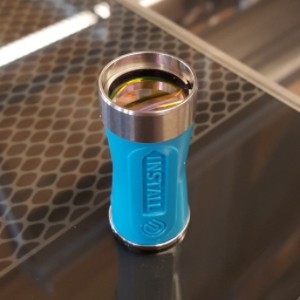
(The bowl shape side of the lens goes up into the head from the hole at the bottom.)

I think support is going to want to take a look at your machine. The good news is they are usually a lot quicker than the 3 days that the Auto-Reply email specifies these days, so hopefully you’ll hear back soon. (That’s just an outside estimate in case they get really bogged down.)

Don’t worry, they’ll get you squared away. :slightly_smiling_face:

2 Likes

I ordered magnets and more wipes today. I am going to go through the whole process again as soon as I get them (Thursday thanks to Amazon Prime).

I’m sorry those prints aren’t coming out perfectly!

When you do that cleaning, can you take photos of each of the parts in the Things that need wiping and the Wiping the Mirror in the Printer Head sections of our support page? You can post these photos in a reply to this thread, or send them to us at support@glowforge.com, and we’ll be happy to take a look.

Thanks in advance.

Things have gone from bad to worse. I have cleaned every lens with the Zeiss wipes. I have checked the crumb tray and used magnets to hold materials flat.
Still not cutting through as of 11/13. In fact, it is now burning the materials on the surface but not cutting through.
So tonight, I cleaned it all again before starting and put in a fresh piece of medium draft board. Loaded the gift of good measure and hit print. It scanned and the blue light flashed. I hit it and crossed my fingers but now the laser isn’t firing. :cry::cry::cry:

Uploading: IMG_6411.PNG…

That sounds as if the mirror isn’t seated properly or the lens was installed backwards after cleaning.


1 Like

Double checked and everything is sitting correctly.

I’m so sorry for the trouble. The logs are currently indicating that the unit can’t communicate with the head properly. Can you try the following steps:

  1. Turn off your Glowforge.

  2. Holding only the finished black surfaces, grasp the printer head as shown. Pull gently up and back to disengage the magnets and remove the head.

  3. There is a small tab in the center of the wire ribbon. Push down fully on the tab to release it, and gently pull the wire ribbon plug from the printer head.

  4. Take a clear photo of the gold pins inside the printer head where you just unplugged the wire ribbon. It should look like this.

  5. Pick up the printer head and wire ribbon. Make sure the tab on the wire ribbon is facing up. Slide the ribbon back into the head until it clicks.

  6. As shown, lower the printer head over the metal plate so that it rests next to the two round posts. Then push it gently away from you – you’ll feel a “click” as magnets pull the printer head until it sits snugly atop the metal plate.

  7. Turn your Glowforge back on.

  8. Send us the photo of the gold pins from step 4.

Then give it another try, and please let us know the results.

1 Like

I tried to run another test of the “gift of good measure” and still the laser is not firing. Tried running at 7:05pm CST. I have video of the unit trying to work…everything looks like it thinks it’s working, just no laser.

Thanks so much for taking the time to do those tests and post the photos. Unfortunately, it looks like your unit is experiencing an issue that we can’t resolve remotely. I want you to have a reliable unit, so I’m recommending we replace this one. I’ll be in touch via email to sort out the details. I’m so sorry about the bad news.