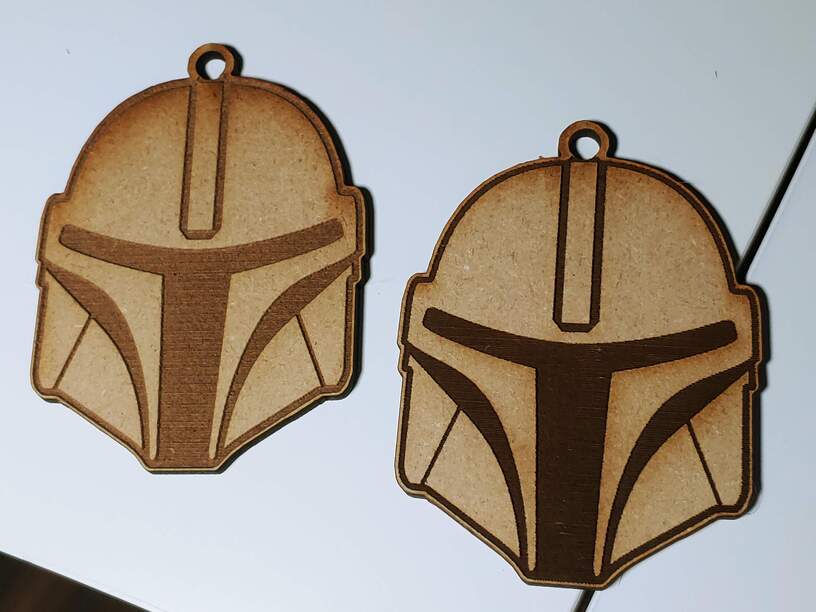
Attached is an image of my problem. I was originally getting nice dark brown engravings that provided a good amount of contrast. Then randomly it’s all shifted to a paler brown. I’ve tried varying the speed and power, but it’s still the pale brown. I’d love some tips. Thanks
The laser boils away the wood and leaves loose carbon and the liquified smoke sitting on the surface. It can be brushed off or washed off to an extent leaving a very thin layer of charred wood if any at all, depending on the wood.
In the case of MDF, there are many things that affect it, but primarily it can soak up humidity making it thicker and more cut resistant as the water from the humidity takes more energy than when dry. A lot of that depends on the weather at your location and how long the MDF has been sitting around. If sitting out or in the middle of a stack of it. For the most part, it is not much of a bother except you might have to slow the cut down to cut through if it has been sitting than when fresh. So even the same piece will cut or engrave differently on different days.
Natural wood is in some ways worse as no two locations on the same piece much less different times, or different pieces, to say nothing of different species. Good hard wood is less prone to changes in humidity but it will warp as well from being out. These are not insurmountable problems and as we get more experience it is easier to go with what each situation throws at us, but there is only one way to get experience.
One way that folk deal with the variation in the color if a good black is needed, is to leave the masking on, and paint it after it is cut with anything from a marker to spray paint, some use lots of different colors. Wander through the Made on a Glowforge area or do a search and there is a lot of information,
1 Like
When did this “shift” occur? When was the darker one printed?
Glowforge recently broke the SD graphic engrave by switching to slower, and in my opinion, less desirable settings. It’s been a couple of weeks.
You can create your own custom settings to restore the previous engrave settings for different materials.
1 Like
Oh no! I’m sorry you’ve hit a snag. I noticed you also emailed us, I’m going to close that and continue working with you here.
I’ve extracted the log files from your Glowforge to review your most recent prints, and compared it with the details you’ve provided to investigate further. It seems that the last several prints the red dot (Autofocuser) is not landing within the correct range.
There can be a few reason’s for this:
- The material is the outside of the supported height range.
- The red dot landed on the edge/curve/side of the material.
- The printer head is not sitting properly on the carriage plate.
- The carriage plate is installed incorrectly.
Could you check the above and let us know if anything looks out of the ordinary?
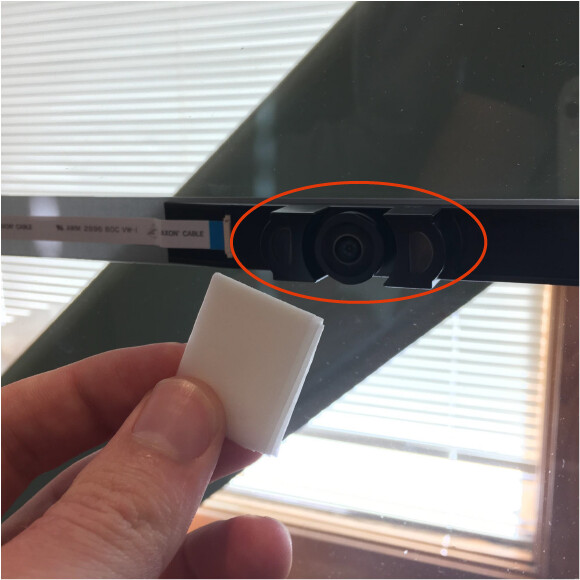
Additionally, I noticed the lid camera looks considerably blurry. Could you please do the following for me?
- Turn off your Glowforge
- Using a Zeiss wipe, gently wipe the lens of the camera on the unit’s lid.
Let us know how it goes!
1 Like
The darker one was printed two days ago. The lighter one was printed yesterday.
I wiped off the lens, but it is still giving me a pale engraving.
When you talk about the autofocuser not landing in the correct range, I believe that was due to some tests I was making by cutting and engraving acrylic without film.
Thank you for working through the instructions my colleague @jeremyh provided. When you first started noticing this behavior, were you using the same material from the same vendor, or alternate pieces?
If you perform the same print, but when using Default settings, does the same trouble occur? It can be difficult to narrow down trouble when reviewing prints on materials that are not Proofgrade, or when using manual settings. We’ll do our best to get you back up and printing, as soon as possible!
I did switch to another vendor’s material instead, but the first half of that sheet printed the dark color, and then switched to the pale. Now lately it is 50/50 dark/pale on the same print.
I know the shadow makes it look like that’s the cause for the engraving color difference, but it really is 50/50 with it being pale and darker.
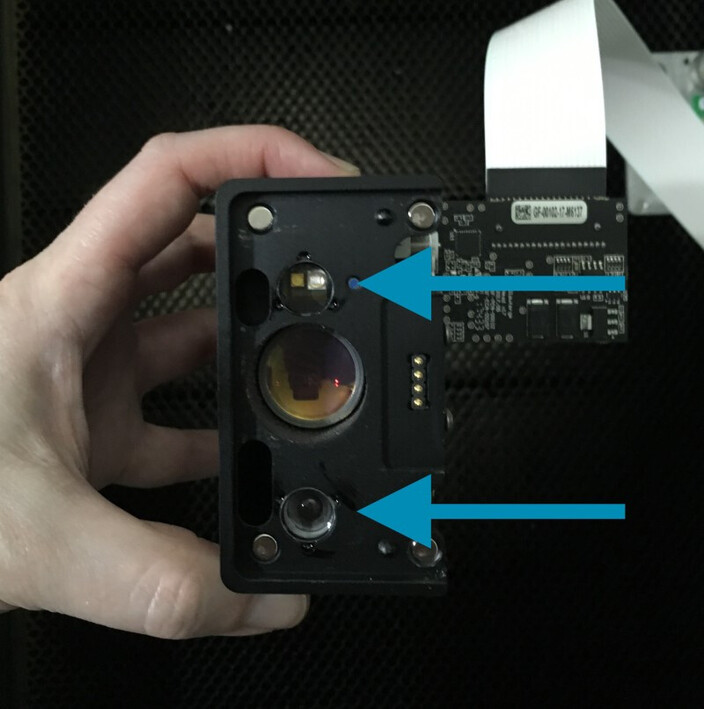
Thank you for that additional information. After reviewing the logs from your unit further, it looks like your Glowforge might be running into trouble during the step where it measures the material height. As a next step, will you please check the 4 magnets on the bottom of the print head, and the 4 magnets on the carriage plate that it rests on? Also, please send us a photo of the print head similar to this example:
When you put the head back on the carriage plate, gently feel to see if it rocks side to side at all. After it’s back in place, please turn on your unit, use Set Focus and place the focus area on the material, so it’s not near an edge. Then watch to make sure the red dot hits the material.
Please let us know what you find, and how running Set Focus goes!
Hello @mhydea, its been a few days since we heard back from you so I wanted to check in. Were you able to try the steps my colleague Ivan provided?
1 Like
It’s been a little while since I’ve seen any replies on this thread so I’m going to close it. If you still need help with this please either start a new thread or email support@glowforge.com.