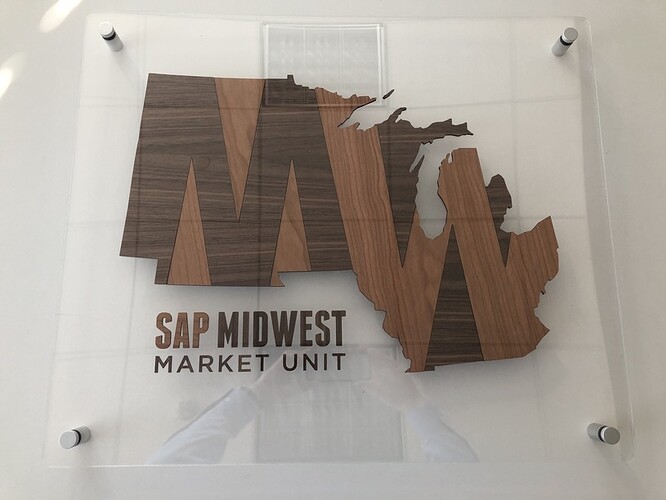
Last year, year the company I work for (SAP) had an internal contest to create a logo for our Midwest Region (“Midwest Market Unit”) - and I submitted a horrible design. I didn’t win, place, or even show (thank goodness.)
The winner came up with a PHENOMENAL design, and it has been used on internal, local marketing material. Since I have done luggage tags and a few other things for a number of people in our office (using the “first one is free” pay for everything else principle), I was asked if I could make a version of the logo for a sign. Months passed, and I finally was able to get around to it.
Because of contrasting colors in the logo, I chose Walnut and Cherry PG, and moved the parts around to fit each set onto a single 12x20 sheet of PG Plywood (for each color).
Several folks here on the Forum provided me one-on-one feedback and suggestions on a few tweaks, and after taking quite a while to decide on where to source the frame (and then waiting for it to arrive), the project is completed!
(Since there is no banana for scale, the dimensions on the frame are 26 inches wide by 22 inches tall.)
Here are a few things I learned.
-
When you are cutting out various pieces to assemble, be careful about “optimizing” space. It’s REALLY important to make sure your final arrangement of the pieces will keep the grain of the wood properly aligned. I didn’t for one of the original components, and ended up having to re-cut it. Luckily, there was still a perfect spot to do so, and it fits in perfectly (it’s the left-most upward pointing cherry ply triangle. Originally, the grain was going 90 degrees off from the rest of the cherry.)
-
Epoxy works well for gluing wood to acrylic, but you should mix VERY SMALL quantities - because when they say it sets in 5 minutes, they mean it. I Ended up wasting a good bit of it as I was gluing the pieces to the back piece of acrylic.
-
Epoxy only takes a small portion of what you think it will. Avoid the excess and don’t risk overflow on the mounting board.
-
Keep some damp / wet cloths or rags handy to quickly wipe off any spillage.
-
Have a few q-tips handy for addressing small amounts of said spillage.
-
Some imperfections will happen, and odds are that they will not be as noticeable as you think they are: specifically, leakage on the backing board. If they are cleaned up fairly well and quickly, they will almost not be noticeable once the front cover is on. And a corollary to that - issues that are obvious when face up under a bright light are not nearly as easy to see when mounted (or up against a wall waiting to be mounted.)
-
When you are mounting wood within an acrylic frame with mounting posts, use some of your scrap wood to cut out washers to go between the layers of acrylic as part of the mounting post. Otherwise, the acrylic sheet will bow in at the mounting post corners.
(Luckily, I realized this as I was putting it together at home, and was able to quickly make several sets of washers.)
I dropped it off in the office on last Friday, and on Tuesday, received wonderful feedback from our SVP, who told me:
“Thank you!!! The Market Unit logo that you created looks amazing. Looking to finalize the best location for this so it can be enjoyed by all. Your creativity and dedication is awesome…what a cool hobby/skill”
And for me, this is really a hobby / side hustle, not a primary form of income, and I have to say that getting that kind of feedback from someone who is a great leader, who I respect immensely, was incredibly meaningful.
So as a “more than just Glowforge” lesson, never forget to give praise and recognition – it can be incredibly impactful for those who hear it.

