Hello everyone! I am finally getting my first post up after admiring everyone else’s amazing work for the last year. I’m excited to finally be joining the party!
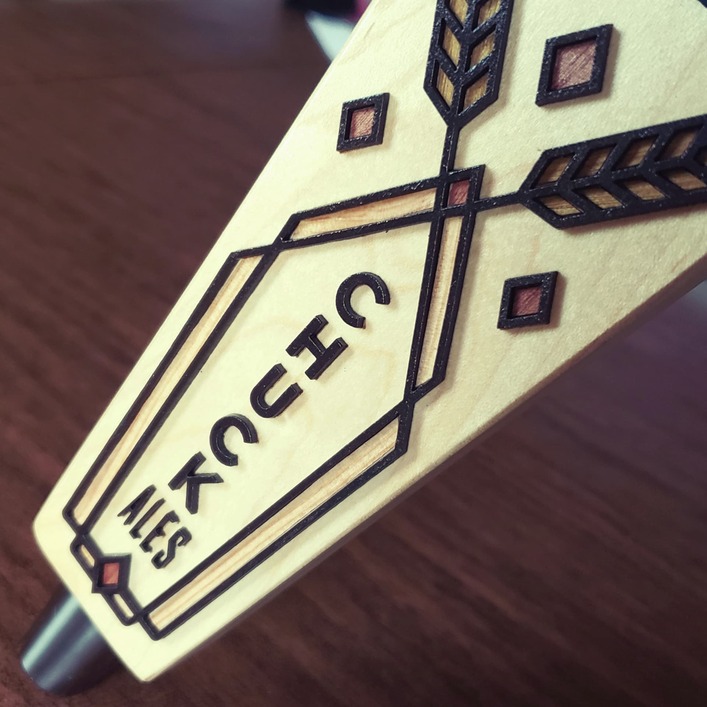
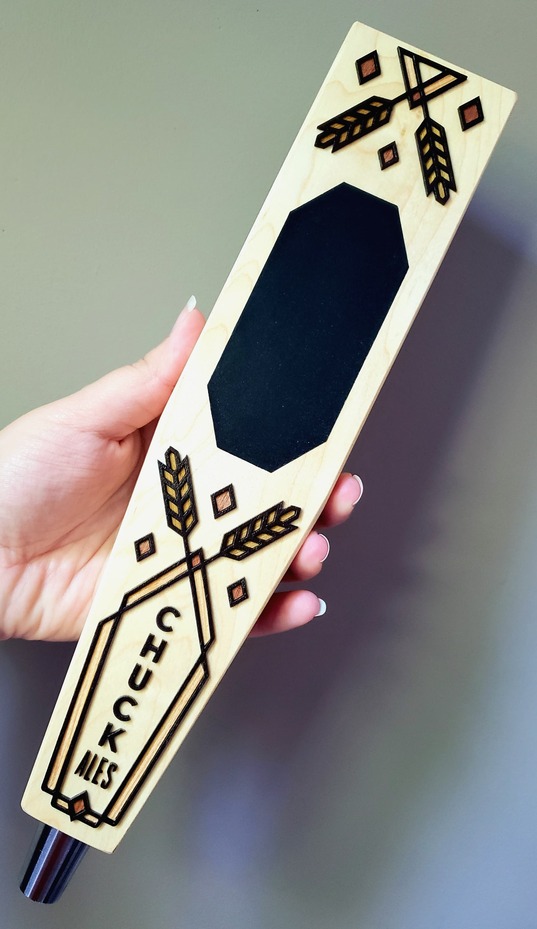
My dad’s birthday was last week and I wanted to make him something special. He’s a passionate home brewer and he has been working on building his own kegerator, so it seemed to make a lot of sense to make him a custom tap handle. Going in, there were a few things I was set on: I knew I wanted it to be a completely custom design and having recently bought some gorgeous wood veneer, I knew I wanted to incorporate that in some way. I also knew that the project needed some minimal brand development so that I could put a name on the tap handle that would really make it his. After much brainstorming and debate, I ended up with “Chuck Ales.” I know, I know - it sounds way too simple (and also like bad grammer) and seems to have no imagination. But actually it is a play on my nickname for my dad - “Chuckles” - which is what “Chuck Ales” sounds like, if you say it out loud quickly! I’ve clearly inherented my dad’s sense of dad humor because things like this totally tickle me. And I knew it would tickle him too, so it was perfect!
I purchased a blank 12" solid maple tap handle from Amazon and went to work designing. A couple hours of sketching later and I had a plan that incorporated elements of art deco and Scandinavian design. I mapped it out in Illustrator and went about selecting the materials. For the outlines of the design and the letters, I selected a 1/16" thick basswood sheet (solid wood, not ply) which cut beautifully, even with the very tiny letters in “ALES.” I primed all the pieces and then hand painted them a super dark brown (almost black) since I wanted lots of contrast with the light maple wood of the base. If I could redo anything in this project, it would be chosing to airbrush or spray paint these pieces instead of hand painting them because I would have gotten a smoother finish. But that is just me being picky and was in no way a deal breaker.
Next I selected the three types of wood veneer I would use to fill the outlined shapes of the design. I went with olive wood for the wheat fill, cherry for the diamonds and an unknown light/medium wood with long thin wood grain lines for the 3rd veneer. When it came to cutting these, I ran into issues with the tiny pieces dissapearing through the crumb tray holes. But then I remembered a tip I had read previously - add foil tape to the back of the material. The laser cut through the veneer but not the thin metal of the tape so I didn’t lose any more pieces. MAGIC! However I learned that my foil tape had adheasive so strong that it destroyed the small pieces of veneer when I tried to peel them off. A few very high tech stick-n-peels on my tshirt reduced the stickiness of the tape and attempt #2 worked perfectly.
Last step before assembly was using the glowforge to lightly score the outlines of all the veneer and basswood pieces onto the blank maple tap handle so everything could be perfectly placed.
Using wood glue, I attached the veneer pieces first, being VERY careful to make the alignment with the scored lines exact. After that I glued on the painted basswood pieces. The ones that had veneer fills pretty much snapped right into place, like puzzle pieces. Very satisfying!
To finish the wood and protect the tap handle when it was in use, I gave it two coats of triple thick polyurethane spray. Once that was dry (I waited about 48 hours) I cut and applied the chalkboard label.
All in all, this project went really smoothly, and I am very pleased with the result! Especially considering I was using unfamiliar materials and a new process. I’m looking forward to using what I learned here to make something else soon!
And the very best part? CHUCKLES LOVED IT! Mission accomplished!