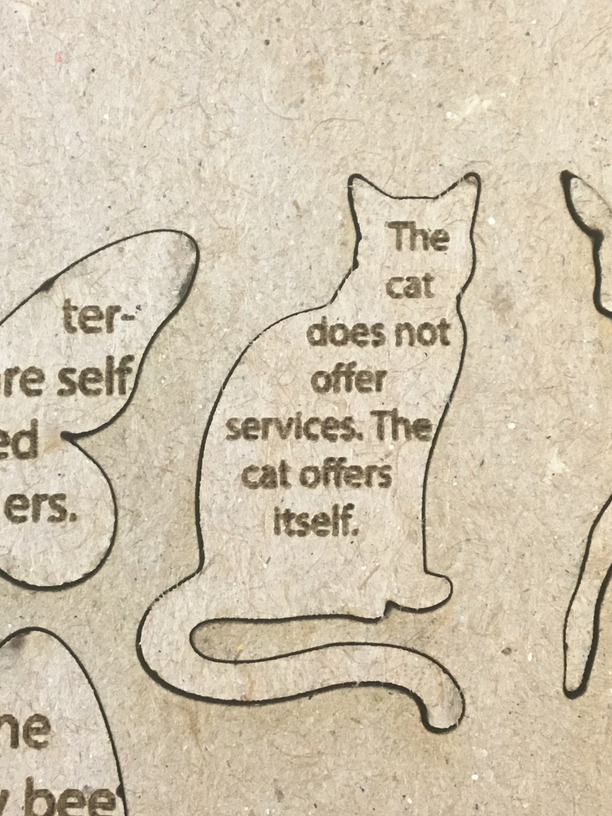
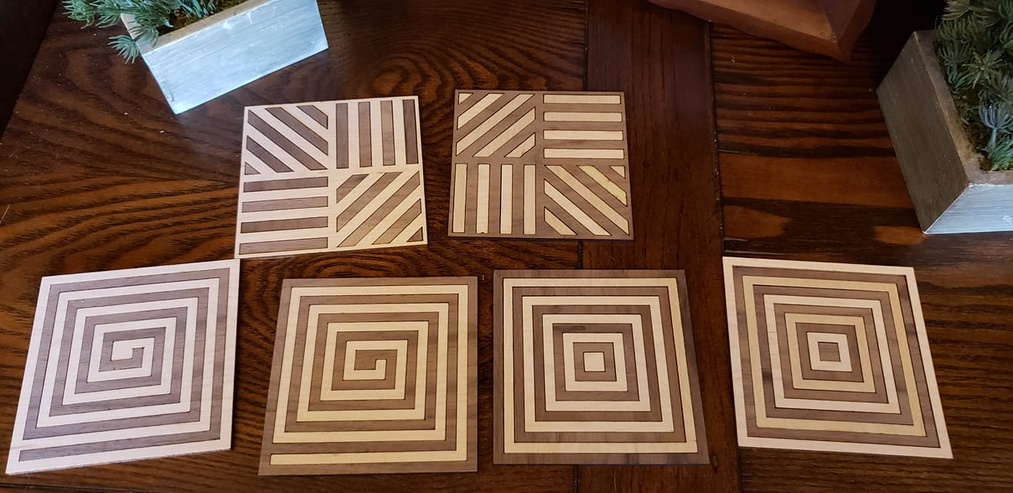
Basically, I just cut my pattern from both types of wood, then swapped the pieces. But I want to ask for some help on this.
First, what do you call this? Is it an inlay?
Next, what should I use to affix the pieces inside the frames and make each coaster flush and flat?
Finally, as these are 1/8", what should I use for a bottom layer, considering that I don’t want the coasters to be much thicker than they already are? Specifically, what would make them usable coasters?
I’d appreciate some advise, if you have the time. Thanks!
Self-adhesive felt, it’s probably going to be polyester but hey these are coasters, or a thin layer of cork would be traditional for the bottom of a coaster.
I’m thinking you’d want something fairly rigid to hold the pieces together before putting felt or cork on them. Maybe a piece of veneer on the underside (Proofgrade already has the 3M adhesive on it). Or get some 10 mil stencil material and 3M dry adhesive.
Frustratingly you can’t adjust for kerf because this is two pieces with the elements switched. When I did something sort of similar but different I did wonder about some sort of grout effect like for tiles but decided that was silly and just bonded to a back plate (in my case wood) but I would think cork would be your man here.
Why would you need double the materials? Couldn’t you have 2 copies of the pattern - one with the kerf adjusted the “other way” and do the different woods/colors with the 2 (similar) patterns…
“Double” depends so much on the specifics of your cuts, but there is always some loss. The process of making a kerf adjustment makes it so the “matches” don’t fit correctly anymore.
It’s hard to describe or illustrate, but essentially if you are cutting a shape and its dimensions are very important, you compensate by cutting it slightly “too large”, and the lost material from the kerf makes up for the difference, your end result is exactly to size.
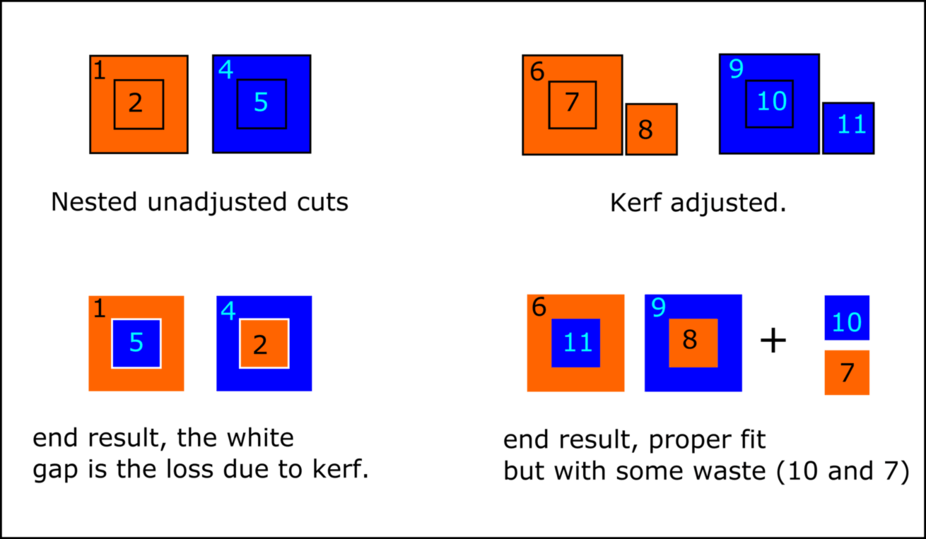
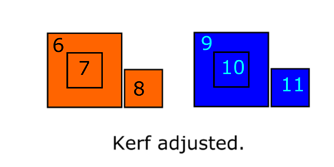
Here’s my bad attempt to illustrate:
On the left you have the straight nested cuts with the black lines representing the thickness of the laser (It’s exaggerated, but I’m trying to demonstrate here. If this were to scale, this would be a tiny part, the black line would be about 0.008" thick for most materials)
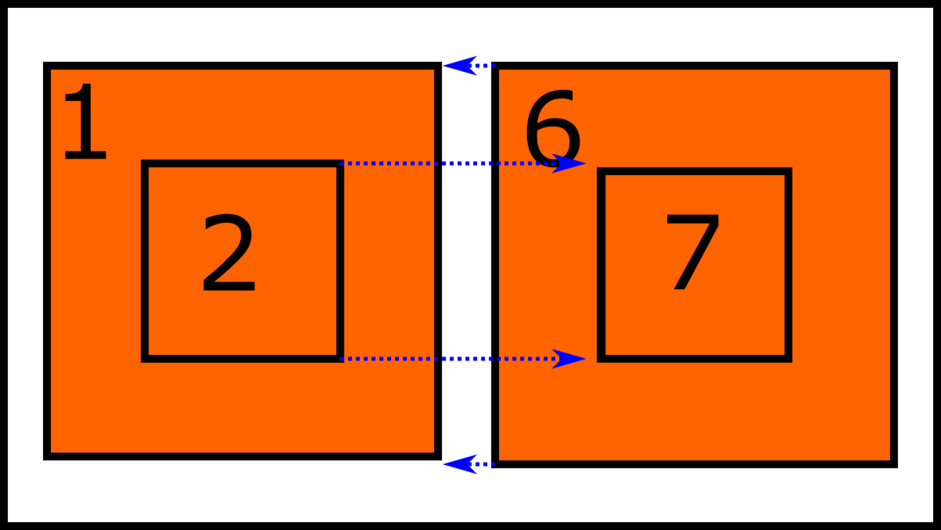
Details on the slight change in scale between non-adjusted and adjusted:
Note how 6/7 is a kerf taller and wider overall, and how 2/7 aren’t the same size anymore
As you can see the end results of the non-adjusted cut has a kerf-thick gap between parts. In order to compensate for that I use thestroke-to-path method, which makes for some too-small inner pieces (#7 and #10) which are loss.
I may be overcomplicating this, but these things will become pretty obvious pretty quickly once you start doing some experiments.
I’ve had reasonably good success with using wood glue for this. Any excess needs to be wiped immediately, though, or it really shows on the proofgrade materials. I’ve also tried putting an adhesive backing on (proofgrade veneer). That works, but not as well as the wood glue IMO. I haven’t found a great solution for acrylics. The ideal, of course, is kerf-adjusted prints. But I just can’t bring myself to accept the material loss for the kinds of non-profit stuff I’ve been making.
I like your illustration of kerf compensation. Yes. You need extra material. And when I need it to be super tight, especially if I’m using thicker wood like 1/4" walnut, you have to take into account the draft of the kerf though the thickness of the material. If you flip the inlay piece, it’s an even tighter fit.
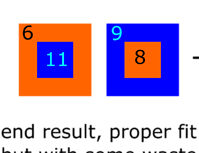
I understand what your saying there. I’m trying to figure out why you couldn’t cut
the 11 shape out of the 9 box and the 8 square out of the 6 then would they not fit like: ?
I have a feeling I may be missing something that hasn’t clicked in my logic… I keep thinking this would be right - the two wouldn’t be exactly identical (since squares are slightly sized off by a kerf in each direction. but hardly noticeable… but they would fit w/o the gap
I think you’re describing exactly what I show on the left with 1/2-4/5. The problem is that the laser cut has a thickness and so you have a laser-wide gap between the pieces. For some things that might work, for others if you need a more exact fit you have to kerf adjust.
Try it out, it can be much easier to understand with a practical experiment.
@marmak3261 might be able to phrase all of this a bit better, he has a lot of experience with kerf adjusting, his post about a compass rose was very instructional early on for me.
I don’t know that I really have any practical advice. I haven’t had the need to kerf adjust anything at all yet. For the puzzles, it’s impractical (understatement) to try and kerf adjust them, since you’d have to design the puzzle and then explode the underlying image to correspond with the puzzle and I think that would be a nightmare.
Cutting wood or thick chipboard puzzles (.08 chipboard - .09” with paper), I modified my initial approach from a full power cut at the necessary speed, to a 2 pass approach (3 for 1/4” Baltic birch) at faster speeds and 100 precision power. I tested the faster speeds until the job length came out to about the same as a single pass at the slower speed.
Cutting at 100 (lower power) will effectively reduce kerf (smaller beam profile, less material removed as measured across the gap), and create a tighter fit than at full power (it also does less damage to the photo paper - I cut image side up).
One thing I started doing is engraving/marking spoken quotes, literary quotes, etc onto the backs of certain puzzle pieces. For this, I reverse the puzzle piece and cut the shapes out of a jig and then place the pieces in it face side down. Usually, I have to gently push the pieces out when I’m done engraving because of the friction fit.
 ?
?