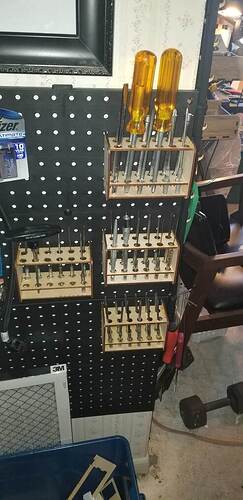
Over the last 40 years of being an electronics tech, I’ve accumulated a lot of Xcelite 99 tools.
I finally gathered them all, sorted them and made these holders so that they will get used more.
I think that one is my favorite so far! (Can’t let hubs see it.) 
Ha! And each new design gets easier not just because I get better but because Darwin. Most things I design now start with another file, save as, and then modify to make the new thing.
Those look handy for sure.
I really need to get my pegboard wall installed… bought the boards ages ago. Thanks for the inspiration!
My tool disorder is getting out of hand. One problems is that I can’t switch between projects easily because the tools are scattered all over.
For example, I am working on the case for the electronics for my MPCNC. I am doing a 3D printed case. So measurement tools and electronics are needed. Then I have to go back to the 3D printer in a different space and I need some of the same tools to fix something on the 3D printer. I’m about ready to get a second and third calipers. Or make a cool holster for it out of leather. It’s my most used tool.
About now is when I need to take a week off of everything and do an Adam Savage tool cart.
And my office at work is just as bad. I know where everything is. On my desk. So yes, in the general vicinity. But a pile fell on the floor two weeks ago and it just becomes another annex to the desk to keep the papers.
I have a different sense of discipline. I stayed up till 2:00 perfecting a few parts in OnShape. I don’t give up. But organizing falls to the wayside.
Thanks for the inspiration.
Trust me. Every one of my organization projects is in direct rebellion to my own disorganized nature. Stuff misplaced, or put away to the extent that it is not accessible. I just got tired of it.
Seriously, you simply cannot have too many pencils, rulers, squares or calipers. I think I’m up to four sets now ranging from pretty decent to elcheapo plastic.
A Savage tool cart would be perfect to tie all this together! Great thinking.
I’m thinking a few things that stay and space for things needed for current project.
Always good to use glowforge to get things organised! 
Nice job on that! Don’t get TOO organized though–we will suspect you of not playing with your toys enough.
But I am using them to organize!  but yeah, if I ever do a panarama or video I’ll make sure I’m in the middle of something.
As Always a great project! Thanks!
I gave up the fight years ago and have tool sets in every work area. Don’t want to be in the basement & have to run up to the garage for something I need for a laser project. Or in the bike barn & have to go to the garage or basement to find a tool. Finally just decided it wasn’t efficient not to have all of the tools needed by that crafting process in the area I do that thing. So now I have many duplicates but much less time just getting tools (& when I find something that requires a trip to another area I go on Amazon and get a duplicate shipped). It’s no more expensive doing that than chasing around & wasting time - it’s not like I’m replicating Snap-On sets ![]()
Files up!
This looks amazing. I’m constantly trying to organize something … so that a proper function is possible. This looks like it worked out well for you!
Mark, I am trying to make this, but the sides seemed to be joined together and I can’t get them separated. Help!!! thanks.
Color me envious. Not that I would put stuff away when I was done…
whoops, I had to look a bit to find my mistake but I deleted the duplicate side and reposted in the original post. The zip is just 99.zip now.
While I don’t mind fixing my own mistakes one bit, you might want to install Inkscape so you can do it yourself.
Mark, I do have Inkscape (though even more of a newbie at it than I am Glowforge!), but sure didn’t think of trying to change it in that program. Silly me! But thank you! Next time I’ll know! 
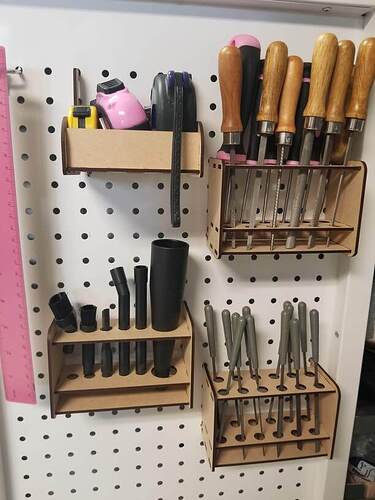
Mark, as you can see, I am using your design to make my tools readily accessible! I did alter the holes so I could make one for my “mini” vacuum attachments, and lowered the top side holes a tad so that I had a little more room at the top. Next project - trying to do one for my little pliers, sidecutters, etc.! I am so thankful for your file, as I would have no clue how to do the side parts that actually connect into the pegboard. The flat parts are easy to change, not only the holes, but the length for what I need. You rock!!
I can’t tell you how thrilled I am that you are not only using my designs but making them your own!
This is exactly how you learn, and soon you will be designing things for yourself starting from scratch.
I actually need to get in and do one for vacuum attachments.

