Hello, my machine GF Pro (1years) no longer works, I turn it on after 5 seconds, the yellow button lights up and nothing. I contacted customer service for a long time without being able to use my machine. I live in France  . I cleaned the fans, checked the contacts. At the start of the failure the head moved and now it doesn’t even move:pensive:. I am helpless, I do not know what to do and especially where the failure comes from. Can you help me please. Thanks in advance
The yellow light could indicate the internal temp is outside parameters.
The Glowforge Basic is designed for use between 60 degrees Fahrenheit (16 Celsius) and 75°F (24°C). The Pro has an expanded operating range up to 81°F (27°C).
1 Like
Thank you, the temperature of my room is around 20 degrees, it turns on, as if it was going to start then in 2 seconds I hear the fan start then cut and the yellow button is displayed
2 Likes
La sonde de température se trouve où ?
 is off, make sure the cables haven’t slipped out from their clips.
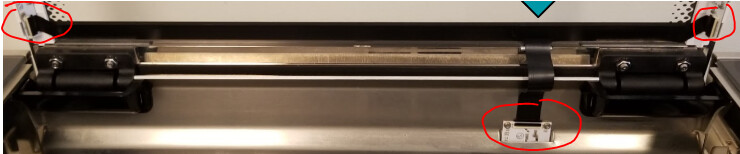
Merci c’est fait mais toujours rien 
Voici la vidéo au bout de 15 secondes de démarrage
Je suis désolé  Un représentant examinera les journaux de votre laser et pourra dire précisément ce qui ne va pas. Cela peut leur prendre un jour ou deux pour répondre ici.
2 Likes
Not sure where it is in the machine. Do you leave the exhaust hose connected and open to outside air when not in use?
Merci en tous cas
Non je le mets dehors par la fenêtre que lorsque je coupe, et ensuite je le rentre
1 Like
Hopefully someone from support will see this soon.
1 Like
J’espère aussi 

1 Like
Oh no, I’m sorry to hear about the trouble @cfeemainbyama.
I extracted the logs from your Glowforge to investigate, and it looks like the orange button is appearing because the Glowforge is having trouble communicating with the printer head. There are two key connections I’d like you to check for me. Could you please do the following?
Turn off your Glowforge.
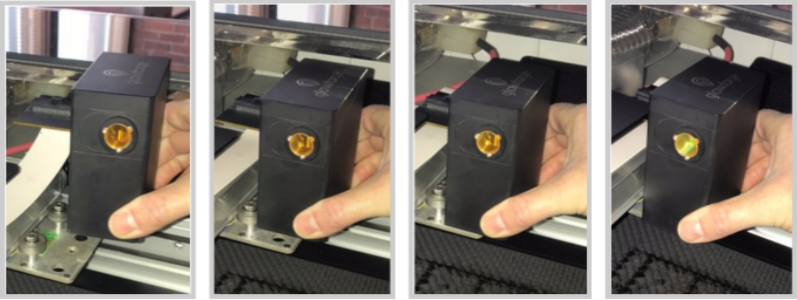
Holding only the finished black surfaces, grasp the printer head as shown. Pull gently up and back to disengage the magnets and remove the head.

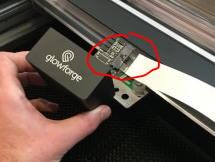
There is a small tab in the center of the wire ribbon. Push down fully on the tab to release it, and gently pull the wire ribbon plug from the printer head.
Take a clear photo of the gold pins inside the printer head where you just unplugged the wire ribbon. It should look like this.
Pick up the printer head and wire ribbon. Make sure the tab on the wire ribbon is facing up. Slide the ribbon back into the head until it clicks.
As shown, lower the printer head over the metal plate so that it rests next to the two round posts. Then push it gently away from you – you’ll feel a “click” as magnets pull the printer head until it sits snugly atop the metal plate.
Pull the laser arm all the way forward.
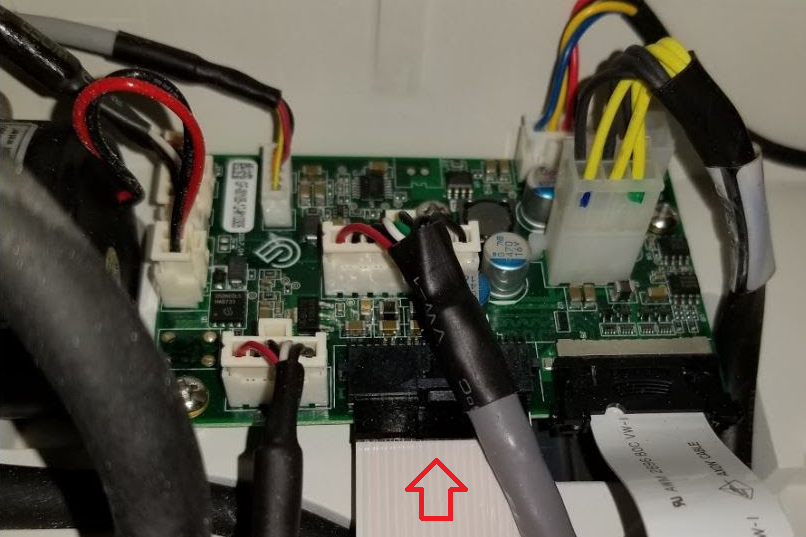
Reach over the laser arm, and to the left of the inside of the unit and you’ll see this circuit board:
Take a photo of the circuit board. If the cable I’ve indicated above with the red arrow appears to be loose, please reconnect it and try printing again. This cable should ‘click’ back into place.
Turn your Glowforge back on.
Send us the photos you took in steps 4 and step 9.


Attachments
![]()


Merci pour votre aide, j’ai déjà envoyé ces photos à votre collègue Rae par email, ce soir j’ai envoyé d’autres photos qu’il m’a demandé. J’attends de ses nouvelles pour savoir ce que je dois faire.
Merci
Hello, @cfeemainbyama I went ahead and sent you an email with the next steps for this issue. To mitigate any confusion I am going to go ahead and close this forum thread. I look forward to hearing back from you by email. Thank you!
1 Like