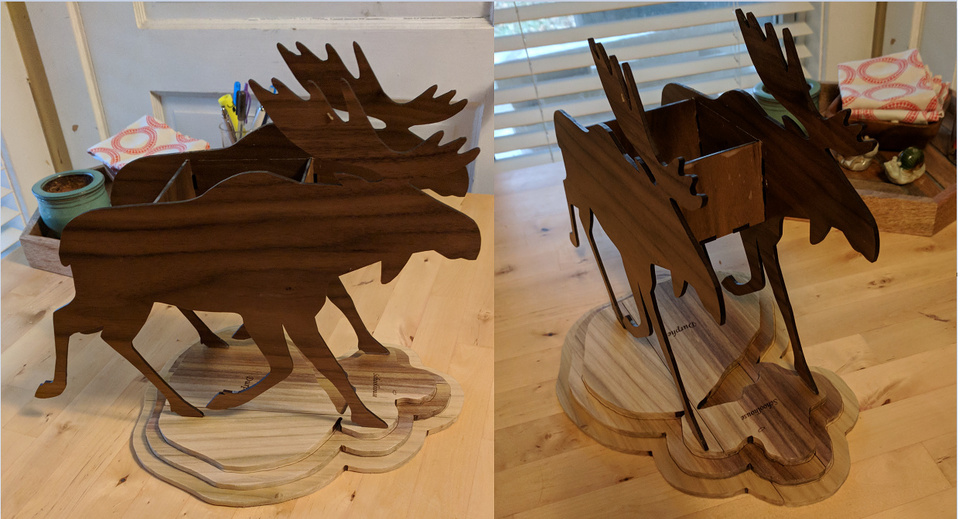
So I made mom a moose centerpiece out of ![]() walnut plywood for her birthday. The box sandwiched inside the two moose sides has full length tabs where the bottom and sides meet. It has half-length tabs that fit into matching engraved holes in the moose sides. This way you don’t get the finger-joint look on the sides. Unfortunately, I had to saw off the half-length tabs on the sides of the box due to a calculation error. Then, somehow I only saved a quarter of the inside box in OpenSCAD. Still perplexed how that happened. So I couldn’t regenerate the holes for the moose sides. I did make a prototype in both cardboard and draft board of just the box. The cardboard and draft board were both thicker than the plywood, so I could only eyeball it. It looked good, but it wasn’t perfect. Oh well, because I sprayed the inside of the box with Flex Seal (as seen on TV). So it’s going to be watertight with or without a tight fight between the box and the sides. Or at least I think it will. It seems Flex Seal takes 24-48 hours to cure and at least 24 hours before you can spray another layer. That part is not shown on TV. Which would have been okay as I had planned on cutting this out Wednesday night and not last night, but they pushed a bad update Wednesday evening and…enough harping on the company, because there would be no present without them.
walnut plywood for her birthday. The box sandwiched inside the two moose sides has full length tabs where the bottom and sides meet. It has half-length tabs that fit into matching engraved holes in the moose sides. This way you don’t get the finger-joint look on the sides. Unfortunately, I had to saw off the half-length tabs on the sides of the box due to a calculation error. Then, somehow I only saved a quarter of the inside box in OpenSCAD. Still perplexed how that happened. So I couldn’t regenerate the holes for the moose sides. I did make a prototype in both cardboard and draft board of just the box. The cardboard and draft board were both thicker than the plywood, so I could only eyeball it. It looked good, but it wasn’t perfect. Oh well, because I sprayed the inside of the box with Flex Seal (as seen on TV). So it’s going to be watertight with or without a tight fight between the box and the sides. Or at least I think it will. It seems Flex Seal takes 24-48 hours to cure and at least 24 hours before you can spray another layer. That part is not shown on TV. Which would have been okay as I had planned on cutting this out Wednesday night and not last night, but they pushed a bad update Wednesday evening and…enough harping on the company, because there would be no present without them.
You can see some Flex Seal over-spray on the front of the box. Cleaning it up is problematic without damaging the ![]() finish. I was smart enough to leave the masking on the moose sides when I sprayed it, but I had a fear about leaving it on the box and having the edges of the masking glued into the piece for ever.
finish. I was smart enough to leave the masking on the moose sides when I sprayed it, but I had a fear about leaving it on the box and having the edges of the masking glued into the piece for ever.
The base is the lake and the lake it connects to where my parents have their cabin.
I took a screenshot from google maps (not the earth view) because it uses just a couple of flat colors. I cleaned up the land around the lake with the eraser tool in MS Paint and cut it down to size. Then I opened the bmp in Inkscape and traced the bitmap. I simplified it and then I had to clean that up, but not much. I found an old post by an Australian woman about how to specify the distance using the Outset command in Inkscape.
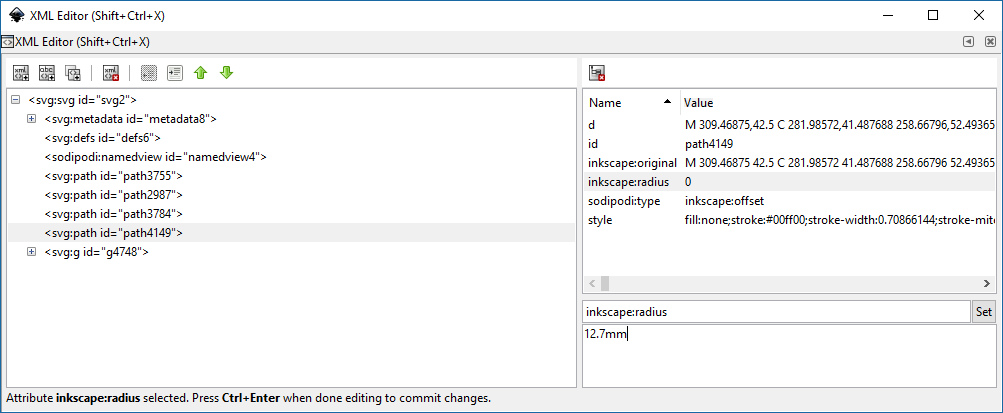
Make a Copy of your image and then do a Paste In Place. With the copy selected go to Path->Dynamic Offset. Then go to Edit->XML Editor. Select the inkscape:radius attribute and enter the distance you want to offset it. If you don’t use a unit of measure it defaults to pixels. Click the set button. Done.
I had to clean up each of the offsets, but again it wasn’t much. With the original outline and the two offsets my next problem is that I wanted to use 1/4" x 6" (actually 5.25") x4’ poplar hardwood boards I had bought when they sent me my shipping email and all of my offsets were wider than that. What I like about the poplar is it is already greenish and its grain sorta looks like bathymetric map lines. So I sliced the files in half in Inkscape and cut them out.
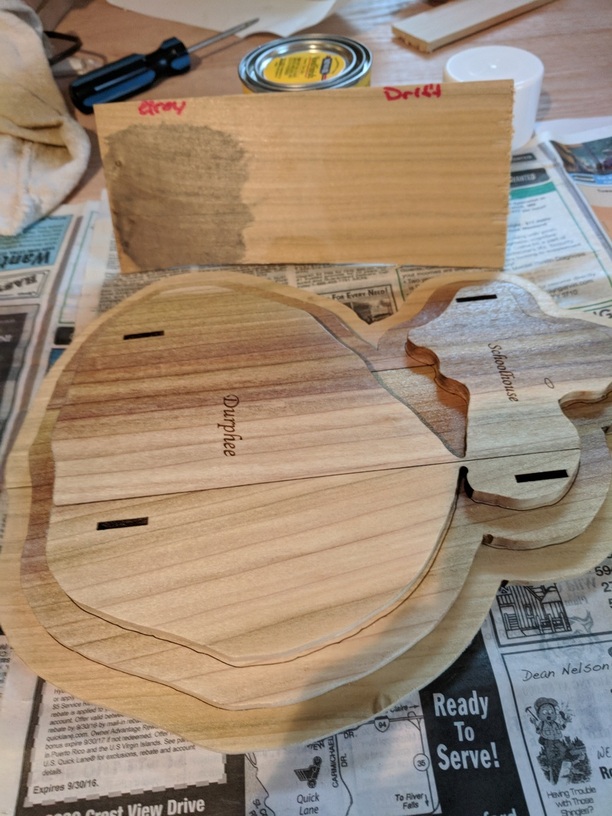
Originally I thought I could keep the top piece of the base less than 5.25" wide, but not if I wanted the moose’s box to be 4" long. So I had to make a decision. The vertical stripe of where the boards meet isn’t as bad as I feared it would be and I actually like the effect of how all three of them are offset from each other. I had originally planned to stain it, but I didn’t like the gray stain and the driftwood stain is apparently a synonym for poplar-colored. You can see the test board behind the base. The test board has two layers of shellac and the base has four. I cleaned up the char on the edges of the lake plates with a dremel and sandpaper. I tried using some off brand magic erasers, and it was working, but I was afraid the water would raise the grain (you have to wet the sponges.) I need to liberate some pure isopropal alcohol from the 55 gallon drum at work and try it.
The 2-P10 glue sampler-pack arrived Friday and it is so much better than the gorilla glue and Loctite glue I have been using.
https://www.amazon.com/gp/product/B00008US7G/ref=oh_aui_detailpage_o00_s00?ie=UTF8&psc=1
If I was to do it again I’d make the base a lot longer. The moose’s rear legs extend so far beyond the end it looks pretty goofy, but moose are goofy so…
I also made her a birthday card. My apologies if I have made @cynd11 and all the other amazing paper crafters feel completely and utterly inadequate in their skills ![]()
![]()
![]()
![]()
![]()
![]()
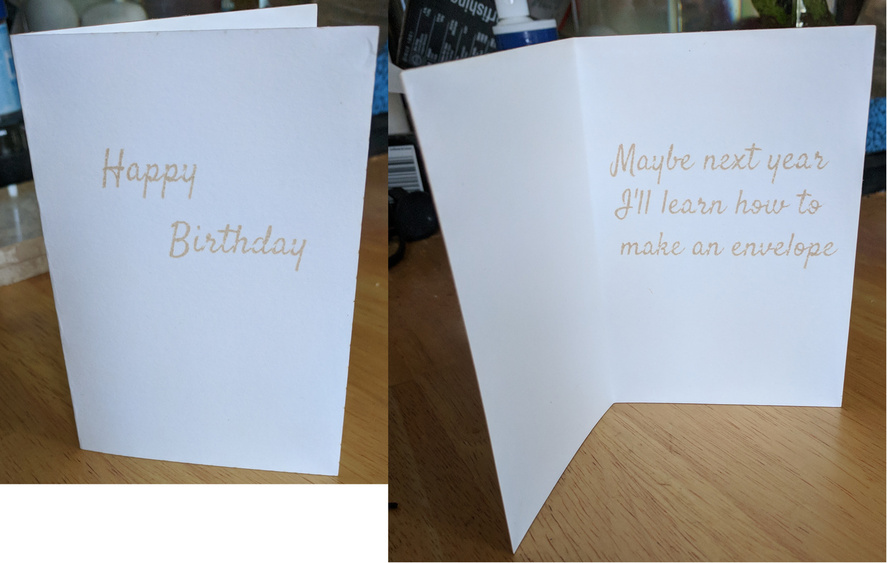
About 1 in 5 years I forget to even buy a grocery store card, so…
I downloaded the google font file and installed the Satisfy font for the card. Those gaps in the lettering are the first time engraving cardstock hasn’t worked perfectly for me. I used my standard 1000 speed, 5 power & 225 lpi settings. Maybe I’ll have time to troubleshoot it this week, but those dead spots aren’t in Inkscape that I can see.
The poplar cut beautifully. When testing it I accidentally had one test set to a single pass. Yes, 0.27" poplar cuts with a single pass. (I used 0.27" focus height for all of the following.) One thing I learned is the height off the honeycomb really matters. Using pro Full Power and speed 165 a single pass easily cuts through masked poplar if it is off the honeycomb a little bit. When tested with the poplar flat against the honeycomb 165 speed doesn’t do it, but 120 does. 120, however, left a lot of flashback if the poplar wasn’t perfectly flat on the honeycomb.
As I was using the pass through slot (4’ board) and the material is just off the honeycomb I used 142 speed, Pro Full Power and 1 pass. I probably should have gone with 150, but I just sanded out the couple of small flashback marks. To score the island I settled on 450 speed and Full Power. You could go faster or use less power. To engrave the names in the lakes I just used whatever the cherry hardwood settings are.