A simple tray

Hello, I am tray.

I was commissioned by a friend to make a birthday gift for her friend. She’d seem some of my laser projects and didn’t know what she wanted, just something lasered, and quickly – she requested it on Saturday and it had to be ready on Thursday. We settled on a valet tray, 7 x 9" x 1-1/2" (178 x 229 x 38mm) in size. Trays are really simple, but you can make an impact even with a project this easy if you take the time to get the details and materials just right.

Notes:

  • All woods used are 1/8"
  • All “hero surfaces” (that is, not the bottom) are sanded to 1500 grit
  • The finger joints were standard fingers but fairly thin at 0.1" (2.5mm)
  • The bottom was sanded to 600
  • All woods are finished with clear Danish oil.
  • Hidden detail: there is a middle layer (of baltic birch) on the base, between the backing and the leather. This gives it a bit more heft and rigidity.
  • No proofgrade was harmed in the making of this tray, as such, please don’t ask for settings.

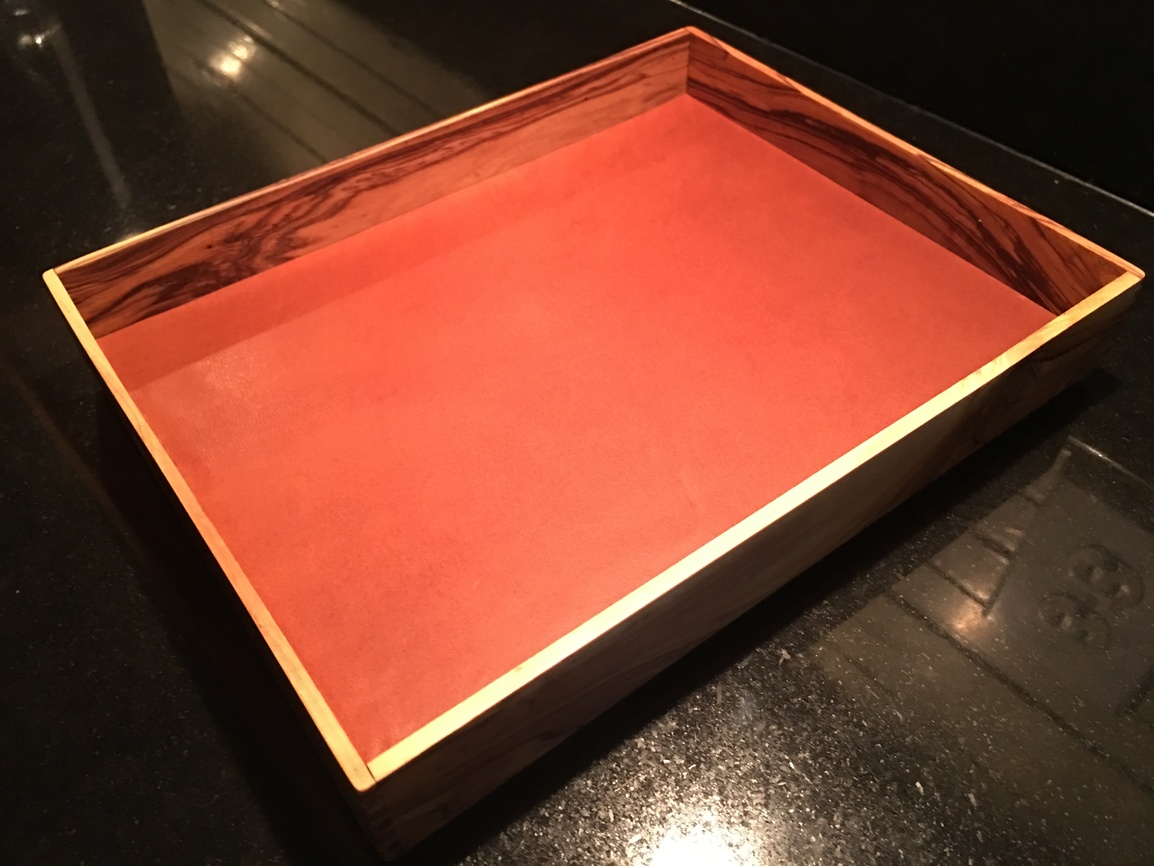
I started by choosing the wood from what I had on hand. I’d been looking for a smaller project for these olivewood pieces I had gotten a while ago from a small company in Jerusalem. I had a 2 quare foot piece of cow leather that has an excellent finish on it, I decided it would be a perfect match, and add some elegance. It’s a really soft leather to the touch, feels very luxurious.


Olivewood, Cow leather

Lighting is tricky, it can make the wood look very different from shot to shot. In reality, the wood is a honey gold color with dark brown veins. It’s really striking, but surprisingly consistent to cut. So many woods that have variety like this are hard to deal with (I am talking to you Ambrosia Maple and Zebrawood), but olivewood was surprisingly compliant.


Olivewood, Cow leather

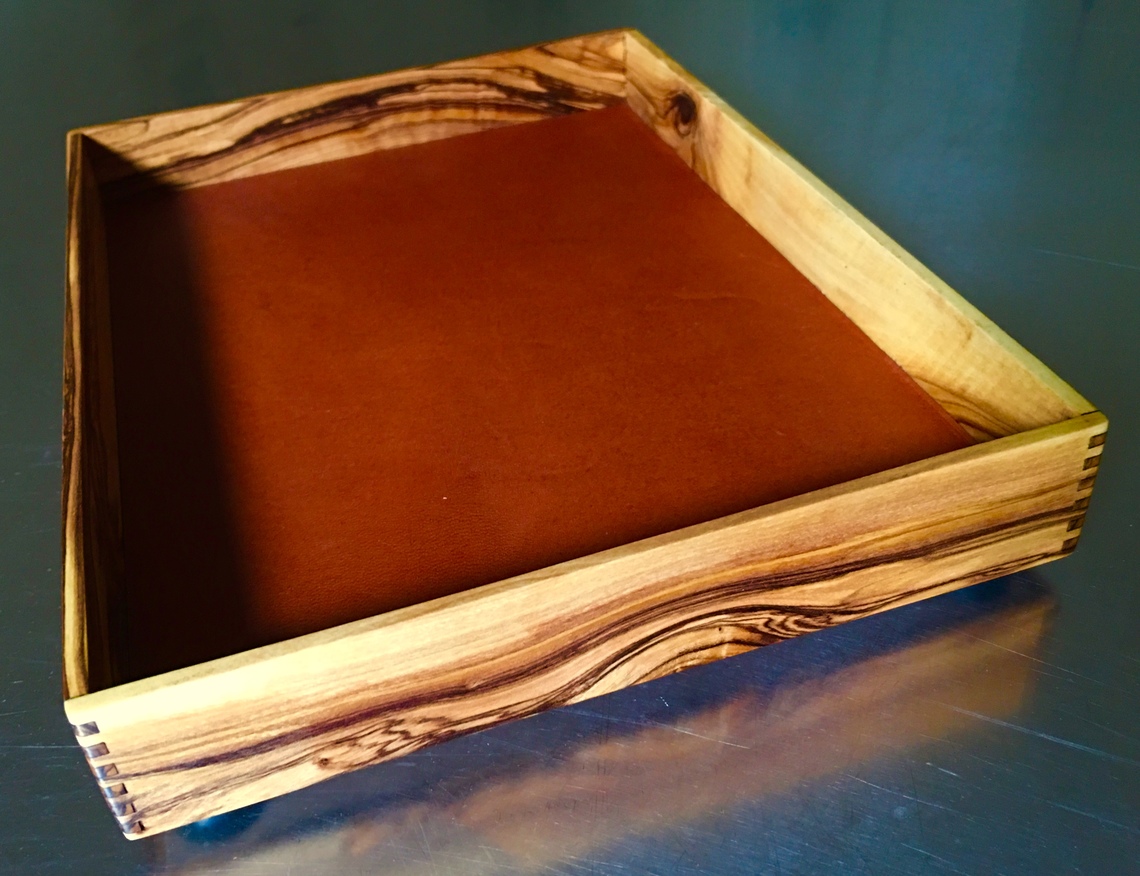
A very similar shot to the last, but turned 180 degrees. You can see the variety in the wood, it’s a really impressive and interesting species. One note of caution: It sands very easily. I wouldn’t call it a softwood exactly, but it’s easy to oversand it and make thin spots if you’re chasing a surface imperfection. As always, I found this out the hard way and wasted 2 “sides”.


Olivewood, Cow leather

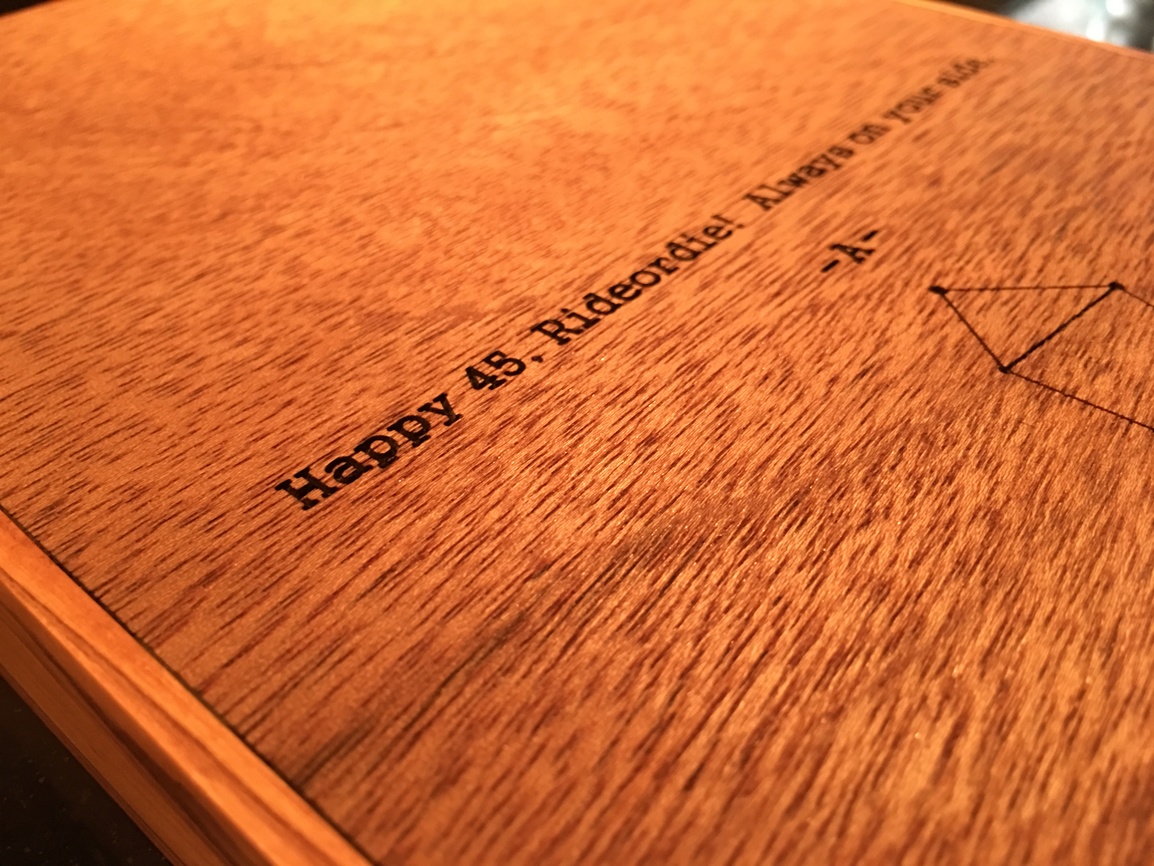
The bottom is engraved for a touch of personalization. Typeface and inscription were the client’s choice, I added the star chart for Libra – The client is into astrology, so it seems apropos. Client loved the idea, and here we are. You may have noticed the rounded corners, they were manually done with a sanding block by eye. See the previous note about the olivewood sanding very easily, these corners weren’t difficult to shape, only taking about 2-3 minutes each.


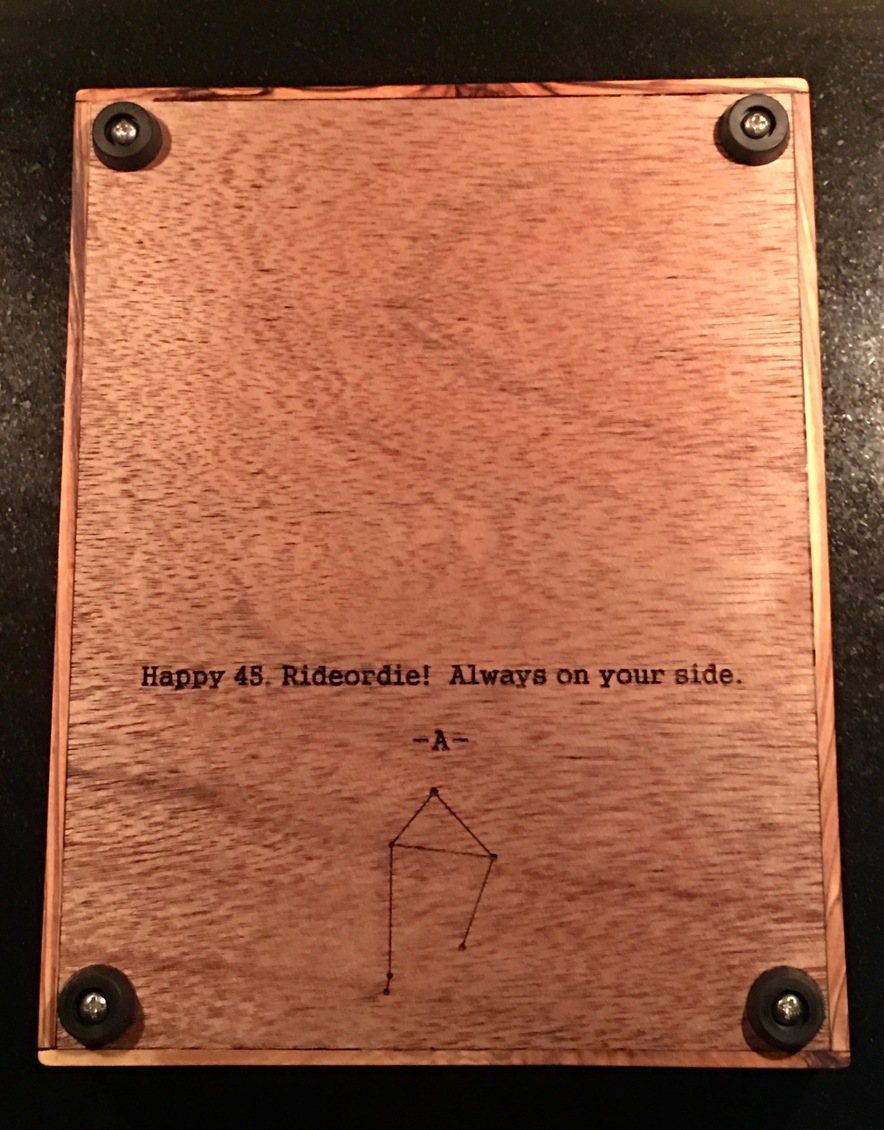
Meranti Lauan, Olivewood, Rubber screw-in feet with stainless steel screws

A close up of the engraving. The surface quality of the meranti is interesting, not exactly porous, but definitely textured. I thought the darker color would complement the darker tones in the olivewood, moreso than BB ply which is my usual go-to.


Meranti Lauan, Olivewood

Overall, I love the olivewood, and will be ordering more, but it does have its challenges.

  • It’s a bit soft
  • it has so many strange grain lines that it sometimes cracks ( I didn’t crack any pieces, but 2 or three already had cracks in them, and I had to cut my pieces around those).
  • I can only source it by the pound in 1/8" with no guarantee of dimensions. This means I was limited to a sort of “find the right project for the material” mindset. I’ve reached out to the seller to see if they’ll do a run of properly dimensioned 1/8", they already sell 1/4" in proper sizes. Will update if I get a reply.

But wow does it make an impression. Worth the small drawbacks.

48 Likes

<3 the rounded corners. did you do that manually with a belt sander or some other way? I think I like your subtle ones better than my more rounded ones.

2 Likes

You’re too fast, I wasn’t finished with the writeup. I just finished it and talk about the corners in the main post, but tl;dr: I do them by hand. Olivewood sands really easily, I think a belt sander would tear through it so quickly that you’d have no tray left :wink:

2 Likes

zowie that’s gorgeous

3 Likes

I’ve only tried sanding corners like that with 1/8 BB (my original test) and with 1/4" walnut, so maybe the soft 1/8 wood could be dangerous. but I also sanded a much rounder edge, not just the slight corner you did. don’t have a pic on my phone, but i’ll snag one of the walnut box tonight. I used 400grit sandpaper on a belt sander attached to a table (a hand sander, but with designed clamps to hold it upside down to a solid surface edge).

2 Likes

The olivewood is gorgeous, where did you find it? :sunglasses:

2 Likes

My secret source… almost hate to tell :wink:

I emailed them yesterday about whether or not they would sell 1/8" slabs in consistent sizes, no reply yet.

9 Likes

I use hand blocks like I’ve described elsewhere in the forum…

Previously:

And I buy inexpensive pre-cut strips of paper from Amazon:

https://www.amazon.com/gp/product/B075WXT1Y2/ref=oh_aui_search_detailpage?ie=UTF8&psc=1

2 Likes

Beautiful! And what a great write up. Thanks!

1 Like

Tray as I might, I see no flaws. Beautiful work! Now olive you to making more pretty things.

7 Likes

This is lovely! I like the personality of the olivewood. These would be perfect for some ornaments I’m thinking about.

I know it varies, but roughly how many pieces are in a pound? Don’t worry… I’m not ordering anything else anytime soon. I won’t flood them with orders. :wink:

1 Like

Beautiful work! And wonderful write-up!

1 Like

Beautiful is not enough to say.

1 Like

As always, an outstanding piece of work, regardless of how simple it is!

1 Like

BTW if anyone wants the same kind of feet:

https://www.amazon.com/Small-Round-Rubber-Feet-Screws/dp/B079PKFTBY/ref=sr_ph_1?ie=UTF8&qid=1539186061&sr=sr-1&keywords=rubber

They work so much better than adhesive feet, and now you can finish your wood without worrying about if the feet will stay on. The only issues are that they are a bit larger than some adhesive feet and that the screws that come with them are kind of long for 1/8" material, so I ordered these:

https://www.amazon.com/gp/product/B00GIBN7I2/ref=oh_aui_search_detailpage?ie=UTF8&psc=1

The feet themselves take about 1/8" inch, so these screw into 2 layers of 1/8" (for a total depth of about 3/8") material quite nicely.

7 Likes

Its going to vary greatly depending on the sizes they cut/send. You can compare density to other woods to give you an idea of what you might get…

I ordered 2 pounds and got sixteen pieces of varying size, but roughly 6-10" long and between 2-3.5" wide.

2 Likes

Thank you. :slight_smile:

I am awful at envisioning things like that.

2 Likes

Another beautiful project. How is the bottom fit? Did you slot the sides or cut a shelf into the sides, just glue or…?

1 Like

Hmm, hopefully this makes sense…

I use a very flat surface (a 12x12 stone slab from home depot) and start by gluing everything true and level. So I built the frame of the tray out of olivewood and clamped it square while also weighing it down on the corners to keep it flat on the stone. I use a piece of wax paper under the wood to keep glue off the stone.

Once that’s dry, I apply glue to the edges of the bottom (already carefully test fit) and then press the frame down around it on the stone. I use weights to keep the bottom flat against the stone and again weigh down the wood frame. When I’m done I have a very rigid, very flat, and very flush tray. I apply glue (sparingly)to the inner surface of the tray bottom and around the bottom 1/8" of inner edges of the wood frame and insert the dry second base layer. Weigh the whole thing down and it glues up flat and true.

The key is to not get glue on the inside walls of the finished tray. I sand the tray edges (the olivewood) thoroughly before assembly, and while you can sand the exterior down later if needed, it’s really hard to do so on the interior, so I protect the surface from all the glue I can. I always toy with masking the inside surfaces but in the end i find that being careful is proof enough against glue.

Ultimately, I have about 1/4" of pretty solid glue contact all around the dual-layer base. I’ve not had a tray come apart yet.

Oh, and bonus little technique: I wear nitrile gloves throughout the sanding and finishing process to protect the wood from hand oils and sweat.

10 Likes