A simple tray

Beautiful! And what a great write up. Thanks!

1 Like

Tray as I might, I see no flaws. Beautiful work! Now olive you to making more pretty things.

7 Likes

This is lovely! I like the personality of the olivewood. These would be perfect for some ornaments I’m thinking about.

I know it varies, but roughly how many pieces are in a pound? Don’t worry… I’m not ordering anything else anytime soon. I won’t flood them with orders. :wink:

1 Like

Beautiful work! And wonderful write-up!

1 Like

Beautiful is not enough to say.

1 Like

As always, an outstanding piece of work, regardless of how simple it is!

1 Like

BTW if anyone wants the same kind of feet:

https://www.amazon.com/Small-Round-Rubber-Feet-Screws/dp/B079PKFTBY/ref=sr_ph_1?ie=UTF8&qid=1539186061&sr=sr-1&keywords=rubber

They work so much better than adhesive feet, and now you can finish your wood without worrying about if the feet will stay on. The only issues are that they are a bit larger than some adhesive feet and that the screws that come with them are kind of long for 1/8" material, so I ordered these:

https://www.amazon.com/gp/product/B00GIBN7I2/ref=oh_aui_search_detailpage?ie=UTF8&psc=1

The feet themselves take about 1/8" inch, so these screw into 2 layers of 1/8" (for a total depth of about 3/8") material quite nicely.

7 Likes

Its going to vary greatly depending on the sizes they cut/send. You can compare density to other woods to give you an idea of what you might get…

I ordered 2 pounds and got sixteen pieces of varying size, but roughly 6-10" long and between 2-3.5" wide.

2 Likes

Thank you. :slight_smile:

I am awful at envisioning things like that.

2 Likes

Another beautiful project. How is the bottom fit? Did you slot the sides or cut a shelf into the sides, just glue or…?

1 Like

Hmm, hopefully this makes sense…

I use a very flat surface (a 12x12 stone slab from home depot) and start by gluing everything true and level. So I built the frame of the tray out of olivewood and clamped it square while also weighing it down on the corners to keep it flat on the stone. I use a piece of wax paper under the wood to keep glue off the stone.

Once that’s dry, I apply glue to the edges of the bottom (already carefully test fit) and then press the frame down around it on the stone. I use weights to keep the bottom flat against the stone and again weigh down the wood frame. When I’m done I have a very rigid, very flat, and very flush tray. I apply glue (sparingly)to the inner surface of the tray bottom and around the bottom 1/8" of inner edges of the wood frame and insert the dry second base layer. Weigh the whole thing down and it glues up flat and true.

The key is to not get glue on the inside walls of the finished tray. I sand the tray edges (the olivewood) thoroughly before assembly, and while you can sand the exterior down later if needed, it’s really hard to do so on the interior, so I protect the surface from all the glue I can. I always toy with masking the inside surfaces but in the end i find that being careful is proof enough against glue.

Ultimately, I have about 1/4" of pretty solid glue contact all around the dual-layer base. I’ve not had a tray come apart yet.

Oh, and bonus little technique: I wear nitrile gloves throughout the sanding and finishing process to protect the wood from hand oils and sweat.

10 Likes

Perfectly explained. Thank you!

1 Like

Lovely turn out … Exceptional write-up!

2 Likes

I have found that wet Q-tips will both wipe away glue but also thin it enough that a dry Q-Tip can wipe it all away, As the glue fluoresces it can tell you when there is none left.

Which brand(s) fluoresce? That’s a good idea, I am going to go see if mine glow or not.

1 Like

i have Elmers and Gorilla wood glues where I refill containers and it was looking at finished pieces that slight excess glue stood out. like many cases it is the difference and not screaming like Yellowheart but as the underlying wood is the same the part with glue residue will be enough different to see it. I also discovered that my wood floors were partially replaced by different wood that the differences are almost impossible to see but stand out strongly in UV light.

As are the rest of your projects, this is stunning. If I may ask though, how did you attach the bottom? Wasn’t sure if it was just glued in, or if you cut a dado for it to fit in? Please, please, keep up the great work

3 Likes

:slight_smile:

2 Likes

What @dierdrebeth 
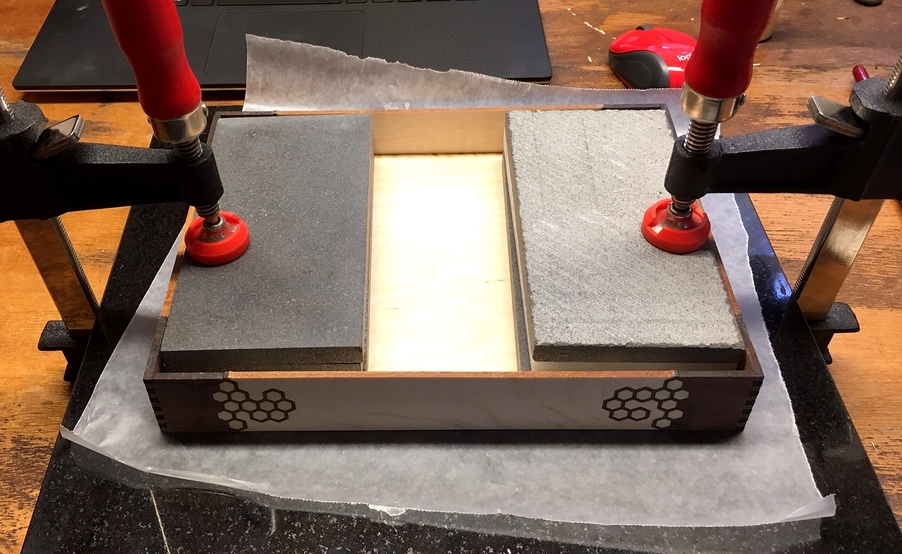
said. I uploaded a pic of the process in the latest tray too:

Specifically:

4 Likes