I’ve read through the various other alignment correction guidance that has been provided for other but that doesn’t seem to have corrected my problem.
Relevant Info:
This is a new thing. My alignment for the first many prints or so was perfect. At some point, however, the prints started being done about a 1/4" to the left. The Y axis is still good.
I have rebooted many times.
I have cleaned out under the crumb tray
I have wiped down all of the edges where the top and front doors seal.
re-calibration moves the print head to exactly the same place every time.
the only thing that seems to be impacted is where the left most edge of the print starts. I have, as a work around, created a very small single vertical line raster that I try to engrave first. I line it up with the edge in the app and keep ‘nudging’ it to the right. Once that burns where I want it to I can index my actual print off that. It seems to work but it’s a HUGE pain.
I do something similar on critical projects. I turn the power down to 1000 speed and 5 power to see where it will engrave on the masking before going to PG or higher manual settings.
It works it’s just a nuisance. What I don’t get is that it did work fine. So, I can’t figure out what changed. I can even manually move the print head and it will re-calibrate to the same place. This clearly isn’t a problem for everyone so it’s not a problem with the app interface. The whole print is making it from the remote servers to my GF, so it’s not a connection thing. … I mean, I haven’t tried re-calibrating with the wifi off but that would be crazy town. It’s almost like it’s calibrating off of some index that got bumped rather than a x0:y0 position for coordinates. My prints are good but I end up wasting a lot of material trying to find out where ‘out of bounds’ starts.
Not sure anything changed but everyone’s experience may be different.
1/4" is not unusual and within what GF considers the maximum error at this time. So unless it is greater than 1/4" it’s not really an issue that the company will chase. Their intent is to improve that through S/W over time.
A lot of folks claim the alignment changes regularly. That has not been my experience for the past year. Been very consistent with reasonably decent alignment toward the center and much larger errors as I get away from center. Might be useful to take snapshots of the preview screen with the same material and material thickness entries over time to see if or how much something changes.
If I cut in the center I’m pleased with the alignment, but if the cut is in the lower left corner it’s way off. Not sure if you are seeing something similar. Of course, if the head is bumped even slightly with power on it will screw up the calibration. And if the material height is off even slightly whether through automatic scanning or manual entries, very large errors in alignment will be introduced.
The unit is excellent about calibrating the physical head to the same place over and over. My jobs run in the same place over and over between power cycles etc.
The disconnect is between the camera view of where it says the material is, and where the print is going to land.
The material height is incredibly important to accurate (as accurate as possible in the current state of software). You didn’t mention if you’re using Proofgrade or not.
The material height on non-PG material is used to dewarp the distortion of the wide-angle lid camera. Any difference between actual material height and entered material height can make a difference in accuracy. There have been some saying that PG has been varying in thickness. This could cause the overlay to be different than the cut by a little bit (not a ton, but a little bit).
As in I can remove the print head and replace it or even, as recommended in one of the staff responses, move the head on the (I bumped it by accident once) and it will reset right back to the same place. It’s clearly doing what it is programmed to be doing. It’s just off.
I use proof-grade but I have the same problem even if I make the settings manually.
I see. I wanted to make sure you weren’t trying to do any manual alignment with the unit powered on.
Any chance your machine has moved or settled in any way? Is the lid fitting any different than it had been? The table surface moved at all (causing a shift in the machine)?
Mine is consistently off. I really want to be able to have the software record my offset and apply it every time.
I can’t understand why alignment is an issue. There are lots of different ways of running an automated and accurate alignment. Heck my £40 inkjet printer manages so why can’t my GF?
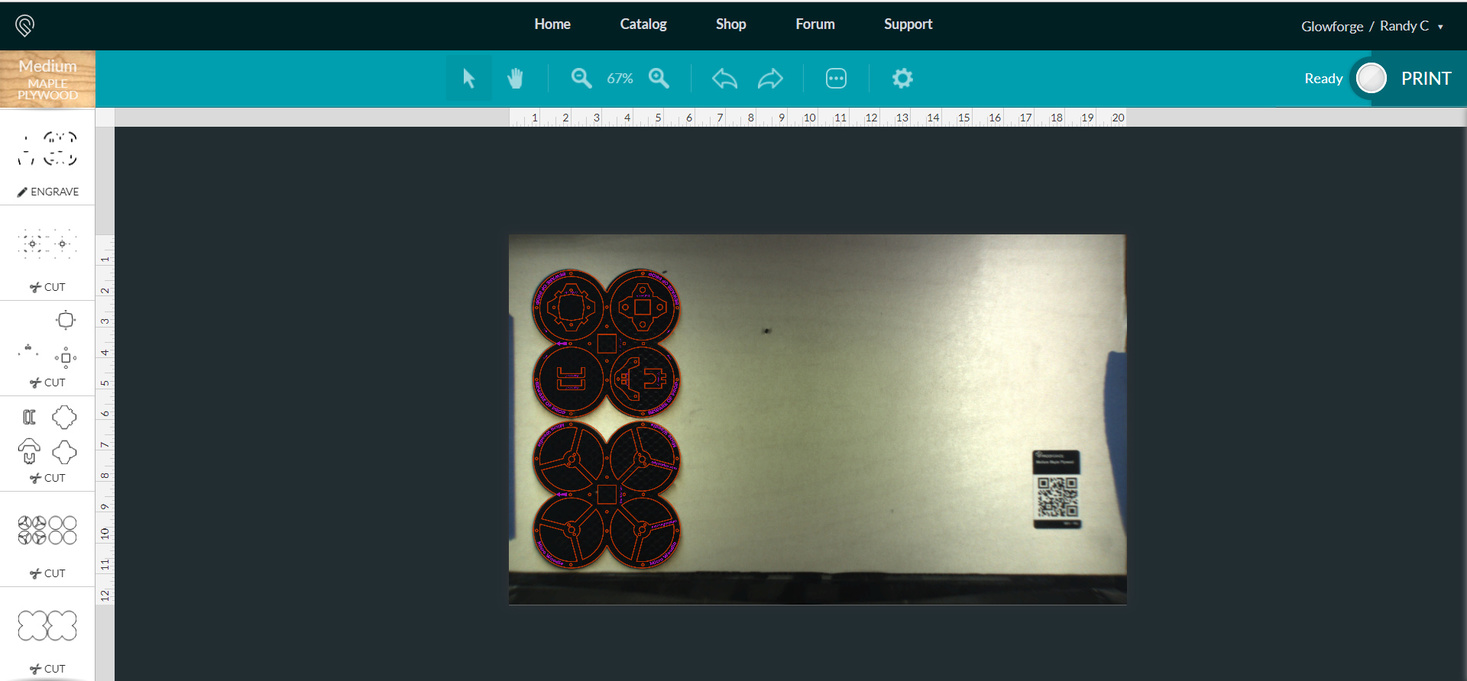
I complained. I have no confirmation that GFHQ did something. But the next day my alignment looked like this.
Good. But still not good enough for random placement. I still need to use a jig for that. It’s just good enough to make sure I’m inside the boundaries of the material I’m cutting, and or not straying in to an area already cut on a used piece of material.
IMO the camera can never be used for exact placement. The image alignment is just too sensitive to even minor mechanical alignment changes (like the one that happens every time you open/close the cover).
I’m not sure what you mean. I’ve been putting “GF” on the front of a lot of stuff of late. I must admit, while it was fun at first, now it’s just started to get G.F. confusing.
Thanks for your patience and for the super-clear post that you started this with.
We’d like to have you try a few troubleshooting steps for us so we can confirm the alignment error:
Turn off your Glowforge.
Check for small pieces of debris or dust.
Check the lower door to make sure it closes all the way. It may require some force to open, but open it, wipe any dust off the edges, and close it all the way.
Remove the tray and clean any dust or debris from the surface underneath. Pay careful attention to remove all debris from the four dimples where the tray rests.
Check the lid to make sure it closes all the way. Small particles of material, such as dust or debris, can prevent it from closing completely.
Check the surface your Glowforge is on to make sure it’s flat. Ensure it is not twisted slightly and that there is no debris propping up one side of the machine.
Turn your Glowforge back on.
We included an extra piece of Proofgrade Draftboard with your materials shipment for troubleshooting. Place the Proofgrade Draftboard in the center of the bed and print the Gift of Good Measure using the default settings.
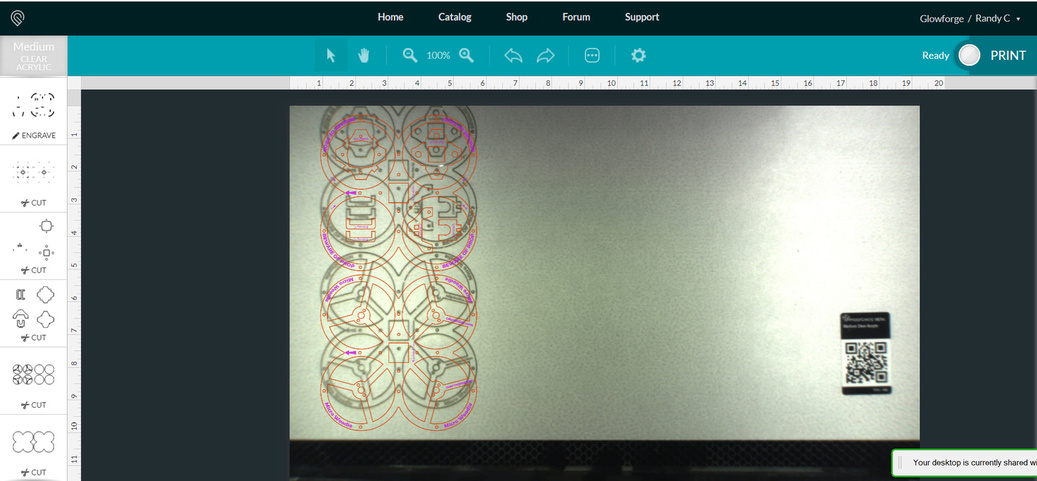
When the print finishes, leave the lid closed and wait until the fans stop and the picture updates. Without moving your artwork or your material, take a screenshot of the Workspace to show us the difference between the artwork placement and the actual print placement. Make sure to include the rulers in your screenshot and show as much of the bed as possible.
Mac: Press Shift-Command-4 and click and drag a box around your image. You’ll find the screenshot file saved on your desktop.
Windows: Click on the Start Menu and type “snipping tool”. Open the Snipping Tool > New then click and drag a box around your image. Click the Save icon and name and save your file.
Send us the screenshot along with the date and time of the print, and we’ll research from there.
Most Windows PC keyboards have a key labelled “PrtScr” that will save the entire desktop image to your Windows clipboard. ALT+PRTSCR will save the current active window. You still need an additional step to create a file, by pasting the clipboard in to any program that can handle a bitmap, so maybe it’s not less work to do it this way… but there is a key on a Windows keyboard specifically for the purpose of saving a screenshot.
I pinned the Snipping Tool onto the Task Manager. (all those tutorials)
(There’s usually other private information on the screen caps that I prefer to clip out, although the PrtScr key is great for capturing pointers and popouts that tend to go away otherwise.)
Yeah, I usually clip out the tabs and favorites bar at the top of my browser. I’d rather not know what people think beyond forum related info. Don’t enjoy conflict so best just to seem socially agnostic.
Oh yeah? Tsk! The things you don’t know about people. (Yeah, I’d rather not have all my banks listed across the world wide web. Or my recreational viewing sites.)