When I trace a black image, whether it is large or small - incomparison to the whole object - it leave spots of white on my object. Or it makes an outline - EX I tried to trace a heart and a panther paw. Both objects are black. It just showed an outline of the objects or it leaves a white spot on the black. Thanks for the help. DM
Yes, that can happen…the glare from the lights causes it.
It’s possible to improve the capture of the image by pressing the up and down arrow keys on your keyboard when you are doing the trace. There’s a tutorial here that explains how:
Some folks have also had luck by temporarily blocking the lid camera flash lights with a taped bit of paper. Or try placing the drawing in a different place to avoid glare spots.
2 Likes
While the trace tool can be handy for quick one-offs, there are alternatives. My current favorite capture tool is the Adobe Capture app. No subscription required!
Here’s an example of a quick grab from a book:
8 Likes
You got that from the Glowforge bed?
Now that’s pretty TimEdwards. I apologize for not being so clear about the struggle I’m having. So let’s if I can do better this time. I design an image. Print it off and place it in the Glowforge to copy with the Trace Image Bed option. If the image is all black or dark grey it copies it with white spots in it. Sometimes it will totally reverse the color. A recent example, I had a black heart and a black paw print. It turned those into an outline drawing. At least I could still use those. The white ameba shapes randomly placed in my drawing… not so much. Thanks for the continued help finding the solution. I’ll post pics when I get home today.
I suspect what you are seeing is reflections from exterior lights, if there is any luster at all the lights on either side and any light from above the Glowforge will be reflected into the camera making “Amoeba shapes” in the distortion… I tried a nice tile I found early on but even with all the manipulation tools it failed totally.
It might work better to carefully take a picture with your phone camera and modify that in Gimp and you should get much better results,
I was able to eliminate the glare spots by putting masking tape over the camera flash (lights on each side of the camera, not the LEDs on the sides of the lid and turning off the room lights).
2 Likes
I just updated my original post to reflect that…thought it was the side lights, but the flash makes more sense.
1 Like
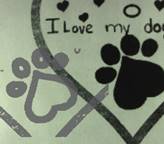
So this is what I am getting. Obviously, the print is the black. The traced image is the grey. I put tape ove the LED lights on the sides. Then tried putting tape on the sides of the eyeball camera in the center of the lid. The picture is with the tape on both sides of the camera. I don’t see an obvious flash so I am just guesing. I really appreciate all the help.
Are you able to adjust the amount of trace by using the Up and Down Arrow keys on the keyboard?
1 Like
No, that was the free Capture app I mentioned.
So if you’ve designed the image digitally, why print it out rather than uploading it directly? You can upload most image formats, and even PDF.
2 Likes
@Jules is absolutely right about the brightness controls and glare. Additionally, you can adjust the sensitivity to fine details by holding down Shift while using the commands for brightness control.
To remove small details like dirt and noise, use Control-Shift-Up Arrow (Windows) or Command-Shift-Up Arrow (Mac). To restore small details, use Control-Shift-Down Arrow (Windows) or Command-Shift-Down Arrow (Mac).
2 Likes
This.
The trace function is designed to allow quick creation of simple objects, like a kids sketch or hand-written design, drawn directly onto material or paper and “traced”. If you’re starting out on a computer or tablet, trace is not the best or easiest way to produce your final output.
1 Like
That is a solution. I made the hearts as a part of a fundraiser - letting people design their heart for Valentine’s Day. So in that case, it was easier for me to drop and scan. Our school is working towards purchasing a machine. The scan option will be the easiest for those users. Trying to work out any kinks they may have. Thanks you so much for your input! ;D
Unfortunately it’s not a “mainstream” function and can have some flaws. Perhaps you could pre-cut and engrave the shape and common details on them, then use the trace function to allow people to add their customization for engraving at the machine. The non-uniformity of the scan would not be as objectionable.
You would need to set up a jig to accurately locate the pre-cut shapes quickly and reliably. That could be a piece of cardboard taped to the bed.
I do something similar when I’m doing a mini-makerfaire. I have a variety of things I’ve already cut out like luggage tags, nameplates, earbud holders, etc. I have pieces of paper with the object printed in very light yellow. Folks pick what they want and use a Sharpie to personalize it. I out the precut piece on the bed along with their drawing. Then I scan the personalization and drag it over on top of the piece and engrave it. Usually only a couple of minutes from drawing to finished piece. It’s a big hit with people.
(I stole the idea & process from GF’s Makerfaire booths where they did the same kind of thing.)
2 Likes
Thank you for the help everyone. I’m going to close this thread. If you run into any other trouble, please start a new topic, or email us at support@glowforge.com. We’re here to help!