Hahaha–was that on purpose? Thanks for testing for us!
I think they all look great, especially the last one. Hopefully you will have thicker wood soon.
Hahaha–was that on purpose? Thanks for testing for us!
I think they all look great, especially the last one. Hopefully you will have thicker wood soon.
Yes indeed…I wanted to see if it worked. It does. ![]()
What kind of alarm? Not too long ago my home alarm system-connected smoke alarm battery was getting low and I COULD NOT make it stop reminding me, until I replaced it (removing the battery wasn’t good enough, a rechargeable CR123 cell wasn’t good enough, it had to be a fresh CR123). It was SO loud and it would go off, in my kitchen, every 8 hours or so, which meant I was NOT able get a decent night of sleep unless I maybe timed it perfectly. If I owned a bat I probably would have smashed the MF thing to bits!
Makes me really mad just thinking about it.
![]()
Sounds like the same thing…we went through this last year…the thing KEPT going off, middle of the night, middle of the afternoon…any time. And it wasn’t the battery.
We had the Protection One people out here half a dozen times to replace just about everything. They finally replaced the key panel at the back door and got it stopped. It had shorted out.
Color me underwhelmed. Maybe it is just the battery this time, but the timing is terrible.
If it’s working now, I’d be really interested in seeing if you can get a 45 degree bevel on an edge of acrylic. If so, dovetail joints are in our future!
There is an optimized “3d engrave” choice in the menu for proofgrade materials. It’s not on, but you can do it manually with the right file/settings.
For me right now, the answer is no. Jules has different hardware than I do, so maybe.
Really!?! How so? Sorry to be so nosy ![]()
Her results come out way better. I have to go through some trouble to get acceptable results, she doesn’t. I was told mine has a bad tube. Looks like hers isn’t bad. Way more power
Yeah, unfortunately I would need to know how to create one, and I don’t yet.
I suspect the default is going to create a curved surface on the edge unless I do something to turn it into a stepped thing that will make sanding easier.
And that’s waaaay down the priority testing list for me. I’m more concerned with getting some of these processes onto paper so that once you guys get your machines, it’s easier for you to use them.
This was the one grayscale engrave demo I will be doing until I get some other questions answered and the results documented. (It’s just too easy to get lost in it and waste an entire day. Chuckle!) ![]()
Maybe you can test it when yours arrives. ![]()
He’s got one of the earlier Pre-release units from the bad batch of tubes. This one has had that tube replaced.
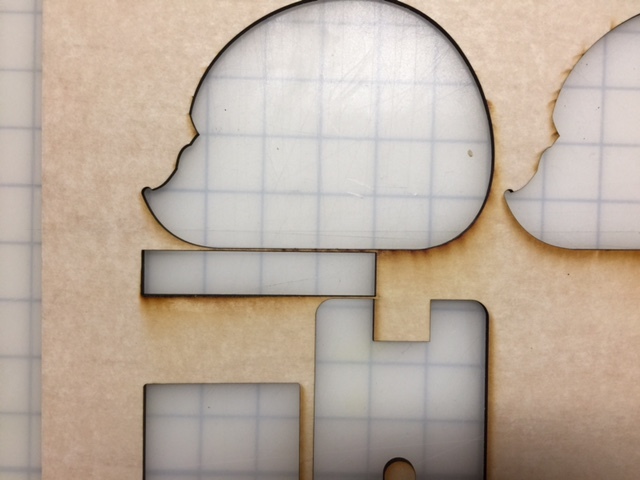
And the placement is dead on. Look closely at the shots I posted up top, I can place an edge exactly on a previous cut and it comes out perfectly.
The one i will post later today I did just that. It left a hair thin bridge between the two, that broke when I lifted the pieces out. ![]()
Easy! Just a gray gradient along an edge. Adjust power so the max depth corresponds to the material thickness.
I wouldn’t know what power to adjust it to. They do everything for us here. We press a button and “magic” happens.
I now understand why @dan keeps using the term. ROFL!
That’s not really a thing yet. There’s no depth anything. You just put in a grayscale image and go. Whatever comes out comes out. Different materials ablate more quickly than others. A grayscale engrave on acrylic really does nothing on my machine. It stays flat and just basicallly marks the surface. On poplar, however, it takes out quite a bit of material.
It’ll take a lot of data collection to find out what settings produce what depths. I’ve started to put things together to accomplish this, but it’ll be a while lol
But that’s in the center of the bed, isn’t it? Put it way out on the outer edge and try again. Or not. I was really directing that question to Philip, who seems to be the only one with a pre-release who understands exactly what I’m talking about.
That’s the laser experience. Typically we (newbie laser owners) are not that good with manual hand tools and can’t bring out the artistry we see other people with infinite patience and skill with chisels and gouges can. So when we take a really nice intricate design picture and the laser actually makes it happen it’s one of those magical moments that just makes you hold your breath in awe.
The laser finally lets me make things like they look in my head. ![]() GF is opening that experience up for the world.
GF is opening that experience up for the world.
It changes on an almost daily basis. I don’t have insight into why though. Some days it’s pretty close, some days it’s not. I would personally prefer to have the ability to place things with numeric positioning because optical/drag and drop is just not accurate enough.
I’ve gotten lucky and had pieces land with sub-mm accuracy to where I wanted them to. But if I started and engrave, closed the browser, then tried to do another one exactly on top of it, it’s basically impossible unless you hack the UI.
Scaling is another example. If you scale or even rotate something you will never get it back the same exact size or rotation. There is currently no size, position, or rotation information given to the user. So nothing is repeatable currently, unless you make all the settings in illustrator as to scaling/rotation etc. kinda undoes the whole align via camera part of the laser though
Totally agree. But what about pass-through and two-sided cutting? How can those possibly work without super accurate alignment?
Head camera is the only way they are going to be able to do that reliably from what I’ve seen. The fact that the camera they are using for placement on material is attached to the lid is just going to give too much variance to be reliable for those type of things IMO.
They may prove me wrong with some kind of other weird magic like comparing the grid of the bed to previous pictures taken to determine if the camera has shifted at all, or using the head camera to home to a specific spot and check the offset of that position with what the lid cam sees. Not sure what they have in store for handling the inconsistencies there, but anything with any sort of accuracy will have the head cam playing a big role.
Amen.
(You know, it’s kind of insulting that people think I don’t know what I’m doing sometimes…![]() )
)
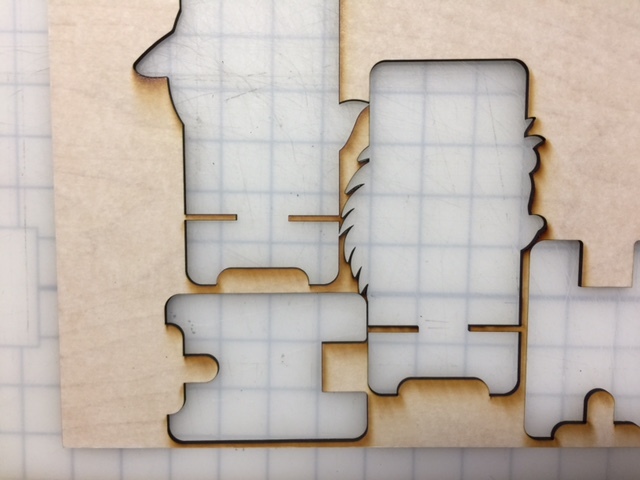
Is this close enough for you? (Far left limits of the field, full and accurate cuts.)
How about this?
I can test things with this machine that Philip can’t with his, because of his tube.
And you guys need to be a little bit patient now. I’m going to test as much as I can, and will report the results once in a while so you can finally ease your minds, but it takes time to test it and take pictures and write it up.
For the record, I’m not taking requests. There are things that I need to test to give feedback to Glowforge, so they can get the machines out the door. That comes first.
If I come across anything that answers one of the bazillion questions that have come up here, I’ll post it here. (And I’ll post some procedures as I discover them, so the folks who want to put a few designs together can get started.)
I’m not even sure if this is what Glowforge wants me to be doing with this thing, but that’s what I’ll do until I hear differently from them I guess. I’ve got a couple of things going now. ![]()