As you might be aware, I was attempting to make a Cajon completely within a Glowforge and it didn’t quite work out as planned.
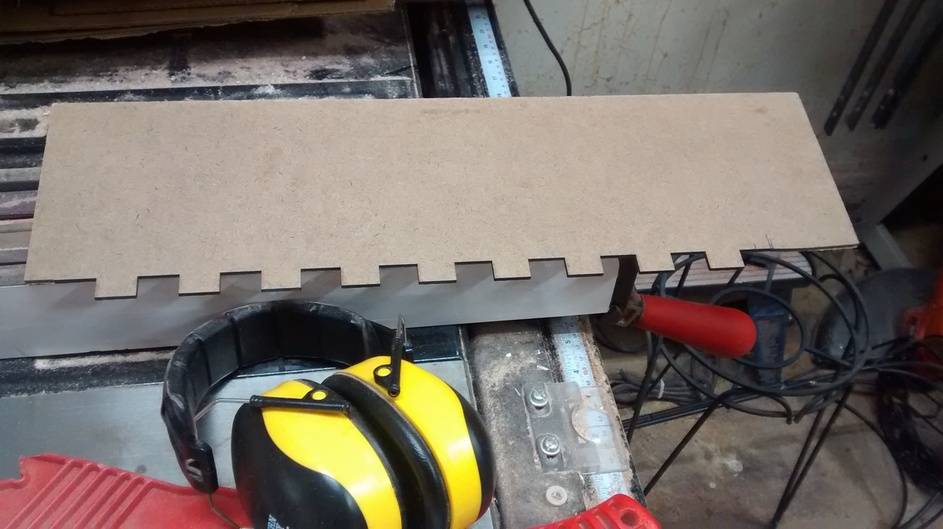
While each of the edges of the cajon could fit within the cutting area of the GlowForge, and the entire side could fit within the space inside the Glowforge, they couldn’t all fit in the cutting area at once. After several hours of testing, I was unable to get the precision of the corners close enough to make me comfortable to actually attempt to use the GF to cut my pieces out. BUT, I did use the laser to make a template that I used to mark up all the edges.
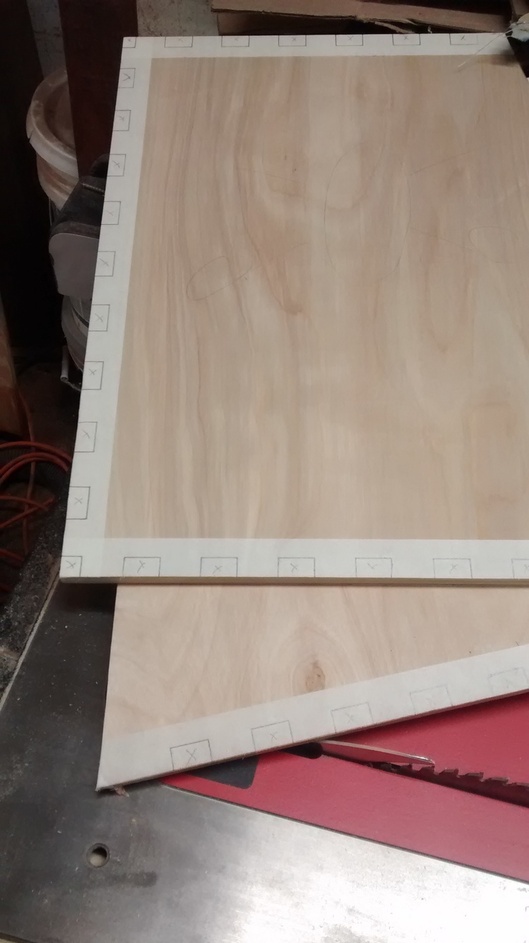
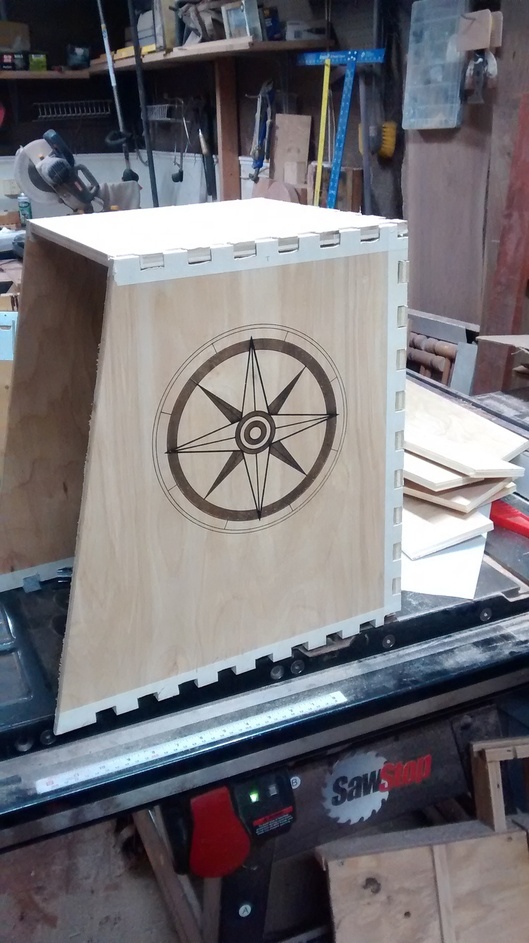
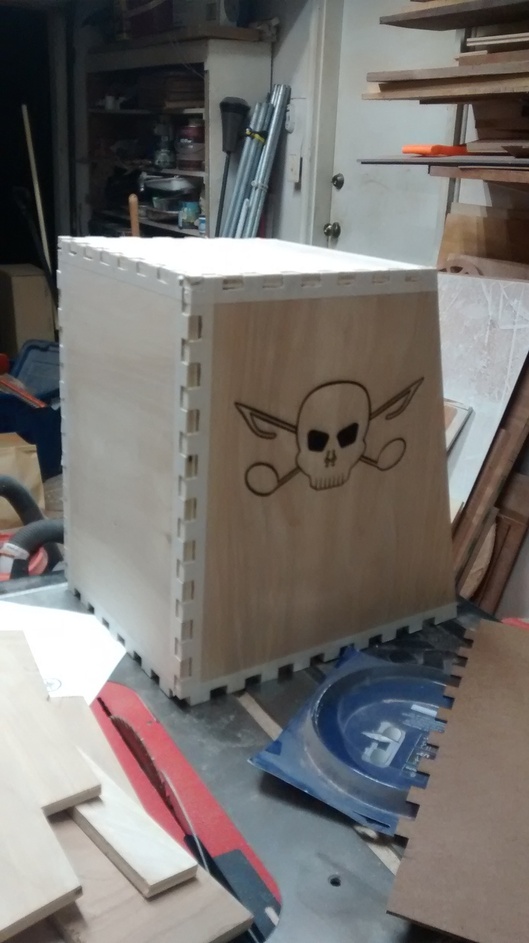
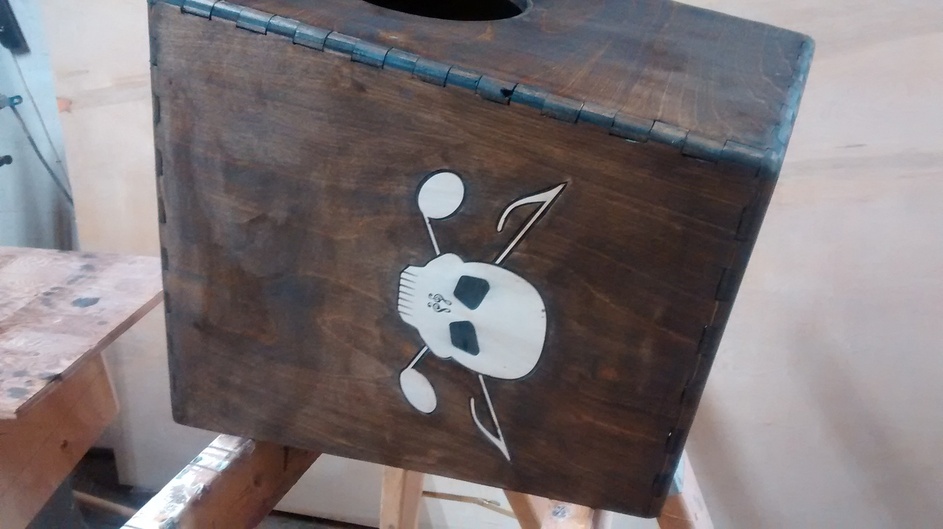
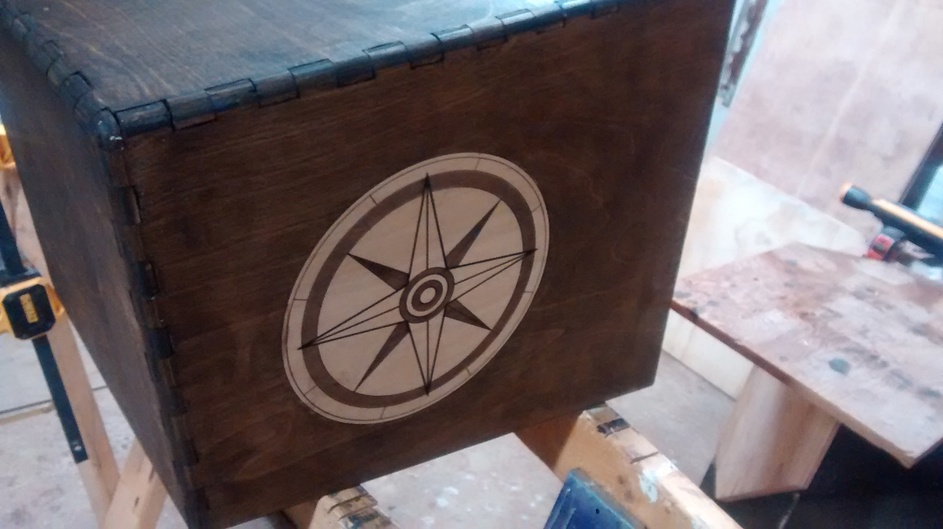
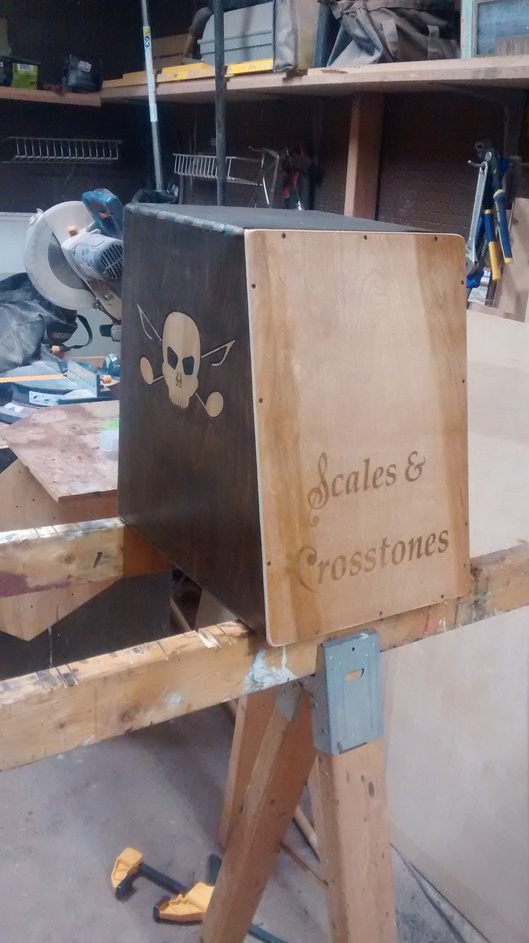
Since the sides could fit within the GF, I was able to use it to add some designs to the sides. These were taken after four of the five sides were all cut out and fitted together.
Then came one of my favorite parts, after the glueup (didn’t have enough clamps but made it work), and the sanding in order to make it all smooth, I got to apply stain. It was tricky around the designs to not get anything into the design itself, but SO worth it in the end.
All in all, a good project and it sounds great as well! The band will get to see it on Tuesday, so I’m looking forward to their reactions as they see that they have a new instrument in time for our next run at the Maryland Renaissance Festival this year.
Awesome job! I initially misread your post that sanding was one of your favourite parts. My initial thought… nut job. Finishing is definitely one of the best parts, bringing out the grain.
Perhaps you could have cut most of the way around and then cut off the castellated off-cut, held that in place and then used it to index to rest of the sheet to move it an exact number of castellations.
I considered that, but even then I couldn’t shift it over and have EXACT placement to continue the cut (rotate the board and line up a cut proved to be nearly impossible with my attempts). The largest side was 16.5 x 18 inches (~42 x 48 cm). So I would have had to rotate the board and attempt to line up the cut. Also, setting up the file to be able to stop in the middle of a side would have been quite challenging as well.
I considered it in theory, and discarded it before attempting anything with it.
@dan, I was trying to make this entire thing on the Glowforge, but unfortunately the precision on lining up two separate cuts between jobs just wasn’t accurate enough yet. Once that can get dialed in, this could very well be a job that I revisit so I can make it entirely on a laser.
The only “tools” I want to use on this project is just to cut the sides to general size. It would be awesome if I could have done everything else (cut the box joints and engrave) completely on the laser. One day!
They really liked it. Our Cajon player really liked the look, the sound, and almost most importantly the lighter weight.
While it is a slightly larger Cajon, the old one was made of 3/4" plywood, the new one is 1/2" plywood and the weight difference is quite noticeable. Since we tend to carry this thing fair distances between vehicles and stages, the lighter weight is quite appreciated.
Having never even heard of a Cajon I went looking it up and found this and was amazed at both the different look of the designs and even more at the rang of quality of sound even when it was great each one had a different personality, just as some looked good but had very poor sound.
I would be very interested in how yours matched what was out there and how much freedom of design there is. There was one that was huge but the sound was terrible, but my impression was that was not so much due to the size. I am wondering if made in quarter inch oak plywood with magic fingers at half the thickness if the wood would not be both strong enough and very rich in sound due to the thinner material,
I’ve made 3 so far. The first one was 3/4" plywood box with a 1/8 plywood face with butt joints and glue (no screws). I made it with the optional snare (I put it on a locking dowel that could be rotated on and off). This Cajon (or Cahone) was used by my band for about 3 years and did quite well, except that our percussion player didn’t use the snare part, so we eventually just removed it. I would say that given the many sounds of the Cajones that you can purchase, the sounds coming from the one I made myself is within that range of sounds. It’s been used for recording and numerous performances. There were two drawbacks to the Cajone. First, it was heavy to lug around, and when you have stages at different times throughout the festival, that became an issue. The second issue was that it was just a box, and the top 90 degree angle ended up rubbing on our percussionists wrists after about 2-3 hours of playing (edge case, I know).
The second Cajone I made was a proof of concept, I re-made my first cajone but with box joints and scaled it down so my daughter (2yrs old at the time) could play on it. This was built shortly before the Glowforge came so unfortunately I was unable to use it to cut the pieces out. The sound is certainly higher than the other one, but I’d compare it to the sound of a hand drum, or a single Bongo.
The third Cajone I made, I angled the front face about 20 degrees and eliminated the wrist rubbing aspect (also makes the cajone face easier to hit while singing). I also made it out of 1/2" plywood for the box and still used 1/8" plywood and while the box and footprint is larger, it’s actually much lighter. I planned out all the box joints using a template cut from the Glowforge (material was 1/2" but the fingers were 1" wide each), the sound hole was cut on the Glowforge, the sides were engraved using the Glowforge, and the front was cut to size and engraved using the Glowforge. It would have been the first instrument completely made on the Glowforge except that I couldn’t get enough accuracy in the corners (because of the size I could only cut one side at a time, once I rotated the piece to make another cut I couldn’t reliably match up the corners exactly). The sound is fantastic and has already made it onto our latest recording!
In short, all the Cajone’s I’ve made sound great and except for the child-sized one, have been used in numerous performances and several Recordings without any issues whatsoever. Cost to make it yourself is One sheet of 1/2 plywood, one sheet of 1.8 plywood (baltic birch is best so far), four rubber feet (with screws), and about 8 - 10 screws to hold the face to the box. If anyone wants a step-by-step on how to make one, I’d gladly write one up (or link you to Woodworking for Mere Mortals on Youtube where I learned how to make one).
Very Cool
I have been making cigarbox sized boxes using fingers spaced at approximately half the wood thickness which produces an extremely strong joint, and had noticed the acoustic effects not realizing that there was anything like a formal design using those effects.
I have a 30 inch Bodhran that I bought for its deep range, and so very much appreciate how much size matters but have found a few things in the Glowforge bed that one can reliably measure from. The lower right hand corner can be seen in the GFUI and a piece cut that will leave only the distanceto the front of the door and side of the crumb tray. Likewise rectangle that is the extreme range of what can be cut lined up to that corner. using two or more of those rectangles and finding the go-no gopoint in that corner can be pretty repeatable.
My testing in both the bottom right and bottom left were off by sometimes up to half an inch. Even just scoring a line, and then “moving” the line in the GFUI did not give me something that I could rely on, it would sometimes not move at all, and other times it would move the score by a non-uniform amount.
That was almost a year ago, the alignment has gotten MUCH better by then, maybe I should revisit those tests and remake another Cajon COMPLETELY within the Glowforge. I still want to do that, I just don’t have a need for it anymore.
They still would be off visually but the point at which a rectangle would go from ready to “no artwork” is reliably repeatable, and marking that point in the crumb tray becomes the measuring point even though it may be off visually in the GFUI.
I have only had mine since February and went through many gyrations, even as the zero point changed with each recalculation, but I found that a fresh recalculation was most likely repeatable, and that bottom right corner was the only place you could see beyond the cutting area.
Even now the image and where it will cut do not line up but a defined distance away from that point is predictable.
In my situation, each side fits in the Glowforge, but no two sides would fit at the same time. I had put all four “sides” directly on top of each other in Inkscape with different colors so I could choose which one to “activate” at a given time. Even when I did that, it seems like the cut ended up in a different spot.
I think if I did the same thing again, I’d be able to do it. Alignment is MUCH better now and a lot more predictable.
I have several boxes that exceed the area if you tried to make all the cuts at once, but I have still placed them as if I was making all the cuts (like 18" x 30") then as each cut is done I use the arrow keys only to slide the design down till the next cuts light up. and slide the wood the other way staying the same distance parallel to the side of the crumb tray. I have a bit of slop between the parts so absolute precision is not needed. but the one time it was I made holes outside the design and used headless pins in the holes so the distance forward and back were exact as well. In that case your process of putting them together in inkscape may have worked best.
Still, where I want accuracy in one direction anyway those arrow keys are great.