Im in the middle of a 5 hour long photo engrave. I did some research and copied all the settings a previous owner used on the same material which looked amazing. Mine however seems to be extremely light. The section of the photo it is currently on right now is not that important, but I fear by the It gets to the faces, it will be all washed out and I would have wasted so much time. Is there a way to cancel the print, change the settings, and restart the print where it left off as to not have to redo the 30 minutes I just did?
2 Likes
No.
Your best option is to let it finish, then run it again without moving the material.
In future, you should test the settings on your material before committing to a long print.
3 Likes
Yea lesson learned. I was hoping the guy who did it before me was my “running tests”
I would agree with @eflyguy, but with one modification…
I don’t know what LPI you used for the engrave, but lower values will run much more quickly. I’d suggest changing the LPI setting in the thumbnail for the second run, and if you want to increase the power or lower the speed slightly (like 10 points) it might darken it up for you.
But do not touch the material on the bed, and do not shift the design on the screen. It will run quicker the second time, but it might still be a couple hours, depending on how high you had that LPI set and how large it is.
Thanks. I have my settings at 600 speed, 45 power, convert to dots, max quality, 450 LPI.
I’m not sure what you are printing on, (what material), but for anything other than anodized aluminum, the 450 is a lot higher than it needs to be. You can take that down to 225 or even 195 and it will really speed things up.
Your final settings should be determined by the material. You can probably use Full Power, but you will need to Speed it up to 1000 speed. It’s going to burn a lot darker, and a lot faster.
This is subjective, of course. Mostly true, but still subjective. She’s not wrong about the speed increase: it’s mostly linear by LPI, as in ~400 lpi takes about twice as long as ~200 lpi, all other settings being the same.
Here’s something that’s a bit more objective:
Your best bet is to follow @eflyguy’s advice: test, test, test. It’s the only way you can be sure you’re satisfied with settings.
2 Likes
im printing on maple hardwood.
Okay, for your current project…try settings of:
Full Power/ 1000 speed and 270 LPI.
And on future projects, run tests to get the best idea of what you need, as the guys suggested. This one should wind up being half the time of the first pass. Just remember to not move the material or the design.
1 Like
thanks a bunch. id show pictures of the progress as well as the photo I am working with, but I guess my amateur status here limits my ability to do such things.
You should be able to upload images, even if you’re new to the forum.

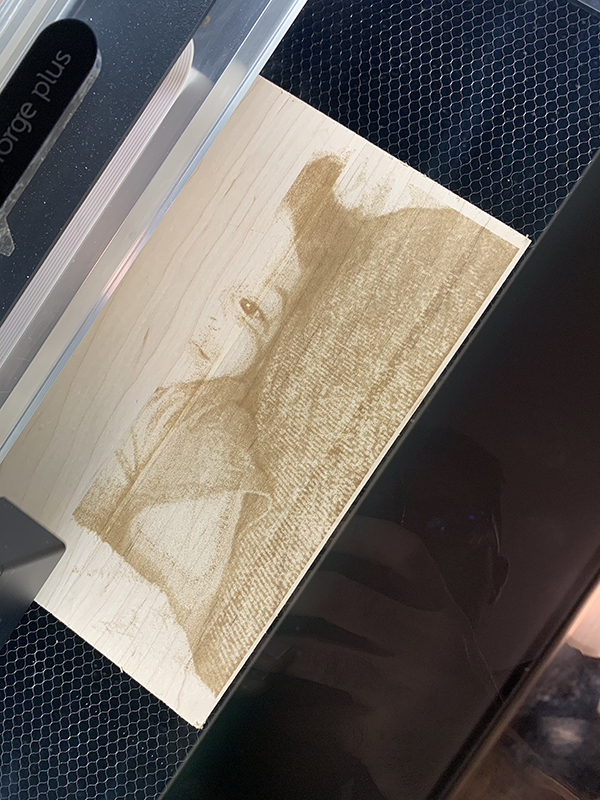
That might turn out okay…just wait and see how it looks when it’s done. Definitely getting a lot of nice detail.
As I expected, it came out super light. I ran a second pass with the settings you recommended and it was just coming in solid dark. ![]() well that was a waste. Do you have a recommendation on how to run tests? What’s the best way to go about that?
well that was a waste. Do you have a recommendation on how to run tests? What’s the best way to go about that?
Manual settings, I tend to increase the minimum dot density to around 8.
I would personally have let that engrave keep going though.
1 Like
If you didn’t stop it…let it finish. since you are running that without a mask (which might have made it a little darker than you like), you can sometimes sand the surface lightly with a fine grade sandpaper afterwards and it will lighten it up.
But what you might want to also do is to bump the contrast in the original photo. Anything pure white will not be engraved, anything pure black will engrave with the thickest density. So you want clear delineations between the two wherever possible.
And also keep in mind…that is as dark as the engraving gets on maple. Each type of material burns differently, and for best contrast, I find that the Basswood is superior to anything else I’ve tried.
2 Likes
Ok thanks. I did stop it. I feel defeated. I’ll try some basswood. Thanks
Here’s how I’ve done it:
Not true.
As always with engraving the “Answer” is complicated. In general, slower speeds yield darker engraves and higher lpi yields darker engraves. It’s true that there are materials that have naturally darker engrave colors and higher or lower contrast — and maple isn’t the darkest of the bunch — but you can definitely get darker results with some tweaking.
The key is finding your balance between power speed and lpi.
1 Like