So i’ve had this Glowforge for about a week and haven’t really gotten a chance to really sit down and use it. But now that i am its giving me a million different problems. The biggest one is centering the image. When my GF turns on it goes through the whole centering the camera bit but i’m not sure if the camera is supposed to go to the center of the bed or?? because it is shifted waaay to the left when its “Centering the head”. When i go to upload my image and center it on my material it works fine but when i go to start it the laser is etching or cutting waaaay offset from where the actual material is. Furthermore when i stop the GF because its not even shooting the laser out and i go back to restrt it the image not only shift and grows or shrinks in size but its also shifting the angle of which its in. Ive tried centering it again, restarting the unit, Set Focus, everything and it keeps doing the same thing over and over and its seriously frustrating. Someone please help cause im getting ready to sell this thing.
Center for the machine is directly underneath the lid camera. The image always has the least distortion there.
The material is not centered on the bed, there is an inch at the top and about 3/4 of an inch on the left that the head can’t reach, so there is always going to be an uncut margin on a sheet of Proofgrade material. The display overlay hides those edges so you can’t place a design in there where it can’t be cut.
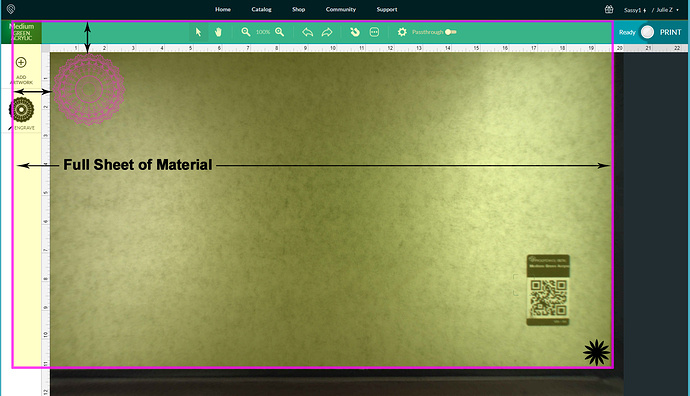
If you are trying to efficiently use up a full sheet of material, start with the front right corner (black star) as your origin, and make sure the entire gridded portion of the tray is covered. Your limits are 19.47" wide and 10.947" tall for cuts on a sheet. (Less than that for engraves, since the head needs room to accelerate and decelerate at the sides.)
As far as the image moving before and after a cut…yes it does. What is important is where the cut or engrave is getting placed on the material.
This part gets technical…
There is an algorithm that uses height measurements both entered, and measured by the head, to calculate the “results” that you see on the screen. What we see on the screen (like the picture above) is a view that has been “corrected” so that the human eye doesn’t freak out.
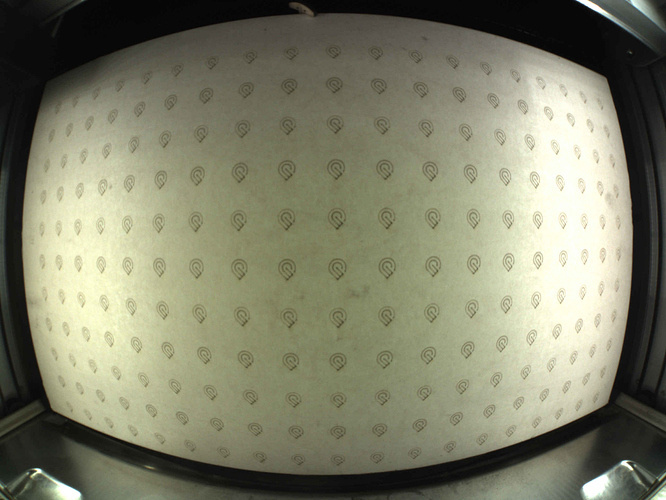
This is what the camera sees…look at the distortion at the edges. The human eye can’t place something accurately out at the edges of the field, so they correct it for us.
What that means is that the screen display that we see can be incorrect if the measurements for thickness are not accurate. It’s a calculated result.
What we need to do to make sure that the actual physical placement of the cut is correct is to make sure of three things:
- We’ve run the Calibration tool. (Link is here if you have not run it yet.)
- We use the Set Focus tool over the place on the material where we intend to put the design, and then place the design where we want it.
- We make sure that the tiny red focusing dot lands on the material, and does not fall off of an edge. If you are cutting something next to a hole in the material from a previous cut, or trying to put engraving on something already cut, you need to watch where that Set Focus dot lands. It flashes for a split second underneath the head after the head moves out to position.
After you have run the job, the view is going to default to the view before Set Focus was used in that spot, so it might look on the screen like it did not land where it was supposed to. This is the important thing…check how it landed on the object. It will be accurate if the thickness information is correct.
Remember what you see on the screen is slightly distorted, and if you have to send a second cut, do not move the design. It will land exactly where the first one did, even if it now looks like it has shifted.
Basically, learn to trust the results instead of your eyes. (Yeah, it takes a while.) 
Jules, thank you for the lengthy reply! It is very much appreciated. I am going to run the calibration again and see what results this yields. It is very frustrating because i am the type of person who always expects things to work as they should and when you spend 4k+ on equipment i would expect just that. Now that i have to learn what mistakes the machine does and trust it i’m a little more annoyed lol. But nonetheless i appreciate your reply and help. All i can do now is try and learn what this thing is doing. Its frustrating because i was trying to make some coasters and i set up a small square to just run and drop the next one in and it seems like it wont place the design in the same place even though i haven’t touched the design at all or shifted the Home position of the square so it should be drag and drop and its not at all. Trying to run 10 pieces of the same thing here consistently is basically not going to happen from what im gathering with this machine.  I just tried running a small picture and it totally offsetted the picture and it ran off into a hole that was in the material.
Ahhhhh…okay. I need to talk to you about jigs.
A jig will work the way you are wanting to do with that…BUT…there’s a catch.
You need to put the outside cut for the hole into the same file as the engraving. Long story very short…there is a relative relationship between the cut and the engrave in the file. The way to do it is this…
-
Create the file with the Cut and Engrave, and align them relative to each other before you save the file.
-
Open the file with both the Cut and the Engrave in the app.
-
Set the Engrave to Ignore.
-
Put the backing (jig) material into the bed, run Set Focus where you want to cut the hole.
-
Cut the hole in the backing material, and remove the center.
-
Then set the Cut to Ignore. Drop the item into the hole to be engraved.
-
Set the Engrave and run it.
-
If you have more than one you can drop the next one in and run the Engrave on it…etc.
The trick is - you have to not let the jig shift between the cut and the engravings. Pin it down at the very first, and do not change anything on the screen except for turning things on and off in the thumbnail column.
You’ll get 100% perfect results as long as nothing is shifted.
Very interesting. See what i am doing is already taking black circles that i ordered that are roughly 4" in diameter. i placed my square on the bottom left corner of the bed and taped it down to ensure it wouldnt move. so all i am doing is etching into that circle. so i figured from a machining standpoint that so long as the next circle is butted up against the square that hasnt moved that it will just engrave the exact same thing in the exact same spot? I absolutely despise drawing on any type of software related to GF because to me it just doesnt make sense that i have to take 10 steps to draw one simple circle to cutout (Hence why i bought precut circles) and am just etching on them. This is proving to be alot more work then i anticipated. I run a Trumpf laser at my work and a several Flow Waterjets and they are sooooooo easy to program and run compared to this table top laser. lol i downloaded Gimp and Inkscape and i deleted them within an hour because i cant justify spending an hour to do some text on a circle and layering a million files ontop of eachother. Sorry i sound like a sour grape, i just get frusturated. Appreciate your super quick responses again though. i was just telling ym wife you are always so helpful to everyone and we all truly appreciate it.
Hmmmm…your problem might be resolved with white masking. The camera has to see that little red laser dot, and dark materials don’t show it very well. Try masking the circles before you engrave them.
Everything i throw on there is always masked off for the purpose of avoiding charring. Again i am at a loss right now. This in theory should be relatively straight forward and its anything but. lol
Well…if you don’t want to use some sort of outside software, you can do it with the Glowforge premium software if it is just text…create the circle, put the text in the circle (which you can change - it’s text) and then try it that way. (I haven’t tried it, but it should work. Just change the text without shifting it on the screen though…clicking it should bring up the flyout menu.)
You do have to cut the circle once, but once you have done that, the engraving is going to stay the same in relationship to it.
Might be worth a shot.
Thanks for the tips!! im taking deep breaths and relaxing for a few before jumping back in. Calibration was just completed per your link so im excited to see if this fixes the issues. Also, just one more noob question. When i do the “set focus” is this to be done before uploading the image and selecting the material while no image is on the screen or can this be done while the image is on the screen and centered to the material? Thanks so much Jules!! You’re great!!
You can do it as many times as you need to. If you do it before the image is on the screen, it will pick up your general material thickness. (For overall view.) But there is still fisheye distortion.
If you do it right where you want to place the design, it gives you a temporary “directly under the camera” view there in that spot. It’s going to shift after the print, but the temporary view after Set Focus is going to be your most accurate view for placement in that spot. So once you run the print there, if you want to drop another coaster into the same spot, don’t shift the design on the screen.
GOT IT!!! Once again, you are a lifesaver my friend! You are everyone’s Spiderman, only we get you every time we ask a question not just once. 
Love the retro UI in that image
Yeah, that one has been around for a while, hasn’t it?
Should pitch it to dan as a new option, “retro mode”
One thing to keep in mind is that you should never move or bump the head (which contains the cameras) if the machine is turned on. That will definitely lead to big offsets and misalignments. Even a little bump can do it.
I’m sorry that you ran into trouble with your new Glowforge. It’s great to see that you received some excellent information and advice already from @jules and our other community members!
Are you still running into trouble? If you have any more questions, please let us know and we’ll be happy to help!
Hello! The main thing i am having trouble with is my image shifting after its done cutting. For example. lets say i pass through my final perimeter cut and it doesnt go through. It would be really nice if i could tell just from the outside of the glass that the cut didnt go all the way through and just set the GF to cut again. But i cant do that because as soon as its done cutting it shifts and scales the image which makes it impossible to overlay and scale again and recut. Is there any way around this or is this just what it is with this machine? Its really infuriating that i work for over an hour to etch a really nice picture and then when it comes time to cutting the perimeter it doesnt cut all the way through and then on top of that it shifts and scales said image which pretty much renders what is already done completley useless unless i remove and find an alternate method of cutting. HELP ME PLEASE!! Before i get bombarded with"What kind of wood are you using?" questions, that is besides the point. My point is that it shifts and scales the image loaded which would make even just dropping a new piece of material into a pre-cut slot to just drop and go impossible without readjusting the image onto the material… Please, any assistance is appreciated!!
Two easy steps to fix it:
- Pin the material down before you start so it does not move in the bed. (When you check it, you might accidentally jostle it.)
- Open the lid and check the cut…if it does not go through…just send the Cut again. DO NOT CHANGE WHAT IS SHOWING ON THE SCREEN. It will cut in the exact same place even though it looks like it shifted and scaled after the cut. (What you see on the screen after the cut is a lie.)
Try it on some scrap material to prove to yourself that it happens that way.
Jules to the aid again!! Unfortunately i have already tried that. The image is shifting and i am not even opening the lid. I keep the lid closed and do not touch the material at all. The image still shifts and when i run the cut again it is completely off. I’ve already ran the calibration you suggested and all seemed fine, i am running the focus before the cut and taking all measures. i am even taping down the sheet to ensure it doesn’t move and 10/10 times its the same outcome.
??? Okay, it’s definitely not supposed to do that.
Can you take some before and after screen shots of the process as you run through one, so support can see how much it is shifting?
Three shots would help:
- Right before you hit Print with the design placed where you want it to be.
- After the job runs with the material showing the cut and the design shifted on the screen.
- Just hit Print again to run it a second time to see where the second cut lands, then take a shot.
If you can, capture the rulers in each of the screen shots…it might help them to see what is going on.